🧢 Beautiful ✨ Detailed πŸ’ Adorable

Leaf Garland Pattern

Leaf Garland Pattern
4.0β˜… Rating
2-4 Hours Time Needed
4.2K Made This
βœ‚οΈ

Beginner Friendly Level

Perfect for those just starting their crochet journey, with clear instructions and simple techniques

⏱️

Bite-Sized Project

Finishes in 2-4 hoursβ€”perfect for an afternoon of creative relaxation.

🏑

Cozy Accent

A warm touch for your space that transforms ordinary corners into inviting nooks filled with handmade charm.

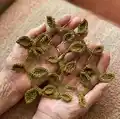
About This Leaf Garland Pattern

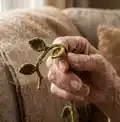
This pattern creates a charming leafy garland worked from a simple chain with small leaves and nodules added as you go. It is wonderfully versatile β€” make long decorative garlands, short lengths for napkin rings, or even a leafy scarf or necklace. The design is based on simple UK/US crochet stitches worked with the right-side facing throughout for a neat organic look.

Leaf Garland Pattern crochet pattern - detailed view of completed project

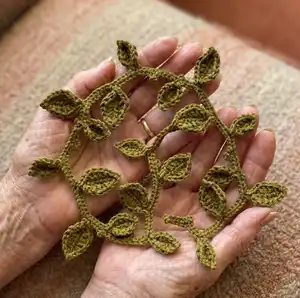
You can use cotton, linen, hemp or metallic yarns depending on the finish you want, and the pattern is easy to adapt for spacing and length. The example uses an organic DK cotton yarn and a 3.5mm (US E-4) hook.

Why You'll Love This Leaf Garland Pattern

I absolutely love this pattern because it is so adaptable and endlessly creative. I love that from the same simple repeat you can create garlands, napkin rings, necklaces or a leafy scarf depending on yarn and length. I enjoy the satisfying rhythm of chains and slip stitches and seeing the leaves appear as you work. The pattern works up quickly and gives an elegant handmade accent that feels special.

Leaf Garland Pattern step 1 - construction progress Leaf Garland Pattern step 2 - assembly progress Leaf Garland Pattern step 3 - details and accessories Leaf Garland Pattern step 4 - final assembly and finishing

Switch Things Up

I love changing up the yarn to create very different looks from the same pattern: try a metallic thread for a festive garland or a bulky wool for a cozy scarf effect.

You can change the spacing by making longer or shorter chains between leaves to create a sparse or dense vine β€” experiment with 6-20 chains to see different outcomes.

I often make mini versions with finer yarn to create a necklace or keyring charm; use a smaller hook and finer yarn to scale down the pattern.

Use contrasting colours for the leaves and vine to make the leaves pop, or variegated yarn for a subtle tonal change along the length.

If you want a sturdier vine, I sometimes work slip stitches back along the chain and add additional leaves on the return trip for a double-layered effect.

Try combining large and small leaves in a single repeat by alternating the 9ch/14ch starting chains to create an organic alternating pattern.

I like to embroider small veins onto finished leaves with a fine yarn for extra detail and personality on each leaf.

To make a wreath, join a finished vine into a circle and sew ends together, then add extra leaves and embellishments around the join for a seamless finish.

You can add beads, tiny crocheted berries or felt accents between leaves to make seasonal or themed decorations β€” glue or stitch them securely in place.

For outdoor use, consider using treated, weather-resistant cord or yarn and hang the garland in a protected area to prevent weather damage; I always test a small sample first.

Common Mistakes & How to Fix Them

βœ— Skipping the back loop only (BLO) instruction will prevent leaves from forming correctly; always work the indicated slip stitches into the BLO to create the leaf base. βœ— Turning your work instead of rotating will reverse the right side and distort shaping; rotate your work and keep the right-side facing as instructed. βœ— Forgetting to count chains between leaves causes uneven spacing; count the chains precisely (for example 9ch or 14ch) if you want identical repeats. βœ— Fastening off too early loses the option of thicker vine construction; decide whether to work back along the chain before fastening off so you can add slip stitches and extra leaves. βœ— Working with an overly stretchy yarn can make the garland sag when hung; choose non-stretchy fibres like cotton, linen or hemp for a stable decorative garland.

Leaf Garland Pattern

Make a delicate, nature-inspired leaf garland with this easy crochet pattern. You can customise length, spacing and yarn to create decorative garlands, napkin rings, necklaces or even a leafy scarf. The pattern uses simple chains and slip stitches with clear step-by-step instructions so you can create a beautiful vine effect quickly. Perfect for seasonal decor, gifts, or to add a handmade touch to your home.

Beginner Friendly 2-4 Hours

Materials Needed for Leaf Garland Pattern

β€” Main Fabric

  • 01
    Organic cotton double-knitting (DK, Category 3, light worsted weight) β€” amount as required for your desired length (example uses DK yarn to make a garland approximately 65 cm / 25 inches long for 5 repeats)
  • 02
    Non-stretchy yarns such as cotton, linen or hemp for long garlands or hanging items β€” amount as needed
  • 03
    Bulky wool (optional) if you want a chunky leafy scarf β€” amount varies with length
  • 04
    Metallic yarn (optional) for a festive Christmas garland β€” small amount for decorative effect

β€” Tools Required

  • 01
    Crochet hook size 3.5mm (US E-4)
  • 02
    Scissors
  • 03
    Yarn needle for weaving in ends
  • 04
    Stitch markers (optional for marking repeats or leaf placement)
  • 05
    Measuring tape (optional to check finished length)

Progress Tracker

0% Complete

β€” About this project :

Info :

This pattern is a great one to have under your belt, because from the same basic design, you can work a great variety of things! You can make a lovely long decorative garland in colours to suit the seasons, or work short lengths to make napkin rings. You can work in a thick woollen yarn to make a warm leafy scarf, or with fine cotton or cobweb yarn to make a necklace with an organic vibe. Use a metallic yarn for a perfect Christmas garland, or household string for an unusual washing line! One of my customers has used this as an edging to a table runner. There really are endless permutations!

β€” Materials & Tools :

Info :

Anything goes, depending on what you are aiming to create! Note that if you’re making a long garland, or something you are going to hang something else from, it’s best to choose a non-stretchy yarn - cotton, linen, hemp, etc are perfect. In my example in the pictures below, I am using a lovely organic cotton double-knitting (DK, Category 3, light worsted weight) yarn, and a 3.5mm hook.

β€” Tension and Size :

Info :

Size and tension are not critical in this project! Just choose the hook that feels right for you with the yarn you are using, or for the look you want to create.

β€” Patterns Notes & Abbreviations :

Infos :

This pattern uses UK crochet terminology (a US version is available) with standard crochet abbreviations as follows: sl st slip stitch. ch chain. dc double crochet. htr half treble. tr treble crochet. BLO back loop only. Unless otherwise stated, work through both loops of any given stitch. The whole piece is worked with right-side facing throughout.

β€” Pattern :

Info :

* Make 9ch.

Item Name (Small Leaf) :

Make a Small Leaf as follows: 6ch, sl st in the back loop only (BLO) of the second ch from the hook and the next 4 ch - 5 sl st. Rotate your work (do not turn over, keep the right-side facing) and now work in the unworked loops of the 5 ch you just worked into: 1dc, 3htr, 1dc (first side of leaf formed). 2ch, sl st into the BLO of the second chain from hook (point of leaf formed). Now working into the BLO of the slip stitches, work: 1dc, 3htr, 1 sl st (second side of leaf formed). Sl st again where the base of the leaf meets the long chain.

Round :

Make 3ch.

Item Name (Nodule) :

Make a Nodule as follows: 2ch, sl st in BLO of second chain from hook.

Info :

**

Info :

Repeat this whole pattern from * to ** (beginning with the 9ch) until the garland is the length you require.

Info :

Make 14ch.

Item Name (Large Leaf) :

Make a Large Leaf as follows: 8ch, sl st in BLO of second ch from hook and next 6 ch - 7 sl st. Working in unworked loops: 1dc, 1htr, 2tr, 2htr, 1dc. 2ch, sl st in BLO of second chain from hook. Working into BLO of slip stitches: 1dc, 2htr, 2tr, 1dc, 1 sl st. Sl st again where base of leaf meets chain.

Info :

Instead of repeating the pattern identically, however, you can vary the spacing of the leaves by working longer/shorter chains between them, according to the effect you want to achieve. Make 10ch to finish the vine.

Info :

In my example, I have worked 5 identical repeats + 10ch, and my garland is about 65cm long.

β€” Work Back / Thicken the Vine :

Info :

Now you can choose EITHER to fasten off at this point OR to start working back along the length of the vine as given below. Working slip stitches back along the length of the chain creates a thicker vine, and you can work more leaves and nodules (or none) as you wish.

Round :

Make 5ch.

Round :

In the BLO of the chain, starting in the second ch from hook, work as follows: 12 sl st.

Info :

β—†

Item Name (Small Leaf applied on the way back) :

Make a Small Leaf. Continuing in the next chain of the main vine, 12 sl st.

Item Name (Large Leaf applied on the way back) :

Make a Large Leaf. Continuing in the next chain of the main vine, 10 sl st.

Item Name (Nodule applied on the way back) :

Make a Nodule. Continuing in the next chain of the main vine, 4 sl st.

Info :

β—†β—†

Info :

As before, you can now choose whether to work identical repeats of the pattern from β—† to β—†β—†, or to improvise with different leaf spacing.

Info :

In my example I have worked 5 identical repeats on the way back along the chain.

β€” Finishing :

Info :

Now continue slip-stitching to the end of your vine as necessary. Cut your yarn, fasten off and weave in the ends.

Info :

All done!

Assembly Instructions

  • Decide whether to fasten off when you reach your desired length or to work back along the chain with slip stitches to create a thicker vine and additional places to attach leaves and nodules.
  • When adding leaves, join each leaf base with a slip stitch into the BLO of the chain at the designated chain space so the leaf sits neatly on the right-side facing of the vine.
  • For symmetrical spacing, count the chains between leaf attachments (for example 9ch or 14ch as instructed) and place small markers if needed to maintain consistent repeats.
  • After finishing the vine, weave in all ends securely with a yarn needle to prevent unraveling, and trim any excess yarn close to the work.
  • If hanging the garland, measure and block lightly if needed so the vine hangs evenly; use non-stretchy yarn for long hanging pieces to avoid sagging.

Important Notes

  • πŸ’‘Use stitch markers or count chains to keep track of repeats and leaf placement for consistent spacing and symmetry.
  • πŸ’‘Choose a non-stretchy yarn such as cotton, linen or hemp for long garlands or items that will be hung to prevent sagging over time.
  • πŸ’‘The entire piece is worked with the right-side facing throughout and unless otherwise stated, work through both loops of each stitch.
  • πŸ’‘You can either fasten off when you reach the end or work slip stitches back along the chain to thicken the vine and add more leaves or nodules.

This pretty Leaf Garland pattern is a versatile and quick project that adds handmade charm to any room. 🌿 Use cotton for crisp, stable vines or metallic yarn for festive sparkle. Make multiple lengths for garlands, napkin rings, or even a wearable leafy necklace. 🧢 Happy crocheting and enjoy making something beautiful!

You ask,

we answer.

FAQs

What length will the finished garland be?

Length depends on how many repeats you make; the designer example uses 5 identical repeats + 10ch to create a garland about 65 cm (25 inches) long.

Can I use a different yarn weight for this pattern?

Yes, you can use different yarn weights but it will change the finished size and look; choose an appropriate hook for your yarn and be aware that bulky yarn will create a chunkier effect.

Do I need to know any advanced stitches?

No, the pattern uses basic stitches (chains, slip stitches, double/half treble/treble in UK terms) and is suitable for beginners comfortable with these techniques.

What are my finishing options for a sturdier vine?

You can either fasten off at the end or work slip stitches back along the chain to create a thicker vine and then add more leaves or nodules for extra texture.