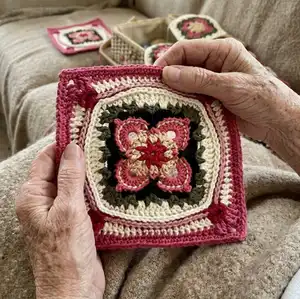
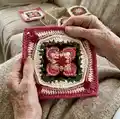
Make a beautiful Lauren Rose crochet square that blends textured petals, post stitches, and delicate popcorn accents. This intermediate square is designed as part of a legacy blanket collection and works perfectly as a standalone cushion or joined blanket panel. Youll enjoy the thoughtful color changes and decorative stitches as you create an heirloom-quality square. Follow the complete rounds and notes to achieve the same gorgeous, professional finish.
Progress Tracker
0% Complete
— Square :
Infos :
STITCHES USED double magic ring rnd (Round) ch (Chain) st(s) (Stitch/stitches) sp/sps (space/spaces) slst (Slip stitch) standing st (Standing stitch) invisible join sc (Single crochet) hdc (Half double crochet) dc (Double crochet) tr (Treble crochet) BPsc (Back post single crochet) FPsc2tog (Front post single crochet 2 together) FPdc (Front post double crochet) tr2tog (Treble crochet 2 together) BPtr2tog (Back post treble crochet 2 together) PC (Popcorn stitch) shell shallow st (Shallow stitch) 3LP (3rd loop of stitch).
Infos :
double magic ring Video at A Yarn of Serendipity. slst: Insert hook into designated st; yo, pull yarn through both loops on hook. standing stitch: Start with a slip knot on hook; Insert hook into designated st or ch sp and finish st as normal. Video at A Yarn of Serendipity. invisible join: Do not join after completing last st of rnd; cut yarn and pull yarn through st; insert hook from back-to-front of 2nd st of rnd; grab yarn and gently pull through; from the back, insert hook from bottom-to-top of the center of last st of rnd; pull yarn gently through st; anchor on backside by drawing through any back loop of first and last sts of rnd, and weave in ends. Video at A Yarn of Serendipity.
Infos :
BPsc: Insert hook from back-to-front-to-back around post, so post is in back of your hook; yo and pull up a loop; yo and pull through remaining 2 loops on hook. FPsc2tog: Insert hook from front-to-back-to-front around post, so post is in front of hook; yo and pull up a loop; leaving 2 loops on hook, insert hook from front-to-back-to-front around post of next st, so post is in front of hook; yo, pull through remaining 3 loops on hook. Video at Cynthia At Moon Loops 1-58 seconds of video. FPdc: Yo, insert hook from front-to-back-to-front around post, so post is in front of hook; yo, pull up a loop; yo, pull through 2 loops on hook; yo, pull through final 2 loops on hook.
Infos :
tr2tog: Yo 2 times; insert hook in first st; yo, pull up a loop; [yo, pull through 2 loops on hook] 2 times; yo 2 times; insert hook in next st; yo, pull through st, [yo, pull through 2 loops on hook] 2 times; yo and draw through all 3 loops on hook. BPtr2tog: Yo 2 times; Insert hook from back-to-front-to-back around post, so post is in back of post; yo and pull yarn through hook; [yo and draw through 2 loops on hook] 2 times; yo twice, and insert hook from back-to-front-to-back around post, so post is in back of post; [yo and draw through 2 loops on hook] 2 times; yo, pull through all 3 loops on your hook. PC: Work 3 dc into same st; drop loop from your hook; insert hook from front-to-back-to-front under top 2 loops of 1st dc of group; grab dropped loop with hook and pull through hook. shell: Work 7 tr in same st. shallow st: Insert hook into the "v" part of the stitch (front and back loop of stitch) and complete indicated stitch. 3LP of hdc, dc, tr: hdc, dc and tr sts all have two main loops: the FL (front loop) and BL (back loop); the yo at the beginning of hdc, dc and tr sts creates the 3rd loop.
Info :
Symbol Guide: ASTERISKS: * to repeat instructions after a single asterisk as directed. Example: * sc in ch-1 sp; ch 1, sk NEXT hdc; sc in NEXT ch-1 sp; ch 1, sk NEXT FPdc; repeat from * around. PARENTHESES: ( ) indicates a group of sts that are worked together in or around the same st. I also use parentheses to indicate the name of sts skipped. Example #1: (2 dc, ch 2, 2 dc) in ch-2 sp. Example #2: sk NEXT (2 hdc, ch-1 sp, 2 hdc). BRACKETS: [ ] repeat instructions within brackets as directed. Example: [dc, ch 1, dc in NEXT dc; ch 1, sk tr] 2 times. COUNT TOTALS: Total chain spaces are included in the st count; corner chain spaces are not included in the total. Example: Counts: 48 dc, 36 FPtr, 8 ch-2 sp, 4 ch-2 corner sp (100 total/25 per side).
Info :
Special Instructions: Instructions for ALL rounds start with a standing stitch and end with an invisible join to 2nd st of rnd, and fasten off. If not changing colors, you can opt to finish the previous rnd with a slip stitch join and use the appropriate "ch" or "chainless starting stitch" to begin the next round. Keep in mind that if you choose the slip stitch end, the "ch" or "chainless starting stitch" will replace the first standing st of the round. Navigate between written instructions, stitch definitions, videos, and pictures by clicking on the corresponding links provided in the original pattern PDF.
Round 1 :
RND 1: A, Rosebud - Large/Mini. Starting in a double magic ring, ch 4 (counts as a 1st dc of rnd, ch 1); [dc, ch 2 as a corner, dc, ch 1] 3 times; dc, ch 2; cut yarn, invisible join to 4th ch of rnd. Counts: 8 dc, 4 ch-1 sps, 4 ch-2 corner sp (12 total/3 per side)
Round 2 :
RND 2: B, Antique Cream - Large/Mini. Starting in any ch-2 corner sp, * (2 dc, ch 3, 2 dc) in ch-2 corner sp; sk NEXT dc, 2 dc in NEXT ch-1 sp, sk NEXT dc; repeat from * around; cut yarn, invisible join. Counts: 24 dc, 4 ch-3 corner sp (24 total/6 per side)
Round 3 :
RND 3: C, Rosy II - Large/Mini. Starting in any ch-3 corner sp, * (6 dc, ch 2, 6 dc) in ch-3 corner sp, sk NEXT 2 dc, FPsc2tog around NEXT 2 dc, sk NEXT 2 dc; repeat from * around; cut yarn, invisible join. Counts: 48 dc, 4 FPsc2tog, 4 ch-2 corner sps (52 total/13 per side)
Round 4 :
RND 4: D, Black - Large/Mini. Starting around any FPsc2tog, * FPdc around FPsc2tog; working in 3LP, dc in NEXT dc, hdc in NEXT 2 dc, sc in NEXT 3 dc; ch 2, sk NEXT ch-2 corner sp; working in 3LP, sc in NEXT 3 dc, hdc in NEXT 2 dc, dc in NEXT dc; repeat from * around; cut yarn, invisible join. Counts: 8 dc, 16 hdc, 24 sc, 4 FPdc, 4 ch-2 corner sps (52 total/13 per side)
Round 5 :
RND 5: E, Olive - Large/Mini. Starting in any ch-2 corner sp, * (2 dc, ch 2, 2 dc) in ch-2 corner sp; ch 1, sk NEXT 2 sc; (dc, ch 1, dc) in NEXT sc, ch 1, sk NEXT (2 hdc, dc); (dc, ch 1, dc) in NEXT FPdc, sk (dc, 2 hdc); (dc, ch 1, dc) in NEXT sc; ch 1, sk NEXT 2 sc; repeat from * around; cut yarn, invisible join. Counts: 40 dc, 28 ch 1 sps, 4 ch-2 corner sp (68 total/17 per side)
Round 6 :
RND 6: F, Ivory - Large/Mini. Starting in any ch-2 corner sp, * (sc, ch 2, sc) in ch-2 corner sp; sc in NEXT 2 dc, hdc in NEXT ch 1 sp; sk NEXT dc, (2 tr) in NEXT ch-1 sp; sk NEXT dc, (3 tr) in ch-1 sp; sk NEXT dc, (2 tr) in ch-1 sp; sk NEXT dc, hdc in NEXT ch-1 sp, sc in NEXT 2 dc; repeat from * around; cut yarn, invisible join. Counts: 28 tr, 16 dc, 8 hdc, 24 sc, 4 ch-2 corner sp (76 total/19 per side)
Round 7 :
RND 7: G, Warm Blush - Large/Mini. Starting in 2nd sc of any side, BPsc around each st across to NEXT ch-2 corner sp; [ch 2, sk NEXT ch-2 corner sp; BPsc around each st across to NEXT ch-2 corner sp] 3 times; ch 2, sk NEXT ch-2 corner, BPsc around NEXT sc; cut yarn, invisible join. Counts: 76 BPsc, 4 ch-2 corner sp (76 total/19 per side)
Round 8 :
RND 8: A, Rosebud - Large/Mini. Starting in any ch-2 corner sp of rnd 6, * (4 dc) in ch-2 corner sp of rnd 6; working in rnd 7, ch 1, sk ch-2 sp; BPsc around each st across to NEXT ch-2 corner sp, ch 1; repeat from * around; cut yarn, invisible join. Counts: 16 dc, 76 BPsc, 8 ch-1 sp (100 total/25 per side)
Round 9 :
RND 9: Large - D, Black/Mini - F, Ivory. Start in 1st BPsc of any side, * working in BPsc only, dc in NEXT 4, hdc in NEXT 3, sc in NEXT 5, hdc in NEXT 3, dc in NEXT 4, ch 6; repeat from * around; cut yarn, invisible join. Counts: 32 dc, 24 hdc, 20 sc, 4 ch-6 corner sp (76 total/19 per side)
Round 10 :
RND 10: Large - F, Ivory/Mini - C, Rosy II. Starting in any ch-6 sp, * dc in ch-6 sp, FOLD ch-6 away from you, work a shallow BPtr2tog in first 2 corner dcs of rnd 8; (dc, ch 2, dc) in ch-6 sp of rnd 9 just worked, FOLD ch 6 away from you, work a shallow BPtr2tog in last 2 corner dcs of rnd 8; dc in ch-6 sp of rnd 9 just worked; working in NEXT 19 sts, 3 hdc, 13 sc, 3 hdc; repeat from * around; cut yarn, invisible join. Counts: 16 dc, 24 hdc, 52 sc, 8 BPtr2tog, 4 ch-2 corner sp (100 total/25 per side)
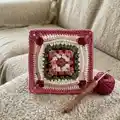
Item Name (Mini Square P1) :
FOR MINI SQUARE ONLY, FINISH AS FOLLOWS: C, Rosy II - In any ch-2 corner sp, * (sc, ch 2, sc); sc across each st to NEXT ch-2 corner sp; repeat from * around; cut yarn, invisible join. Mini Square Counts: 108 sc, 4 ch-2 corner sp (108 total/27 per side). To embellish petals, turn to back and surface slst around inside edges of petals.
Infos :
COMPLETE RNDS 11-15, FOR LARGE SQUARE
Round 11 :
RND 11: C, Rosy II - Large. Starting in any ch-2 corner sp, * (sc, ch 2, sc) in ch-2 corner sp; sc in NEXT 2 sts; ch 1, sk NEXT 2 sts; work shell in NEXT st; ch 1, sk NEXT 2 sts; [sc in NEXT 2 sts, ch 1, PC in NEXT sc, ch 1,] 3 times, sc in NEXT 2 sts; ch 1, sk NEXT 2 sts; work shell in NEXT st; ch 1; sk NEXT 2 sts; sc in NEXT 2 sts; repeat from * around; cut yarn, invisible join. Counts: 56 sc, 8 shells, 12 PC, 40 ch-1 sps, 4 ch-2 corner sp (164 total/41 per side)
Round 12 :
RND 12: B, Antique Cream - Large. Starting in any ch-2 corner sp, * (dc, ch 1, dc; ch 2, dc, ch 1, dc) in ch-2 corner sp; ch 3, sk across each st to NEXT shell; BPsc in 3rd, 4th and 5th tr of shell, ch 3; dc in sc, ch 3; [sk across each st to 2nd sc after PC, dc in sc, ch 3] 3 times; sk across each st to NEXT shell; BPsc in 3rd, 4th and 5th tr; ch 3, sk across each st to NEXT ch-2 corner sp; repeat from * around; cut yarn, invisible join. Counts: 32 dc, 24 BPsc, 28 ch-3 sps, 4 ch-2 corners (140 total/35 per side)
Round 13 :
RND 13: E, Olive - Large. Starting in any ch-2 corner sp, * (dc, ch 1, dc, ch 2; dc, ch 1, dc) in ch-2 corner sp; sk NEXT dc, (2 dc) in NEXT ch-1 sp, sk NEXT dc; (dc, 2 hdc) in NEXT ch-3 sp; sc in NEXT 3 BPsc; (2 hdc) in NEXT ch-3 sp, sk NEXT dc; [hdc in NEXT ch-3 sp; working in front of ch-3 sp, tr2tog in worked scs of rnd 10 before and after PC of rnd 11; hdc in ch-3 sp of rnd 13 just worked, sk NEXT dc] 3 times; (2 hdc) in NEXT ch-3 sp; sc in NEXT 3 BPsc; (2 hdc, dc) in NEXT ch-1 sp, sk NEXT dc; repeat from * around; cut yarn, invisible join. Counts: 24 sc, 56 hdc, 40 dc, 12 dc2tog, 8 ch-1 sps, 4 ch-2 corner sp (140 total/35 per side)
Info :
tr2tog - stitch placement for 1st tr and 2nd tr (see pattern photos for placement guidance).
Round 14 :
RND 14: F, Ivory - Large. Starting in any ch-2 corner sp, * (dc, ch 2, dc) in ch-2 corner sp; dc in 3LP of NEXT dc; dc in NEXT ch-1 sp; working in 3LP, dc in NEXT 31 sts; dc in NEXT ch-1 sp; dc in 3LP of NEXT dc; repeat from * around; cut yarn, invisible join. Count: 148 dc, 4 ch-2 corner sps (148 total/37 per side)
Round 15 :
RND 15: F, Ivory - Large. Starting in any ch 2 corner sp, * (sc, ch 2, sc) in ch-2 corner sp; sc across each st to NEXT ch-2 corner sp; repeat from * around; cut yarn, invisible join and weave in ALL yarn ends. Large square count: 156 sc, 4 ch-2 corner sps (156 total/39 per side)
Info :
I highly recommend blocking this square to achieve your final shape and size. Blocking will make your stitches even, more defined and give your square a more professional appearance. You can either wet block or steam block, but always make sure you are careful when steam blocking acrylic yarn.
Info :
This pattern is copyright protected. You may only print a copy of this pattern for your own use. If you share your finished square, link to the designers website, A Yarn of Serendipity Facebook page, Love Crafts, Ravelry, Ribblr, Makerist or Creative Fabrica. Please do not distribute this pattern or photos in any other form.
This Lauren Rose Square is the start of a heart-filled blanket design that celebrates family and craftsmanship. Whether you make a mini square for a gift or nine for a blanket, each round brings beautiful texture and color. Enjoy the process and the heirloom result—happy crocheting! 🧶🧵