🧶 Beautiful ✨ Detailed 💝 Adorable

Lamas Amigurumi Pattern

Lamas Amigurumi Pattern
4.4★ Rating
5-7 Hours Time Needed
4.0K Made This
✂️

Intermediate Level

Ideal for those with basic crochet experience, featuring slightly more advanced stitches and techniques to expand your skills.

⏱️

Weekend Treat

Takes 5-7 hours, making it an enjoyable project to finish over a couple of days.

🧸

Cute Companion

An adorable friend to cherish, handcrafted with love to bring comfort and joy for years to come.

About This Lamas Amigurumi Pattern

This pattern creates a mother lama with a tiny baby lama that fits into a crocheted pocket on the mama. The design uses sport weight Yarn Art Jeans and a 2 mm hook for a firm, detailed fabric. Techniques include working in spirals, front loop only detailing, and small decorative curls. Every piece is described round-by-round so you can follow along precisely.

Lamas Amigurumi Pattern crochet pattern - detailed view of completed project

The pattern includes full instructions for both mother and baby lamas, from limbs to facial embroidery. Photos and assembly guidance help you place and sew parts for the best finished look.

Why You'll Love This Lamas Amigurumi Pattern

I absolutely love this pattern because it balances sweet, collectible charm with practical, clear instructions that make assembly satisfying. I enjoy the little details like the curly hair and sewn-on pocket, which give the lama personality and character. The pattern encourages creativity — you can change colors and embellishments to make every lama unique. Sewing the tiny features and watching the face come to life is one of my favorite, calming steps.

Lamas Amigurumi Pattern step 1 - construction progress Lamas Amigurumi Pattern step 2 - assembly progress Lamas Amigurumi Pattern step 3 - details and accessories Lamas Amigurumi Pattern step 4 - final assembly and finishing

Switch Things Up

I love customizing this pattern — I often change the main colors to give each lama a unique personality, like pastel shades for a nursery-ready look or bold brights for playful toys.

If you want a bigger lama, try using thicker yarn and a larger hook; conversely, use thinner yarn for a tiny keychain-sized baby.

I sometimes add felt or tiny buttons as accessories, or embroider eyelashes and freckles to vary facial expressions and charm.

Try different stitch textures on the skirt or pocket edge, such as picot or shell trims, to give each outfit a different style.

You can make the baby removable or sewn in place; removable babies make the toy interactive while sewn babies keep everything secure for small children.

To create posable limbs, add thin wire inside the arms and legs before stuffing, which allows gentle posing when displaying the lama.

Mix and match yarn fibers for texture: a slightly fuzzy yarn for the curls gives a softer, more natural mane effect.

I also experiment with tiny accessories like a crocheted blanket or a mini hat — they are simple and add huge character.

embroidery color choices change the expression dramatically; try darker browns for bold lines or lighter tones for a softer look.

Finally, when gifting, add a small loop on the top curl to hang the lama as an ornament — it's a quick swap and a lovely presentation idea.

Common Mistakes & How to Fix Them

✗ Skipping the row marker when working in continuous rounds leads to misplaced increases and decreases; place a marker at the beginning of each new round to keep your stitch counts accurate. ✗ Forgetting to stuff pieces as you go can make shaping difficult and cause lumps later; stuff gradually and evenly, adding small amounts of fiberfill while shaping each section. ✗ Not switching color and working BLO or FLO as specified will change the look of the garment edges and ribbing; follow color change rounds exactly and work BLO/FLO where instructed to match the photographed result. ✗ Not counting stitches after increase or decrease rounds results in incorrect shaping later; count stitches at the end of each increase or decrease round and correct immediately if needed. ✗ Overtightening your tension on small pieces makes them stiff and harder to join; maintain consistent, moderate tension so pieces sit flat and sew together neatly.

Lamas Amigurumi Pattern

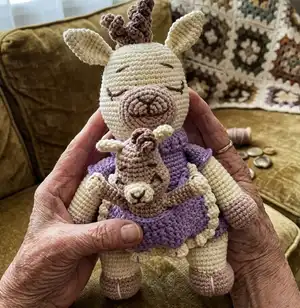
Make a charming mother and baby lama amigurumi using sport weight yarn and simple amigurumi techniques. This pattern walks you through every piece — arms, legs, head, curls, pocket and finishing details — with clear step-by-step rounds. You will enjoy sewing and customizing the tiny details to give your lama personality. Perfect as a handmade gift or cozy collectible.

Intermediate 5-7 Hours

Materials Needed for Lamas Amigurumi Pattern

— Main Fabric

  • 01
    Sport weight 4ply yarn Yarn Art Jeans (50g / 160m) N40 - Brown
  • 02
    Sport weight 4ply yarn Yarn Art Jeans (50g / 160m) N86 - Yellow
  • 03
    Sport weight 4ply yarn Yarn Art Jeans (50g / 160m) N87 - Beige
  • 04
    Sport weight 4ply yarn Yarn Art Jeans (50g / 160m) N89 - Purple
  • 05
    Fiberfill stuffing (for head, body, limbs and tail)

— Tools Required

  • 01
    Crochet hook size 2.0 mm
  • 02
    Tapestry/yarn needle for sewing and embroidery
  • 03
    Scissors
  • 04
    Stitch markers
  • 05
    Pins for positioning pieces during assembly
  • 06
    Optional: stuffing tool or chopstick to place fiberfill

Progress Tracker

0% Complete

— MOTHER LAMA Arms (make 2) :

Round 1 :

6sc in MR

Info :

Place row marker here.

Round 2 :

6inc (12)

Round 3 :

(1sc, inc) *6 (18)

Round 4 :

(2sc, inc) *6 (24)

Round 5-8 :

24sc (4 rounds)

Round 9 :

(2sc, dec) *6 (18)

Round 10 :

Change color to yellow. BLO 18sc.

Round 11-21 :

18sc (11 rounds)

Round 22 :

Change color to purple. BLO 18sc.

Round 23-26 :

18sc (4 rounds)

Info :

Stuff the arms with fiberfill.

Info :

Fold in half and make 9sc through both sides, weave in the yarn ends.

Info :

Return to round 22 of the arms and work with purple yarn through front loops: FLO ch1, 18sc, sl st in one stitch. Cut the yarn and fasten off.

— MOTHER LAMA Ears (make 2) :

Round 1 :

With yellow yarn. 6sc in MR

Info :

Place row marker here.

Round 2 :

(1sc, inc) *3 (9)

Round 3 :

9sc

Round 4 :

(2sc, inc) *3 (12)

Round 5 :

(3sc, inc) *3 (15)

Round 6 :

(4sc, inc) *3 (18)

Round 7-8 :

18sc (2 rounds)

Round 9 :

(1sc, dec) *6 (12)

Round 10-12 :

12sc (3 rounds)

Info :

Leave long tail for sewing. Do not stuff.

— MOTHER LAMA Nose :

Round 1 :

With beige yarn. 6sc in MR

Info :

Place row marker here.

Round 2 :

6inc (12)

Round 3 :

(3inc, 3sc) *2 (18)

Round 4 :

(1sc, inc)*3, 3sc, (1sc, inc)*3, 3sc (24)

Round 5 :

(3sc, inc) *6 (30)

Round 6-7 :

30sc (2 rounds)

Info :

Stuff the nose with fiberfill. Leave long tail for sewing.

— MOTHER LAMA Curls (make 6) :

Info :

Crochet 3 pieces in beige and 3 pieces in brown.

Instruction :

Chain 21. Start in the second chain from the hook 20inc

Info :

Leave long tail for sewing.

— MOTHER LAMA Legs (make 2) :

Round 1 :

With beige yarn. 6sc in MR

Info :

Place row marker here.

Round 2 :

6inc (12)

Round 3 :

(1sc, inc) *6 (18)

Round 4 :

(2sc, inc) *6 (24)

Round 5 :

(3sc, inc) *6 (30)

Round 6-9 :

30sc (4 rounds)

Round 10 :

(3sc, dec) *6 (24)

Round 11 :

Change color to yellow. BLO 24sc.

Round 12-17 :

24sc (6 rounds)

Round 18 :

Change color to purple. Stuff the legs with fiberfill.

Info :

Fold in half and crochet 12sc through both sides. Cut the yarn and fasten off on the first leg. Crochet the second leg in the same way then continue: turn, ch1, 12sc, do not cut the yarn.

— MOTHER LAMA Body :

Round 19 :

ch10, join the first leg, 12sc in the first leg. Place marker, this will be the beginning of your new round.

Round 20 :

Crochet in a spiral: FLO 12sc, 10sc on the chain, FLO 12sc, continue on other side FLO 12sc, 10sc on the chain, FLO 12sc. (68)

Round 21 :

BLO 68sc

Round 22-29 :

68sc (8 rounds)

Round 30 :

(32sc, dec) *2 (66)

Round 31 :

66sc

Round 32 :

(9sc, dec) *6 (60)

Round 33 :

60sc

Round 34 :

(8sc, dec) *6 (54)

Round 35-37 :

54sc (3 rounds)

Round 38 :

(7sc, dec) *6 (48)

Round 39-41 :

48sc (3 rounds)

Round 42 :

Attach the arms : 45sc on the body, attach arm using the last 3 sc on round 42 and the first 6 sc on round 43 (to give a total of 9 sc) through both left arm and body

Round 43 :

15sc on the body, 9sc on right arm and body, 18sc on the body (48)

Round 44 :

48sc

Round 45 :

(6sc, dec) *6 (42)

Round 46-47 :

42sc ( rounds)

Round 48 :

Change color to yellow. BLO 42sc. Stuff the body with fiberfill.

— MOTHER LAMA Head :

Round 49 :

42sc

Round 50 :

(6sc, inc) *6 (48)

Round 51 :

(7sc, inc) *6 (54)

Round 52 :

(8sc, inc) *6 (60)

Round 53-58 :

60sc (6 rounds)

Round 59 :

(8sc, dec) *6 (54)

Round 60-64 :

54sc (5 rounds)

Round 65 :

(7sc, dec) *6 (48)

Round 66 :

48sc

Round 67 :

(6sc, dec) *6 (42)

Round 68 :

42sc

Info :

Stuff the head with fiberfill.

Round 69 :

(5sc, dec) *6 (36)

Round 70 :

(4sc, dec) *6 (30)

Round 71 :

(3sc, dec) *6 (24)

Round 72 :

(2sc, dec) *6 (18)

Round 73 :

(1sc, dec) *6 (12)

Round 74 :

6dec

Info :

Fasten off, cut the yarn, weave in the yarn ends.

— MOTHER LAMA Skirt and Decorative Front Loops :

Info :

Return to round 21 of the body and work with purple yarn through the front loops: ch1,(3dc in one stitch, sc)*34. Cut the yarn and fasten off.

Info :

Return to round 48 of the body-head and work with purple yarn through front loops:

Round 1 :

ch1,(dc, dc-inc)*20, 2dc, sl st, turn (62)

Round 2 :

ch1,(Fpdc, Bpdc) *31, sl st, turn (62)

Round 3 :

ch1,(Bpdc, Fpdc) *31, sl st (62)

Info :

Fasten off weave in ends.

— MOTHER LAMA Pocket :

Info :

With purple yarn. Work in rows.

Round 1 :

Chain 23. From the second chain on the hook: 22sc, turn (22)

Round 2 :

Ch1, 4sc, ch6 (skip 6sc, start from the next stitch), 2sc, ch6 (skip 6sc, start from the next stitch), 4sc, turn (22)

Round 3-13 :

Ch1, 22sc, turn (10 rounds)

Info :

Crocheted with yellow yarn around the perimeter of the pocket: (sc, 3dc in one stitch) *23.

Info :

Fasten off, cut the yarn, weave in the yarn ends.

Info :

Sew the pocket on to the front of the body 2 Rows down from under arms and in line to the top of the legs, make sure you allow enough room for the baby lama to be inserted.

— MOTHER LAMA Finishing :

Info :

Sew the nose and ears to the head.

Info :

Sew the curls to the head.

Info :

Add Indentation's to hooves follow the photos below.

Info :

Embroider the nose, mouth, eyes and eyebrows with brown yarn.

— BABY LAMA Arms (make 2) :

Round 1 :

With yellow yarn. 6sc in MR

Info :

Place row marker here.

Round 2 :

6inc (12)

Round 3 :

12sc

Round 4 :

(2sc, dec) *3 (9)

Round 5 :

Change color to beige. BLO 7sc, dec (8)

Round 6-11 :

8sc (6 rounds)

Info :

Stuff the arms with fiberfill. Fold in half and make 4sc through both sides, weave in the yarn ends.

— BABY LAMA Ears (make 2) :

Round 1 :

With yellow yarn. 6sc in MR

Info :

Place row marker here.

Round 2-3 :

6sc (2 rounds)

Info :

Leave a long tail for sewing.

— BABY LAMA Nose :

Round 1 :

With yellow yarn. 6sc in MR

Info :

Place row marker here.

Round 2 :

6inc (12)

Round 3 :

12sc

Info :

Leave a long tail for sewing.

— BABY LAMA Tail :

Round 1 :

With yellow yarn. 6sc in MR

Info :

Place row marker here.

Round 2 :

6inc (12)

Round 3 :

12sc

Round 4 :

6dec

Info :

Stuff the tail with fiberfill. Leave a long tail for sewing.

— BABY LAMA Curl :

Instruction :

With beige yarn. Chain 16. Start in the second chain from the hook: 15inc

Info :

Leave a long tail for sewing.

— BABY LAMA Legs (make 2) :

Round 1 :

With yellow yarn. 6sc in MR

Info :

Place row marker here.

Round 2 :

6inc (12)

Round 3 :

12sc

Round 4 :

(2sc, dec) *3 (9)

Round 5 :

Change color to beige. BLO 9sc

Round 6-8 :

9sc (3 rounds)

— BABY LAMA Body :

Info :

Stuff the legs. Fasten off on the first leg. Crochet the second leg in the same way and crochet an extra sl st, do not cut the yarn.

Round 9 :

ch5, join the first leg, 9sc, 5sc on the chain, 9sc on the second leg. Place a marker of a new round beginning. (28)

Round 10 :

28sc

Info :

Stuff the body with fiberfill.

Round 11 :

24sc, inc, 2sc, inc (30)

Round 12-14 :

30sc (3 rounds)

Round 15 :

(3sc, dec) *6 (24)

Round 16-18 :

24sc (3 rounds)

Round 19 :

Add arms: 1sc, 4sc with the arm and body together; 8sc; 4sc with the second arm and body; 7sc (24)

Round 20 :

(2sc, dec) *6 (18)

Round 21 :

18sc

Round 22 :

(2sc, inc) *6 (24)

Round 23 :

(3sc, inc) *6 (30)

Round 24-26 :

30sc (3 rounds)

Round 27 :

(3sc, dec) *6 (24)

Round 28-32 :

24sc (5 rounds)

Round 33 :

(2sc, dec) *6 (18)

Round 34 :

(1sc, dec) *6 (12)

Round 35 :

6dec

Info :

Stuff the head with fiberfill. Fasten off, cut the yarn, weave in the yarn ends.

Info :

Sew the nose and ears to the head.

Info :

Hoof indentations follow the photos below.

Info :

Sew the tail to the body and sew the curly hair to the head. Embroider eyes, eyebrows, nose and mouth with brown yarn.

Info :

Congrats! Your Lamas is ready!!!

Assembly Instructions

  • Sew the nose to the center of the head and position the ears to the top sides of the head, securing with hidden stitches and weaving in ends.
  • Sew the curls to the top of the head in the arrangement shown in photos, using the long tails to stitch each curl securely.
  • Attach the arms to the body where indicated: align the last 3 sc of round 42 with the first 6 sc of round 43 to give a total of 9 sc and sew through both arm and body.
  • Sew the pocket onto the front of the body 2 rows down from under the arms and aligned to the top of the legs so the baby lama fits inside.
  • Add hoof indentations by using a needle and yarn to pull a small tuck into each hoof as shown in the photos, then secure and weave in ends.
  • Embroider the nose, mouth, eyes and eyebrows with brown yarn following the photo references for placement and expression.

Important Notes

  • 💡Use a stitch marker at the start of each round so you do not lose your place while working in continuous spirals.
  • 💡Stuff pieces gradually and evenly to preserve shape and avoid overstuffing which can distort the fabric.
  • 💡Weave in ends securely and leave long tails where indicated for sewing parts together neatly and invisibly.
  • 💡Follow color change rounds and BLO/FLO instructions exactly to match the skirt and sleeve edge details.

Create a precious mother-and-baby lama set with this detailed amigurumi pattern — perfect for gifting or display. The tiny pocket, curly hair and embroidered face give it a truly handcrafted personality. Enjoy every stitch and the satisfaction of finishing a cuddly, handmade companion. 🧶✨😊

You ask,

we answer.

FAQs

What size will the finished piece be?

The finished mother lama measures approximately 24 cm (9.4 inches) tall and the baby lama about 12 cm (4.7 inches) when using the recommended yarn and 2.0 mm hook.

Can I use a different yarn weight or hook?

Yes, but your finished size will change. If you use a thicker yarn, choose a larger hook and expect a larger, squishier result; for a smaller version, use thinner yarn and a smaller hook.

Are safety eyes required for this pattern?

This pattern uses embroidery for the eyes and facial features, so safety eyes are optional; embroidery keeps the toy child-safe and matches the pattern photos.

Do I need advanced crochet skills to make this?

This pattern is rated intermediate and requires familiarity with amigurumi techniques, increases, decreases, BLO/FLO, and simple post-stitches; basic amigurumi experience is recommended.

How long does this project typically take to complete?

Most crocheters complete both mother and baby lamas in about 5-7 hours, depending on experience level and finishing speed.