About This Kirby Hello Kitty Amigurumi Pattern
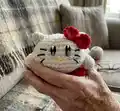
This pattern teaches you how to crochet a tiny Kirby-Hello Kitty hybrid amigurumi using DK yarn and a 3mm hook. You will make a rounded body/head, two ears, two arms, two legs and a small bow, then embroider the face for charming expression. Clear step-by-step rounds and photos guide you from start to finish.

Perfect for gifting or collecting, the finished kitty is about 2 inches (5 cm) tall. The pattern uses simple shaping and embroidery to achieve a sweet, finished look.
Why You'll Love This Kirby Hello Kitty Amigurumi Pattern
I absolutely love this pattern because it turns simple rounds into a character with a lot of personality. The combination of classic Kirby shape and Hello Kitty details makes a playful, nostalgic design that is quick to make. I enjoy the small scale — it is satisfying to finish in one sitting and gives a lovely handmade gift. The embroidered face lets you customize expression easily, which is one of my favorite parts of the process.
Switch Things Up
I love how easy it is to customize this tiny kitty by changing colors — try pastel pinks or soft greys for a different vibe.
I often make a mini keychain version by using finer yarn and a smaller hook to create pocket-sized charms.
You can experiment with different yarn weights: bulky yarn with a larger hook makes a chunkier, cuddlier version.
I sometimes add tiny felt accessories or a removable scarf to give each kitty a personality and seasonal flair.
Try embroidering different eye shapes and mouth expressions to change the character's mood and look.
I like to add a small loop behind the head and attach a keyring for a functional keychain gift idea.
For a sturdier toy, you can use a slightly tighter tension and more stuffing; for a floppy look, reduce stuffing a little.
I sometimes use metallic thread for a sparkly bow or switch to cotton yarn for a matte finish that photographs nicely.
To make a family set, vary yarn colors and facial details to create siblings or themed sets like holiday kitties.
I also recommend playing with the placement of the bow and whiskers to achieve the cutest silhouette for your project.
Common Mistakes & How to Fix Them
✗ Skipping the stitch marker when working continuous rounds leads to miscounted rounds; place a marker at the start of each round and move it up as you go.
✗ Understuffing the body makes it floppy and hard to shape; stuff gradually with polyester fiberfill, shaping as you go until the piece is firm but not overstuffed.
✗ Forgetting to thread through the front loops when closing will leave a visible hole; follow the closing steps carefully and pull the yarn through the front loops before tightening.
✗ Rushing the embroidery can make eyes and whiskers uneven; take your time marking levels and practice stitches on scrap yarn before embroidering the finished piece.