🧢 Beautiful ✨ Detailed πŸ’ Adorable

Jellyfish Amigurumi Pattern

Jellyfish Amigurumi Pattern
4.3β˜… Rating
5-7 Hours Time Needed
1.9K Made This
βœ‚οΈ

Intermediate Level

Ideal for those with basic crochet experience, featuring slightly more advanced stitches and techniques to expand your skills.

⏱️

Weekend Treat

Takes 5-7 hours, making it an enjoyable project to finish over a couple of days.

🧸

Cute Companion

An adorable friend to cherish, handcrafted with love to bring comfort and joy for years to come.

About This Jellyfish Amigurumi Pattern

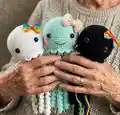
This detailed pattern teaches you how to crochet a whimsical jellyfish amigurumi with a scalloped ridge and mixed tentacles. You will work the head in continuous rounds, attach safety eyes, make both chain and curly tentacles, and add small crocheted cheeks. The instructions include materials, abbreviations, every round, and clear assembly steps so you can reproduce the exact look.

Jellyfish Amigurumi Pattern crochet pattern - detailed view of completed project

Perfect for an intermediate crocheter who enjoys shaping and assembly, this pattern offers helpful photos and notes. Create a playful toy or nursery decor that is full of texture and character.

Why You'll Love This Jellyfish Amigurumi Pattern

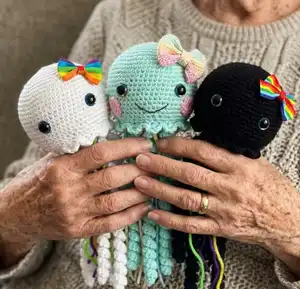
I absolutely love this pattern because it combines simple amigurumi shaping with playful textured tentacles that give the jellyfish so much personality. I enjoy how the ridge around the brim adds a delicate scalloped edge that makes the finished piece look professional. The mix of chain tentacles and curly tentacles allows for creative color choices and fun movement. I find assembling the cheeks and embroidered smile very rewarding, turning a crocheted sphere into a friendly face I am proud to gift.

Jellyfish Amigurumi Pattern step 1 - construction progress Jellyfish Amigurumi Pattern step 2 - assembly progress Jellyfish Amigurumi Pattern step 3 - details and accessories Jellyfish Amigurumi Pattern step 4 - final assembly and finishing

Switch Things Up

I love how customizable this jellyfish pattern is; you can change colors to create totally different moods for each piece.

Try pastel shades for a soft nursery toy or neon brights for a playful, modern look that pops in photos.

Want a smaller version? Use a lighter weight yarn and a smaller hook to produce a miniature jellyfish perfect for keychains.

For a larger, cuddlier jellyfish, choose bulky yarn and a larger hook and increase tentacle lengths for dramatic drape.

I often mix multiple colors for the chain tentacles so each strand has a different hue for a rainbow effect.

Consider swapping safety eyes for embroidered eyes if making the toy for a baby or if you prefer a softer appearance.

Add a loop at the top of the head to hang the jellyfish as a mobile or wall decoration instead of a toy.

Embroider different facial expressionsβ€”higher or lower smiles, small blushing cheeks, or winking eyesβ€”to create distinct personalities.

Use metallic or sparkly yarn for one or two tentacles to add subtle shimmer and special touches for gift recipients.

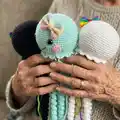
I sometimes stitch a little felt accessory like a bow or tiny flower onto the ridge for seasonal or themed variations.

Finally, experiment with stuffing density; firmer stuffing helps the head keep shape while softer stuffing gives a squishier cuddly feel.

Common Mistakes & How to Fix Them

βœ— Skipping the stitch marker while working in a continuous spiral causes lost beginning-of-rounds; always place a stitch marker at the start of each round and move it up after each round. βœ— Forgetting to place the eyes between the correct rounds will change facial placement; follow the instruction to place eyes between rounds 17 and 18 leaving 11 holes between them for correct spacing. βœ— Not stuffing the head at the correct stage leads to misshapen results; start stuffing at the instructed round (after round 26) and stuff gradually to maintain an even round shape. βœ— Using incorrect hook size or inconsistent tension can change finished size dramatically; use a 3.25 mm (D) hook with worsted weight #4 yarn and maintain consistent tension throughout. βœ— Sewing tentacles without pinning first causes uneven placement; pin chain and curly tentacles in a circle on the underside before sewing to ensure symmetry and correct coverage.

Jellyfish Amigurumi Pattern

Make a sweet, squishy jellyfish amigurumi that measures about 16 inches from head to tentacle tip. This pattern guides you through crocheting the head, adding a decorative ridge, and making both curly and chain tentacles for a playful finish. You will get clear materials lists, abbreviations, stitch rounds, and step-by-step assembly tips so you can create a charming handmade friend.

Intermediate 5-7 Hours

Materials Needed for Jellyfish Amigurumi Pattern

β€” Main Fabric

  • 01
    Worsted Weight yarn (#4), approximately 100g of main color (Color A)
  • 02
    Accent colors: 50-75g total for tentacle and detail colors (Color B: Tentacle Color)
  • 03
    Color C: Pink - small amount for cheeks (approx 10-20g)
  • 04
    Safety eyes: 18 mm (2 pieces) for main eye placement
  • 05
    Black embroidery thread for smile and facial details
  • 06
    Polyfil stuffing (fiberfill) for head stuffing

β€” Tools Required

  • 01
    Crochet hook size 3.25 mm (D)
  • 02
    18 mm safety eyes (2 pieces)
  • 03
    Scissors
  • 04
    Sewing needle and yarn needle for sewing and weaving ends
  • 05
    Stitch markers
  • 06
    Polyester stuffing (fiberfill)
  • 07
    Pins for assembly and placement
  • 08
    Black embroidery thread for facial details

Progress Tracker

0% Complete

β€” Head :

Round 1 :

Make 6 sc into a magic ring=6

Round 2 :

Increase in each st around= 12

Round 3 :

(sc, inc) x 6= 18

Round 4 :

(2 sc, inc) x 6= 24

Round 5 :

(3 sc, inc) x 6= 30

Round 6 :

(4 sc, inc) x 6= 36

Round 7 :

(5 sc, inc) x 6= 42

Round 8 :

(6 sc, inc) x 6= 48

Round 9 :

(7 sc, inc) x 6= 54

Round 10 :

(8 sc, inc) x 6= 60

Round 11-21 :

sc in each st around

Info :

Place the eyes between rounds 17 and 18, leaving 11 holes in between them.

Round 22 :

(8 sc, dec) x 6= 54

Round 23 :

(7 sc, dec) x 6= 48

Round 24 :

(6 sc, dec) x 6= 42

Round 25 :

(5 sc, dec) x 6= 36

Round 26 :

BLO (4 sc, dec) x 6= 30

Info :

Start stuffing the head

Round 27 :

(3 sc, dec) x 6= 24

Round 28 :

(2 sc, dec) x 6= 18

Round 29 :

(sc, dec) x 6= 12

Round 30 :

dec x 6= 6

Info :

F/O and sew the hole closed

β€” Ridge on Head :

Info :

With Color A: Attach the yarn to round 26 of the head

Info :

*Follow pictures below for help*

Round 1 :

* (hdc, dc, tr, dc, hdc) in one st, sl st in the 2 stitches *

Info :

Repeat from * to * around the head

Info :

F/O and weave in the tail ends

β€” Curly Tentacles (Make 7) :

Info :

With Color A: CH 71

Round 1 :

sc in 2nd ch from hook, inc in next st, (sc, inc) across the chain

Info :

F/O and leave a long tail for sewing

β€” Chain Tentacles (Make 5) :

Info :

With Color of Choice: CH 75

Round 1 :

Sl st in 2nd ch from hook and across

Info :

F/O and leave a long tail for sewing

β€” Cheeks (Make 2) :

Round 1 :

With Color C: Make 6 sc into a magic ring= 6

Round 2 :

Increase in each st around= 12

Info :

F/O and leave a long tail for sewing

β€” Assembly :

Head and Body :

1. Mark 2 spots on the head with pins approximately between rounds 21 and 22. Cut a long strand of black embroidery thread. Thread your needle and insert the needle into a hole on the side of the head. Bring your needle up to the first pin and then bring the needle to the 2nd pin. Make a line and be easy and wrap the thread around the middle of the smile to hold it in place. Weave in the tail ends. 2. Pin the cheeks next to the eyes and sew into place.

Chain Tentacles :

1. Pin the chain tentacles in the middle of the jellyfish in a circle. 2. Sew them onto the jellyfish.

Curly Tentacles :

1. Pin the curly tentacles around the chain tentacles. 2. Sew the curly tentacles onto the jellyfish.

Info :

You now have your finished jellyfish!

Assembly Instructions

  • Attach the embroidered smile: mark two spots between rounds 21 and 22, insert the needle through a side hole, bring up at the first pin and then the second pin, wrap thread around the middle of the smile to hold it, then weave in tails securely.
  • Pin and sew the cheeks next to the eyes using the long tail left from the cheek pieces to secure them in place, ensuring symmetry on both sides of the face.
  • Pin the chain tentacles in a circular arrangement in the middle underside of the jellyfish and sew them securely through the head base so they hang evenly.
  • Arrange the curly tentacles around the sewn chain tentacles, pinning them evenly, then sew each curly tentacle in place to create the textured skirt effect.
  • Weave in and hide all tail ends inside the head and check stuffing distribution; make any final adjustments before closing and finishing the piece.

Important Notes

  • πŸ’‘Do not join rounds unless stated; work in a continuous spiral to maintain even shaping.
  • πŸ’‘Use a stitch marker to mark the beginning of each round so you can keep track of increases and decreases.
  • πŸ’‘All stitches are worked in both loops unless stated otherwise; exceptions like BLO are noted in the rounds.
  • πŸ’‘Place safety eyes between rounds 17 and 18 leaving 11 stitches between eyes for the correct facial placement.

This adorable jellyfish amigurumi is perfect for gifting or brightening a nursery with handmade charm. The pattern includes full rounds, tentacle variations, and clear assembly instructions to guide you. Make one in your favorite colors and watch it come to life! πŸ§ΆπŸ™βœ¨

You ask,

we answer.

FAQs

What size will the finished piece be?

The finished jellyfish measures approximately 16 inches from the top of the head to the bottom of the tentacles when using worsted weight #4 yarn and a 3.25 mm hook.

Can I use different yarn weights for this pattern?

Yes, you can use different yarn weights but it will change the final size and the placement of eyes; adjust hook size and eye placements accordingly.

Do I need prior crochet experience for this pattern?

This pattern is rated intermediate, so familiarity with single crochet, increases, decreases, and working in the round is recommended.

How long does this project typically take to complete?

Most crocheters complete this project in 5-7 hours, though time may vary depending on experience, customization, and assembly time.