🧶 Beautiful ✨ Detailed 💝 Adorable

Jack in Love Amigurumi Pattern

Jack in Love Amigurumi Pattern
4.0★ Rating
5-7 Hours Time Needed
1.6K Made This
✂️

Intermediate Level

Ideal for those with basic crochet experience, featuring slightly more advanced stitches and techniques to expand your skills.

⏱️

Weekend Treat

Takes 5-7 hours, making it an enjoyable project to finish over a couple of days.

🧸

Cute Companion

An adorable friend to cherish, handcrafted with love to bring comfort and joy for years to come.

About This Jack in Love Amigurumi Pattern

This pattern creates a small decorative amigurumi: a skull-like pot holding a heart-shaped tree with tiny leaves. It includes step-by-step crochet rounds for the base, soil, stem, branches, leaves and embroidered facial details. Techniques covered include invisible decreases, working in BLO/FLO, wiring for shape, and simple embroidery. Suitable for intermediate crocheters who enjoy shaping and assembly.

Jack in Love Amigurumi Pattern crochet pattern - detailed view of completed project

Youll receive full round-by-round instructions, material lists and helpful photo references. The pattern includes tips for different yarns and hook sizes to vary final size and texture.

Why You'll Love This Jack in Love Amigurumi Pattern

I absolutely love this pattern because it combines crochet shaping with playful character design in a compact project. I enjoy the way the branches can be wired and bent into a heart — it adds a hands-on creative finishing touch that feels very rewarding. The embroidered face gives so much personality with minimal materials, and I usually make a few for gifts because theyre quick to personalize. Working the leaves and tiny branches is relaxing and makes the piece feel handcrafted and special.

Jack in Love Amigurumi Pattern step 1 - construction progress Jack in Love Amigurumi Pattern step 2 - assembly progress Jack in Love Amigurumi Pattern step 3 - details and accessories Jack in Love Amigurumi Pattern step 4 - final assembly and finishing

Switch Things Up

I love customizing this pattern by changing yarn and hook size — try cotton for a crisp look or acrylic blends for softer texture.

If you want a miniature version, use fingering yarn and a smaller hook to make keychain-friendly sizes.

For a chunkier, decorative version, use sport or DK yarn with a larger hook and add more stuffing for a plush look.

I often swap leaf colors to create seasonal versions — try autumn tones or pastel spring greens for variety.

You can embellish the pot with embroidered patterns, beads, or tiny crocheted flowers to personalize each piece.

Try using metallic or colored wire for the branches to add a subtle shimmer or contrast against the yarn color.

I sometimes make the face friendlier by adjusting eye shapes or changing the mouth embroidery style for playful expressions.

Consider making a set in various sizes and grouping them as shelf décor or gifts — they look charming in clusters.

If you want more stability, glue the plastic insert into the base or add a heavier washer beneath the plastic for extra weight.

Experiment with textured stitches on the pot (e.g., hdc or front post rows) to create tactile interest and different visual effects.

Common Mistakes & How to Fix Them

✗ Skipping stitch markers when working in continuous spirals leads to lost round counts; use a marker at the start of every round and move it each round to stay on track. ✗ Forgetting to stuff gradually causes lumps and uneven shaping; stuff a little at a time and shape as you go for an even finish. ✗ Using too flexible plastic for the base may make the toy unstable; cut multiple layers of plastic or use a firmer lid to create a sturdy bottom. ✗ Crocheting decreases incorrectly around the soil can distort the opening; follow the pattern notes to use regular decreases for the soil round and invisible decreases elsewhere. ✗ Changing color without securing ends creates loose stitches and gaps; fasten off and weave in tails as instructed, and use the second-half color change method for neat transitions.

Jack in Love Amigurumi Pattern

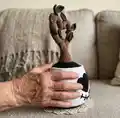
Make a charming Jack in Love amigurumi — a tiny potted tree with a heart-shaped trunk and sweet embroidered face. This pattern walks you through crochet, shaping, wiring, and assembling to create a 15–27 cm decorative toy depending on yarn and hook. Youll enjoy shaping branches, sewing tiny leaves, and embroidering the expressive face for a delightful finished piece. Perfect for gifting or keeping as a unique handmade accent.

Intermediate 5-7 Hours

Materials Needed for Jack in Love Amigurumi Pattern

— Main Fabric

  • 01
    Sport weight yarn (Fine yarn) or 8/4 cotton+acrylic (fine weight) for main parts
  • 02
    White yarn (approx. 20g) - Alize Cotton Gold or similar (pot)
  • 03
    Black yarn (approx. 15g) - Yarn Art Jeans #53 (bottom of base, soil, eyes, mouth, nose)
  • 04
    Brown yarn (approx. 10g) - Yarn Art Jeans #40 (tree and branches)
  • 05
    Green yarn (approx. 5g) - Yarn Art Jeans #82 (leaves)
  • 06
    Alternative: Fingering (super fine) 100% cotton for tighter stitches and smaller finished size

— Tools Required

  • 01
    Crochet hook suitable for your yarn (pattern sample uses 2 mm Clover Amour; corresponds to about 1.75 mm regular hook)
  • 02
    Optional crochet hook 2.25 mm used in testing sample
  • 03
    Scissors
  • 04
    Tapestry needle for sewing and weaving ends
  • 05
    Pins for positioning pieces
  • 06
    Stitch marker (or piece of yarn)
  • 07
    Polyester fiberfill stuffing
  • 08
    Stuffing tool (wooden skewers and tweezers recommended)
  • 09
    Wire 2 mm (approximately 60 cm total; copper recommended)
  • 10
    A piece of plastic to make the bottom steady (e.g., lid of a plastic container)

Progress Tracker

0% Complete

— Abbreviations & Notes :

Info :

This pattern uses US terminology. All parts are worked in continuous spirals (without slip stitch and ch), unless noted otherwise. To keep track of the rounds use a stitch marker. I crochet using semi-X stitches: Insert the hook into the stitch. Yarn under (place the crochet hook over the yarn). Pull through. Yarn over. Pull through 2 loops on the hook.

— Base :

Round 1 :

6 sc in a MR (6)

Round 2 :

6 inc (12)

Round 3 :

(inc, 1 sc) * 6 (18)

Round 4 :

(inc, 2 sc) * 6 (24)

Round 5 :

(inc, 3 sc) * 6 (30)

Round 6 :

2 sc, (inc, 4 sc) * 5, inc, 2 sc (36)

Round 7 :

(inc, 5 sc) * 6 (42)

Round 8 :

3 sc, (inc, 6 sc) * 5, inc, 3 sc (48)

Round 9 :

(inc, 7 sc) * 6 (54)

Round 10 :

4 sc, (inc, 8 sc) * 5, inc, 4 sc (60)

Info :

Change to white color (fasten off black yarn).

Round 11 :

BLO (p.8) 60 sc (60)

Round 12 :

(inc, 9 sc) * 6 (66)

Round 13 :

66 sc (66)

Round 14 :

5 sc, (inc, 10 sc) *5, inc, 5 sc (72)

Round 15 :

72 sc (72)

Round 16 :

(inc, 11 sc) * 6 (78)

Round 17-21 :

(5 rows) 78 sc (78)

Round 22 :

(dec, 11 sc) * 6 (72)

Round 23-25 :

(3 rows) 72 sc (72)

Round 26 :

5 sc, (dec, 10 sc) * 5, dec, 5 sc (66)

Round 27-30 :

(4 rows) 66 sc (66)

Info :

Cut out a piece of plastic to fit the bottom (it will help to make the base steady) and put it inside the base (as shown in the p.9). If your plastic is too flexible, cut out 2 or 3 pieces and put them together.

Round 31 :

FLO 66 sc (p.10) (66)

Round 32 :

66 sc (p.11) (66)

Info :

Cut the yarn off leaving a tail 15-20 cm to weave in the end. Use the "straight edge" method (see the next page for instructions).

Info :

Straight edge method: Skip one stitch and insert the needle into the 2nd one (p.12), pull it out. Insert the needle into the last stitch of the round (between the front and the back loop of the stitch) (p.13). Pull the needle out, tighten the thread, weave in the end (p.14).

— Top (Soil) :

Info :

Attach black yarn to the back loop of 30th round (p.15). Make regular decreases in the next round instead of invisible ones: pull a loop through one stitch, pull a loop through the next stitch (p.16), yarn over, pull through 3 loops on the hook (p.17).

Round 1 :

(dec, 9 sc) * 6 (60)

Round 2 :

4 sc, (dec, 8 sc) * 5, dec, 4 sc (54)

Round 3 :

(dec, 7 sc) * 6 (48)

Round 4 :

(dec, 6 sc) * 6 (42)

Round 5 :

(dec, 5 sc) * 6 (36)

Round 6 :

(dec, 4 sc) * 6 (30)

Info :

Stuff the base firmly.

Round 7 :

(dec, 3 sc) * 6 (24)

Info :

Change to brown color (fasten off black yarn).

Round 8 :

FLO 24 sc (24)

Round 9 :

(dec, 2 sc) * 6 (18)

Round 10-11 :

(2 rounds) 18 sc (18)

Round 12 :

(dec, 1 sc) * 6 (12)

Round 13-16 :

(4 rounds) 12 sc (12)

Info :

Stuff the stem. From the next round, we will start to make branches.

Round 17 :

6 sc, ch 2 (8)

Info :

Continue crocheting the next round starting from the 1st stitch of the previous round (p.20). Mark the 2nd of 2 chains (p.21 - red loop), we will need it while crocheting the second branch.

Round 18 :

6 sc, 2 sc along the chain, make sure to crochet only into BLO of the chain (p.21 - white loops), as we will need the front loops (red and yellow) to crochet the second branch (p.22).

Round 19-27 :

(9 rounds) 8 sc (8)

Round 28 :

dec, 6 (7)

Round 29-32 :

(4 rounds) 7 sc (7)

Round 33 :

dec, 5 (6)

Round 34-43 :

(10 rounds) 6 sc (6)

Info :

Measure how much wire you will need, it should be inserted into the branch and about half of the body (p.23), cut 2 such pieces. Bend the bottom and top parts (p.24), insert the wire (p.25).

Info :

Cut the yarn off leaving a 15 cm tail for closing the opening. Insert the yarn tail into a needle, go under the front loops of all 6 sc (p.26), tighten the thread and weave in the yarn end (p.27).

Info :

Crochet the 2nd branch. Attach yarn to the marked loop of 17th round (p.28), leave 10-15 cm yarn tail, we will need it later.

Round 17 (2nd branch) :

2 sc along the chain, 6 sc (p.29) (8)

Round 18 (2nd branch) :

8 sc (8)

Info :

Repeat rounds 19-43 of the first branch. Insert the 2nd piece of wire into the 2nd branch. Cut the yarn off and close the opening. If there is a hole left between two branches, sew it using the yarn tail left from starting the 2nd branch (p.30,31). Bend the branches to form a heart (p.32,33).

— Leaves :

Info :

Separate leaves (make 4). Ch 4, turn, work from the 2nd ch from hook (p.34 - white loop).

Leaf 1 :

1 sc, 2 hdc in 1 loop, 1 sc, ch 2, sl st into the 2nd ch from hook (p.35,36), continue on the other side of the chain: 1 sc, 2 hdc in 1 loop, 1 sc, sl st into the 1st stitch of the row (p.37,38).

Info :

Cut the yarn off leaving 10-15 cm for sewing.

Info :

Leaves on branches (make 4): Crochet the leaves in the same way, but make the last sl st with brown yarn (p.39,40). Ch 5, attach it to the tree with a sl st (p.41,42).

Info :

Weave in the ends. Sew the leaves on the branches randomly (p.48). You may attach some small branches on the inner side of the tree, and then sew the leaf to the outer side (p.45-47).

Info :

Make a few small branches without leaves: attach brown yarn to the tree (p.49), ch 6 starting from the 2nd ch from the hook (p.50): 5 sl st, sl st to the same place from where the ch begins (p.51). Cut the yarn off and weave in the ends. If the branch looks down, make a few stitches to make it look up (p.52).

— Eyes :

Info :

Work with black yarn. Eyes will be worked in rows with a turning ch. Ch 2, turn, work from the 2nd ch from hook:

Round 1 :

3 sc in 1 stitch (p.54), ch 1, turn (3)

Round 2 :

inc, 1 sc, inc (p.55), ch 1, turn (5)

Round 3 :

inc, 3 sc, inc, ch 1, turn (7)

Round 4 :

inc, 5 sc, inc, ch 1, turn (p.56) (9)

Round 5 :

Skip 2 stitches, crochet into the 3rd stitch (p.56): (1 hdc, 2 dc, 2 tr, 2 dc, 1 hdc) (p.57), sl st into the next stitch, skip 2 stitches, crochet into the 3rd stitch: (1 hdc, 2 dc, 2 tr, 2 dc, 1 hdc)

Info :

Continue crocheting around the heart (p.59,60): 3 sc on the side part, 3 sc into the base ch, 3 sc on the side part.

Info :

Cut the yarn off leaving 40-50 cm. Weave in the end using the "straight edge" method, but in this case do not skip any stitches, insert the needle into the 1st stitch of the row. Do not cut off the yarn; we will need it to sew the eyes to the base.

— Assembling :

Info :

Pin the eyes between rounds 15 and 25 (if you count from the 1st white round, the eyes will be between the 8th and 18th rounds); the shortest distance between eyes is 6 stitches (on the 14th round) (p.61).

Info :

Make sure that the middle part of the tree (the place where the branches are divided) corresponds with the middle part of the face.

Info :

Sew them around using an invisible stitch: grab a stitch on the head (p.62), insert the needle into a stitch on the eye (from the inner side - p.63), insert it back into the next stitch on the eye (from the outer side - p.64). Sew the eyes around and weave in the end.

Info :

Cut a piece of yarn (approximately 10 cm) and pin it to create a guideline for embroidering the mouth (as shown in the p.65). Embroider the mouth with black yarn; you will need 50-60 cm for the mouth and nose. If your yarn looks thin, you may use 2 threads for embroidery. Thread a needle and embroider the mouth following this guideline using running stitch (p.66,67).

Info :

Cover the blank spaces left with vertical stitches (p.68-70). Don't cut the yarn off; continue to embroider the nose. Mark the points where the nose should be (if you count from the 1st white row, the nose will be between 6th and 8th rounds). The distance between the upper points is 1 stitch and between the lower points is 5 stitches (p.71).

Info :

Embroider the nose making 3 stitches for each nostril (p.71-74). Weave in the yarn end.

— Final :

Info :

Weave in all ends, arrange branches and leaves as you prefer, and adjust wire to hold the heart shape. Your Jack in Love is ready!

Assembly Instructions

  • Pin the eyes between rounds 15 and 25 (counting from the 1st white round the eyes will be between the 8th and 18th rounds); position them so the shortest distance between them is 6 stitches on the 14th round, then sew in place with an invisible stitch.
  • Align the middle part of the tree (where branches divide) with the middle part of the face before securing the tree into the soil; insert and anchor the wired branch bottoms into the top opening and sew or tack the stem securely.
  • Insert 2 mm wire pieces into each branch before closing the branch tops; bend and shape the branches into a heart, then sew any gap between the two branches using the tail left from starting the 2nd branch.
  • Sew the leaves to the branches randomly using the 10-15 cm yarn tails; attach some leaves on inner side of branch and then sew leaf to outer side for secure positioning.
  • Embroider the mouth using a pinned guideline and running stitch, using approximately 50-60 cm of black yarn for mouth and nose; cover blank spaces with vertical stitches and weave in ends.
  • Place the plastic disk(s) in the base before closing round 31-32 to stabilize the pot and ensure the toy stands evenly.

Important Notes

  • 💡All parts are worked in continuous spirals unless stated otherwise—use a stitch marker to mark the first stitch of each round.
  • 💡Stuff firmly but gradually to maintain smooth shape and prevent lumps; use a stuffing tool to get filler into narrow necks and branches.
  • 💡Use copper wire for branches if possible as it is stable and bends easily; cut two equal pieces and insert before final closing.
  • 💡When changing colors, fasten off and weave ends securely or use the second-half color change technique described in the color change note for neater transitions.

This Jack in Love amigurumi is a charming handmade accent that brightens any shelf or desk. Its heart-shaped tree and embroidered skull pot are perfect for gifts or seasonal decor. Create it in different yarns and sizes for unique results and lots of handmade joy. 🧶💕

You ask,

we answer.

FAQs

What size will the finished piece be?

Using the recommended yarn and a 2 mm hook the toy will be approximately 15 cm (6 inches) tall; samples made with different yarn and hooks measured 16 cm and 27 cm tall.

Can I use different yarn weights for this pattern?

Yes, you can use different yarn weights but this will affect the final size and tension; choose an appropriate hook size and test gauge to ensure desired results.

Do I need prior crochet experience for this pattern?

This pattern is rated intermediate—basic knowledge of single crochet, increases, decreases, working in BLO/FLO, and simple shaping is recommended for best results.

How long does this project typically take to complete?

Most crocheters complete this project in about 5-7 hours, depending on experience, speed, and whether you make additional leaves or embellishments.

Is wire necessary for the branches?

Wire is recommended (2 mm) to shape and stabilize the heart-shaped branches; you can omit it for a floppy look but wiring helps achieve the signature heart shape.

How do I secure the plastic base insert?

Cut a plastic disk to fit the base, insert before finishing rounds 31-32 and center it inside the base; use multiple layers if the plastic is too flexible to create a steady bottom.