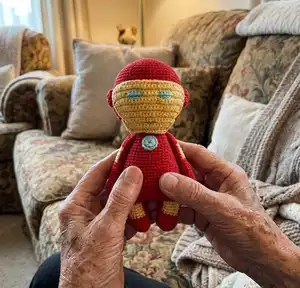
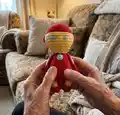
Make a charming Iron Man amigurumi with clear, photo-guided steps and full round-by-round instructions. This pattern walks you through crocheting the head, body, limbs, helmet and decorations so you can create a detailed collectible. Perfect for crafters who love small character projects and careful finishing work. The finished toy measures about 17 cm tall and includes tips for eyes, sewing and embellishments.
Progress Tracker
0% Complete
— Head :
Info :
Start to crochet with the flesh thread, stuff tightly in the course of crocheting.
Round 3 :
(1 sc, inc)*6 (18)
Round 4 :
1 sc, inc, (2 sc, inc)*5, 1 sc (24)
Round 5 :
(3 sc, inc)*6 (30)
Round 6 :
2 sc, inc, (4 sc, inc)*5, 2 sc (36)
Round 7 :
(5 sc, inc)*6 (42)
Round 8 :
3 sc, inc, (6 sc, inc)*5, 3 sc (48)
Round 9 :
(7 sc, inc)*6 (54)
Round 10 :
4 sc, inc, (8 sc, inc)*5, 4 sc (60)
Round 11 :
(9 sc, inc)*6 (66)
Round 12-22 :
66 sc (11 rows)
Info :
If you want to insert the eyes with stalks, it's time to insert them. I recommend to insert the eyes between 18th and 19th rows, the space between them is 10 sc.
Round 23 :
(9 sc, dec)*6 (60)
Round 24 :
4 sc, dec, (8 sc, dec)*5, 4 sc (54)
Round 25 :
(7 sc, dec)*6 (48)
Round 26 :
3 sc, dec, (6 sc, dec)*5, 3 sc (42)
Round 27 :
(5 sc, dec)*6 (36)
Round 28 :
2 sc, dec, (4 sc, dec)*5, 2 sc (30)
Round 29 :
(3 sc, dec)*6 (24)
Round 30 :
1 sc, dec, (2 sc, dec)*5, 1 sc (18)
Round 31 :
(1 sc, dec)*6 (12)
Info :
Cut a thread, tighten the opening, hide the end of a thread in the detail.
— Legs (2 details) :
Info :
Start to crochet with the red thread. Crochet the right and left legs up to the 9th row in the same way according to the scheme:
Round 3 :
(1 sc, inc)*6 (18)
Round 4-8 :
18 sc (5 rows)
Item Name (P1) :
RIGHT LEG (looking at the back of the head) 9-12 rnd: 1 sc with the red thread, 6 sc with the yellow thread, 11 sc with the red thread (4 rows). Don't cut the yellow thread, cut the red thread, fasten off.
Item Name (P1) :
LEFT LEG (looking at the back of the head) 9-12 rnd: 10 sc with the red thread, 6 sc with the yellow thread, 2 sc with the red thread (4 rows). Don't cut either the red or yellow threads.
— Body :
Info :
Start to connect the legs. To do this make chain 6 ch from the second leg and insert the hook in the first loop of the first leg and crochet according to the scheme:
Round 1 :
On the right leg (looking at the back of the head): 1 sc with the red thread, 6 sc with the yellow thread, 11 sc with the red thread
Round 1 :
On the chain: 6 sc with the red thread
Round 1 :
On the left thread (looking at the back of the head): 10 sc with the red thread, 6 sc with the yellow thread, 2 sc with the red thread
Round 1 :
On the other side of the chain: 10 sc with the red thread, 6 sc with the yellow thread, 2 sc with the red thread
Info :
We should have 48 sc in this row. Cut the yellow threads, fasten off. Stuff the legs and continue to crochet the body. Stuff the detail tightly in the course of crocheting.
Round 2 :
(7 sc, inc)*6 (54)
Round 3-11 :
54 sc (9 rows)
Round 12 :
(7 sc, dec)*6 (48)
Round 13-15 :
48 sc (3 rows)
Round 16 :
3 sc, dec, (6 sc, dec)*5, 3 sc (42)
Round 17-19 :
42 sc (3 rows)
Info :
Crochet additional 12 sc to move the beginning of the row back. Cut the thread, leaving a long end for sewing.
Round 20 :
(5 sc, dec)*6 (36)
Round 21-23 :
36 sc (3 rows)
Round 24 :
2 sc, dec, (4 sc, dec)*5, 2 sc (30)
Round 25-26 :
30 sc (2 rows)
Round 27 :
(3 sc, dec)*6 (24)
— Arms (2 details) :
Info :
Start to crochet with the red thread, stuff not tightly up the 10th row.
Round 3-13 :
10 sc (10 rows)
Round 14-18 :
4 sc with the yellow thread, 6 sc with the red thread (5 rows)
Info :
Cut the yellow thread, fasten off.
Round 19-21 :
10 sc (3 rows)
Round 22 :
(3 sc, dec)*2 (8)
Info :
Fold the detail in half and connect the edges by 4 sc. Cut a thread, leaving along end for sewing.
— Helmet :
Info :
Crochet with the red thread. I recommend crocheting the helmet less tightly than the head or using a larger hook.
Round 3 :
(1 sc, inc)*6 (18)
Round 4 :
1 sc, inc, (2 sc, inc)*5, 1 sc (24)
Round 5 :
(3 sc, inc)*6 (30)
Round 6 :
2 sc, inc, (4 sc, inc)*5, 2 sc (36)
Round 7 :
(5 sc, inc)*6 (42)
Round 8 :
3 sc, inc, (6 sc, inc)*5, 3 sc (48)
Round 9 :
(7 sc, inc)*6 (54)
Round 10 :
4 sc, inc, (8 sc, inc)*5, 4 sc (60)
Round 11 :
(9 sc, inc)*6 (66)
Round 12-17 :
66 sc (6 rows)
Info :
Cut the thread, fasten off.
Info :
Attach the red thread to the 46th loop of the last helmet's row and crochet 42 sc. This will be the 18th row, turn the crocheting and further crochet in back-and-forth rows.
Round 19-22 :
1 ch, 42 sc, turn the crocheting (4 rows)
Round 23 :
1 ch, 6 sc, dec, (12 sc, dec)*2, 6 sc, turn the crocheting (39)
Round 24 :
1 ch, (11 sc, dec)*3, turn the crocheting (36)
Round 25 :
1 ch, 5 sc, dec, (10 sc, dec)*2, 5 sc, turn the crocheting (33)
Round 26 :
1 ch, (dec, 9 sc)*3, turn the crocheting (30)
Round 27 :
1 ch, 4 sc, dec, (8 sc, dec)*2, 4 sc, turn the crocheting (27)
Round 28 :
1 ch, (7 sc, dec)*3, turn the crocheting (24)
Round 29 :
1 ch, 3 sc, dec, (6 sc, dec)*2, 3 sc, turn the crocheting (21)
Round 30 :
1 ch, (dec, 5 sc)*3, turn the crocheting (18)
Info :
Cut the thread, leaving a long end for sewing.
— Ears (2 details) :
Info :
Crochet with the red thread, don't stuff.
Round 3-4 :
12 sc (2 rows)
Info :
Cut the thread, tighten the opening, hide the end of the thread.
— Yellow Part Of The Helmet :
Info :
Crochet with the yellow thread in back-and-forth rows. Make chain 12 ch and crochet according to the scheme:
Round 1 :
1 ch, 12 sc, turn the crocheting
Round 2 :
1 ch, (3 sc, inc)*3, turn the crocheting (15)
Round 3 :
1 ch, 15 sc, turn the crocheting
Round 4 :
1 ch, 2 sc, inc, (4 sc, inc)*2, 2 sc, turn the crocheting (18)
Round 5 :
1 ch, 18 sc, turn the crocheting
Round 6 :
1 ch, (inc, 5 sc)*3, turn the crocheting (21)
Round 7 :
1 ch, 21 sc, turn the crocheting
Round 8 :
1 ch, 3 sc, inc, (6 sc, inc)*2, 3 sc, turn the crocheting (24)
Round 9 :
1 ch, 24 sc, turn the crocheting
Round 10 :
1 ch, (7 sc, inc)*3, turn the crocheting (27)
Round 11-12 :
1 ch, 6 sc with the yellow thread, 5 sc with the light blue thread, 5 sc with the yellow thread, 5 sc with the light blue thread, 6 sc with the yellow thread (2 rows)
Round 13-14 :
1 ch, 27 sc, turn the crocheting
Info :
Crochet 1 row of sc around the perimeter of the detail, crochet one increase in the corners. Cut the thread, fasten off.
Info :
Now need to crochet the strap on which the part will hold. To do this insert the hook on the side between the 5th and 6th rows as it's shown at the photo and make chain 15 ch with the red thread. Further make 1 sl st in the corner loop of the detail (look at the photo). Cut the thread, fasten off, hide the end.
Info :
Make the 2nd strap in the same way. Insert the hook in the corner loop on the other detail's side and make chain 15 ch with the red thread. Further make 1 sl st between the 5th and 6th rows. Cut the thread, fasten off, hide the end of the thread.
Info :
Embroider the mouth with the black sewing thread (2 threads).
— Assembly and Decorations :
Info :
Sew the head to the body. In the course of sewing stuff the neck very tightly, so as the head doesn't dangle because of its heaviness.
Info :
If you haven't used the eyes with stalks, it's time to glue them. I use eyes with stalks, but glue them. I like it better this way, because the plug doesn't interfere with the design of the face in the future, and a thread "doesn't run" under the glued eye.
Info :
Firstly mark the points 1 and 2 between the 18th and 19th rows of the head (the space between points is 10 sc). Now take a thick knitting needle or something similar (I use knitting needle No5.5 (5.5 mm)) and start to gradually expand the crocheted fabric at these points.
Info :
Now take glue and drip inside the resulting hole. Also, lubricate the inner surface of the eye with glue. Insert the eyes there and press on them, wait a couple of minutes.
Info :
Embroider the whites of the eyes with a white thread (I use whole thread Yarn Art Jeans). Embroider the nose with a flesh thread (I use a whole thread Alize Cotton Gold, the same as when crocheting the head) between the 20th and 21st rows of the head, the width of the nose is 3 sc. Embroider the mouth and brows with a black sewing thread (2 threads). Embroider the cheeks with a red thread (I use a thread Alize Cotton Gold, 2 threads of 4) between the 21st and 22nd rows, the width of the cheek is 2 sc.
Info :
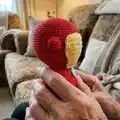
Sew the helmet. I recommend you firstly mark with pins where the edges of the helmet should be located. Sew the bottom of the helmet After that, sew the mask along the entire inner border in the same way.
Info :
Before sewing the arms, need to make lasers (2 details) with the light blue thread. To do this, crochet 1 ch, 8 sc in MR, sl st to join in the end. Tighten the ring, cut the thread, leaving a long end for sewing. Sew the lasers on the inside of the arms as it's shown at the photo.
Info :
Sew the arms between the 26th and 27th rows of the body (I recommend to steam off them).
Info :
Sew the "ears" on the sides symmetrically to each other as it's shown at the photo. Now can put on the yellow part of the helmet.
Info :
It's left to make the big laser on the chest. To do this, crochet 2 ch, 12 hdc in MR, sl st to join in the end. Tighten the ring, cut the thread, leaving a long end for sewing. Sew the laser to the chest as it's shown at the photo.
This Iron Man amigurumi pattern is a delightful small collectible with a removable helmet and tiny laser details. It combines clear round-by-round instructions with helpful photos so you can assemble and finish with confidence. Perfect as a gift or shelf companion for Marvel-loving crafters! 🧶🤖