🧢 Beautiful ✨ Detailed πŸ’ Adorable

Infinity Cube Amigurumi Pattern

Infinity Cube Amigurumi Pattern
4.0β˜… Rating
5-7 Hours Time Needed
2.1K Made This
βœ‚οΈ

Intermediate Level

Ideal for those with basic crochet experience, featuring slightly more advanced stitches and techniques to expand your skills.

⏱️

Weekend Treat

Takes 5-7 hours, making it an enjoyable project to finish over a couple of days.

🎁

Tiny Treasure

Small, sweet, and gift-worthy creations that fit perfectly in the palm of your hand with detailed charm.

About This Infinity Cube Amigurumi Pattern

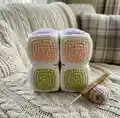
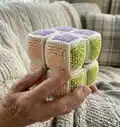
This pattern teaches you to crochet colorful squares and join them into soft, twistable Infinity Cubes. You will make 48 squares in six colors and edge them in white to form eight small cubes. The design focuses on simple shaping, neat seams and an assembly method that creates a dynamic fidget toy.

Infinity Cube Amigurumi Pattern crochet pattern - detailed view of completed project

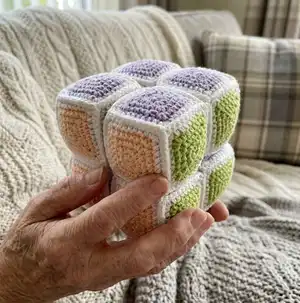
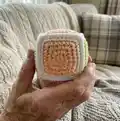
Clear rounds and photo instructions guide you through each step from squares to finished toy. The finished cube measures approximately 10 cm using the suggested materials.

Why You'll Love This Infinity Cube Amigurumi Pattern

I absolutely love this pattern because it transforms basic crochet squares into a clever, tactile fidget toy that is both playful and soothing. I enjoy how the color combinations bring personality to each cube and how the simple assembly creates surprising movement. The pattern is satisfying to make from start to finishβ€”you see progress quickly as you complete each square and cube. I find it a wonderful gift idea for kids or adults who appreciate handmade sensory toys, and I love that you can customize it endlessly.

Infinity Cube Amigurumi Pattern step 1 - construction progress Infinity Cube Amigurumi Pattern step 2 - assembly progress Infinity Cube Amigurumi Pattern step 3 - details and accessories Infinity Cube Amigurumi Pattern step 4 - final assembly and finishing

Switch Things Up

I love how many ways you can customize this Infinity Cube: change the color palette to match a nursery, use bright primary colors for kids, or go monochrome for a stylish adult fidget toy.

If you want a larger or smaller cube, switch yarn weight and hook sizeβ€”use bulky yarn with a larger hook for a chunky version or fine cotton with a small hook for mini keychain cubes.

I often add embroidered symbols or small appliques to the center square for personalization, like initials, stars or hearts to make each cube unique.

Try altering the texture by substituting some rounds with half double crochet (hdc) or front loop only (FLO) rows to create contrasting ridges that feel nice to touch.

For an extra tactile experience, insert a small bell or rattle before final closing to make a sensory version for babies or toddlers, ensuring the item is age-appropriate and safely enclosed.

Want a more durable toy? Use mercerized cotton and tighter tension, and reinforce seams with an extra pass of stitching along join lines to withstand heavy handling.

I sometimes make a set of three cubes in coordinating colors and attach them with a removable clip so they can be played with together or separated as single fidgets.

Consider using variegated yarn for the colored squares so each face has a different shading, creating a subtle, fascinating look when you twist the cube.

Embellish with small felt shapes sewn onto faces after assembly for a soft contrast, or add a contrast border instead of white to change the visual emphasis.

If you enjoy mixed-media, try inserting thin flexible wire inside seams before final closing to add a slight poseable quality, but ensure ends are well secured and padded inside the stuffing.

Common Mistakes & How to Fix Them

βœ— Skipping the chain (ch) counted as a stitch when counting rows leads to wrong stitch totals; always count the turning chain as instructed when tallying stitches. βœ— Overstuffing the cube causes the sides to bulge and deform the shape; fill the cube lightly and shape it by hand after assembly to keep neat edges. βœ— Failing to secure and hide thread tails leaves bulky seams and loose ends; fasten off carefully and hide ends inside the cube using a yarn needle. βœ— Rushing corner joins without using the additional slip stitch makes the corner look rounded; when joining, make the extra sl st through the corner sc to sharpen each corner. βœ— Not aligning color faces consistently when assembling parts will produce mismatch in the final toy; follow the assembly photos and orientation notes to keep faces directed the same way.

Infinity Cube Amigurumi Pattern

Make a tactile Infinity Cube fidget toy with this step-by-step crochet pattern. You will create 48 colorful squares and assemble them into eight soft, twistable cubes that fit in your hand. The pattern uses simple stitches and clear photos to guide you through shaping and assembly. Perfect for gifting or stress relief, this project combines bright colors and soft texture for a playful finished piece.

Intermediate 5-7 Hours

Materials Needed for Infinity Cube Amigurumi Pattern

β€” Main Fabric

  • 01
    YarnArt Jeans 75 (blue) - approximate small skein for one color
  • 02
    YarnArt Jeans 72 (purple) - approximate small skein for one color
  • 03
    YarnArt Jeans 53 (light green) - approximate small skein for one color
  • 04
    YarnArt Jeans 23 (carrot) - approximate small skein for one color
  • 05
    YarnArt Jeans 88 (yellow) - approximate small skein for one color
  • 06
    YarnArt Jeans 73 (peach) - approximate small skein for one color
  • 07
    Alize Cotton Gold 55 (white) - for edging and joining (enough to edge 48 squares and join cubes)

β€” Tools Required

  • 01
    Crochet hook No 2
  • 02
    Holofiber filler
  • 03
    Sewing needle / yarn needle
  • 04
    Scissors
  • 05
    Optional: pins for positioning pieces during assembly
  • 06
    Optional: iron or steamer for final shaping

Progress Tracker

0% Complete

β€” Square :

Info :

Note! Inc3 - (1 sc, 1 hdc, 1 sc)*in one stitch. All inc3 are in the corners of the square. In the last row (when you work along the edge of the square with white yarn): inc3 - 3 sc in one stitch. Make 8 squares of each color. In total, you should have 48 squares.

Round 1 :

7 sc in ar, sl st, ch (8)

Round 2 :

inc3 in the next stitch (count ch as sc when you count stitches in the rows), (sc, inc3)*3, sl st in ch of the beginning of the row, ch (16)

Round 3 :

inc3 in the next stitch, (3 sc, inc3)*3, 2 sc, sl st in ch of the beginning of the row, ch (24)

Round 4 :

inc3 in the next stitch, (5 sc, inc3)*3, 4 sc, sl st in ch of the beginning of the row (32)

Info :

Fasten off, cut the thread. Hide the end of the thread when you work along the edge of the square with white yarn.

Round 5 :

Attach a white thread to any of the sides of the square and work along the edge of the square with sc, make inc3 in the corners of the square (3 sc (!) in one stitch). Finish with a needle (see photo) and fasten the thread from the inside. As a result - on the sides of the square you should have (7 sc + 3sc (on the tops))*4 (40)

β€” Cube making :

Info :

Now you need to make 8 cubes. Work with sc to connect two squares. When you work in the corners that have already been connected, make addition sl st through sc in the corner to "sharp" the corner. Fasten the thread tails and hide them inside of the cube.

Info :

Cube making scheme: follow the diagram to place colors: center row (purple, carrot, blue) with light green to left and peach on top and yellow below as shown in the pattern photo.

Info :

Making sl st in the corner: when joining, make a slip stitch through the corner sc to keep the corner pointed and neat (refer to the photos in the pattern).

β€” Attaching the yarn and filling :

Info :

Attach the yarn to the corner by inserting the hook and starting the sc along the edge. Continue joining squares with sc until the cube is formed.

Info :

When you have one side left open, fill the cube with holofiber. Do not fill tightly (this is important!!!) in order not to deform the cube. After the cube is assembled, give the part the correct shape with your hands.

β€” Cubes connection :

Info :

Make 2 parts, each of them has 4 cubes.

Part 1 :

Assemble 4 cubes as shown in the photo. The faces of the same color of all the cubes are directed in the same direction (the photo is signed in which direction and which color). The places where the cubes are sewed together are shown by dashes and arrows. Sew with simple seam "stitch to stitch" in sc of the white yarn row.

Info :

*purple - from above *blue - from below

Part 2 :

Assemble the second set of 4 cubes in the same manner, keeping the faces of the same color directed in the same direction as in part 1 (refer to assembly photos for orientation and seams).

Info :

Now, assemble part 1 and part 2, as in the photo below. The side faces of the same color of all the cubes are directed in the same direction (in the photo it is signed, in which direction which color). The color of the upper and lower faces is the same. At this stage, we do not sew anything.

Info :

At the final stage, we need to turn the toy 180' (two parts at the same time) so that the upper faces are at the bottom. Check the photo below. Sew in places marked with a stroke.

β€” Finishing and shaping :

Info :

Your cube is almost ready! Now, to make your cube more dynamic, I advise you to steam it with an iron.

Info :

Pass the iron along all the faces, giving the cube the correct shape (do not press the iron too much, it can deform the side faces). Pay special attention to the seams between the cubes, apply steam to them several times to make them soft, to make easy to play with the cube.

Info :

Done! Now you can twist it, fold it, turn it! And also - develop imagination, fine motor skills, study colors and shapes with your child. Or just get away from the outside world and calm down. I hope you enjoyed the process of creating this mysterious toy! Happy crocheting!

Assembly Instructions

  • Edge each colored square with white yarn and secure ends inside before joining to keep a clean edge and consistent stitch count on each side.
  • Join squares with single crochet (sc) along the edges to form cube faces, making an extra slip stitch through corner sc to sharpen corners and keeping seams neat.
  • When one side of a cube remains open, lightly stuff the cube with holofiberβ€”do not overfillβ€”to avoid deforming the cube; shape by hand after assembly.
  • Create two parts of four cubes each, aligning faces of the same color in the same direction, then join the two parts and sew in places marked in the photos to complete the toy.
  • Sew seams using a simple stitch-to-stitch seam in the white sc row for a secure, clean connection between cubes.
  • After assembly, lightly steam the faces and seams with an iron (use steam, do not press hard) to refine shape and soften seams for smooth movement.

Important Notes

  • πŸ’‘Use the turning chain (ch) as counted stitches where indicated so your stitch counts match the pattern exactly.
  • πŸ’‘Do not overstuff the cubes; filling too tightly will distort the cube shape and make seams bulky.
  • πŸ’‘Hide and secure all thread tails inside the cube after joining to keep a neat finish and prevent unraveling.
  • πŸ’‘Follow the photo orientation carefully when assembling parts so faces of the same color are directed consistently for correct final movement.

This Infinity Cube pattern is a playful fidget toy perfect for gifting or quiet moments of focus. 🧢 Create colorful, twistable cubes with soft seams and tactile motion for hands-on fun. ✨ Enjoy customizing colors and sharing this cozy little handmade treasure with someone special. 🧡

You ask,

we answer.

FAQs

What size will the finished piece be?

The finished infinity cube measures approximately 10 cm across when finished with the recommended yarn and hook size.

Can I use different yarn weights for this pattern?

Yes, you can use different yarn weights, but this will change the final size and the recommended hook. Adjust stuffing and tension accordingly for best results.

Do I need prior crochet experience for this pattern?

This pattern is rated intermediate, so basic knowledge of single crochet, half double crochet, increases, and joining techniques is recommended.

How long does this project typically take to complete?

Most crocheters complete this project in 5-7 hours, though time may vary depending on experience, color changes, and assembly speed.