🧢 Beautiful ✨ Detailed πŸ’ Adorable

Indigo Coat Pattern

Indigo Coat Pattern
4.4β˜… Rating
12-15 Hours Time Needed
2.6K Made This
βœ‚οΈ

Intermediate Level

Ideal for those with basic crochet experience, featuring slightly more advanced stitches and techniques to expand your skills.

⏱️

Multi-Day Project

A rewarding 12+ hour journeyβ€”perfect for dedicated crafters who love detailed work.

πŸ§₯

Layered Comfort

Perfect for cozy, stylish layering through changing seasons with versatile, mix-and-match potential.

About This Indigo Coat Pattern

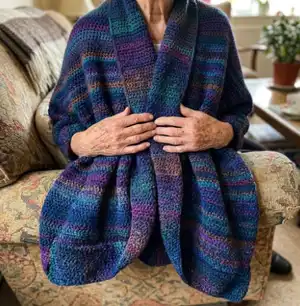
This pattern creates a one-size Indigo Coat worked in stocking stitch with a decorative garter stitch border band. It is designed for James C. Brett Marble DK yarn and features clear schematics for shaping and measurements. The coat offers an oversized, layered silhouette with deliberately placed twists at each corner of the border.

Indigo Coat Pattern crochet pattern - detailed view of completed project

Included are full instructions for Front Right, Front Left, Back panels and the long Border Band. Abbreviations and schematics are provided for easy reference while knitting.

Why You'll Love This Indigo Coat Pattern

I absolutely love this pattern because it transforms simple stocking stitch into a sophisticated, roomy coat that feels both modern and timeless. I enjoy how the long border band with corner twists gives the coat a distinctive finish without complicated stitches. The pattern is thoughtfully written with schematics and row counters so I can follow shaping precisely every step of the way. Making this coat lets me experiment with self-striping or variegated DK yarn to beautiful effect.

Indigo Coat Pattern step 1 - construction progress Indigo Coat Pattern step 2 - assembly progress Indigo Coat Pattern step 3 - details and accessories Indigo Coat Pattern step 4 - final assembly and finishing

Switch Things Up

I love experimenting with colourways for this coat; try substituting the Marble DK for a hand-dyed DK to get unique variegation and longer or shorter colour pooling effects.

To make the coat smaller or larger, adjust needle size and make a test swatch to calculate the new stitch counts for the panels and border band.

I often change the border band length to make a shorter open cardigan version; reduce the W to measurements proportionally and keep MK twist points at equivalent proportions.

Want pockets? I usually pick up stitches on the inside of the front panels and knit a small pocket rectangle, then seam it in before joining side seams.

Try substituting a solid DK for a more subtle, classic look, or contrast the border band colour for a bolder edge detail.

I sometimes add a narrow facing or lining to the border band for extra structure and warmth; hand-sew a lightweight lining to the inside after joining.

For added texture, replace part of the border band with a slipped-stitch or seed stitch panel while keeping the rest garter stitch, but maintain the MK twist points.

If you want more drape, use a slightly larger needle for the body while keeping the border band on the recommended needle to retain a crisp edge.

I like to add small embroidered motifs or subtle surface embroidery along the front left panel to personalize the coat once knitted and blocked.

For a more structured shoulder, pick up and knit a short provisional stitch band at the shoulder seams and graft them after blocking for a cleaner shoulder join.

Make a version with a collar by lengthening the border band at the center back and shaping a folded collar section; this adds warmth and a different silhouette.

If you prefer buttons, add buttonhole placement notes along one front edge before stitching the border band down so the buttonholes sit neatly within the band.

Common Mistakes & How to Fix Them

βœ— Skipping the recommended sample swatch can lead to incorrect sizing and improper drape; always knit a 10 cm square in stocking stitch and adjust needle size to match the gauge. βœ— Failing to mark corners and twist points when making the border band can cause misalignment at joins; use waste yarn markers (MK) exactly as instructed to match twists with coat corners. βœ— Ignoring row counters or failing to record row counts will make shaping inaccurate; use a row counter and note Rc numbers to follow armhole and shoulder shaping correctly. βœ— Joining the border band without twisting at the corners results in a floppy or uneven edge; when you reach each corner, twist the band over and continue the seam on the opposite side as directed. βœ— Uneven tension between stocking stitch body and garter border can cause pulling; maintain consistent tension and block gently if necessary to even out edges.

Indigo Coat Pattern

Create a drapey, designer-inspired Indigo Coat knit in a beautiful James C. Brett Marble DK yarn. This one-size pattern guides you through shaping, shoulder and armhole work, and a distinctive long border band with clear schematics. Youll enjoy a modern oversized silhouette that layers beautifully over everyday outfits. The pattern includes full abbreviations, schematics, and step-by-step instructions to make assembly and finishing straightforward.

Intermediate 12-15 Hours

Materials Needed for Indigo Coat Pattern

β€” Main Fabric

  • 01
    James C. Brett Marble DK, shade MT34 - total yarn used approximately 950g
  • 02
    DK weight yarn (pattern written for Marble DK - adjust if substituting yarn weight)
  • 03
    Gauge: Stocking stitch (StSt) 20.68 sts = 10 cms, 29.41 rows = 10 cms

β€” Tools Required

  • 01
    Knitting needles size 4.5mm
  • 02
    Waste yarn for MK (mark each end with waste yarn)
  • 03
    Row counter (Rc) or method to track row numbers
  • 04
    Measuring tape
  • 05
    Stitch markers
  • 06
    Tapestry/yarn needle for seaming and weaving in ends
  • 07
    Scissors
  • 08
    Pins for blocking and assembly

Progress Tracker

0% Complete

β€” Front Right :

Row 1 :

CO 75s

Row 2 :

W in Stst

Row 3 :

>1s L ev 5r x 19. Rc95. 56s

Row 4 :

<1s L rc98,99

Row 5 :

<5s L rc100

Row 6 :

<73s L rc102

Row 7 :

<16s L rc104

Row 8 :

<1s L rc107,112,118,124,129. 157s

Row 9 :

W to rc136

Row 10 :

>1 st L rc137

Row 11 :

*>5 sts L rc138. W 1 r

Row 12 :

>5 sts L rc140. W 1 r

Row 13 :

>6 sts L rc142. W 1 r*

Row 14 :

Rep last 6 rs from * to * x 5. Rc173

Info :

Shape neck and shoulder: On L rep from * to * twice more. Rc185

Info :

AT THE SAME TIME: On Rt **>1s Rt nx 3 rs >2s Rt nx r** Rep from ** to ** x2. Rc185. 13s

Row 15 :

>5 sts L Rc186

Row 16 :

>3 sts L Rc188

Row 17 :

COff rem 5 sts

β€” Front Left :

Row 1 :

CO 3 sts

Row 2 :

W in Stst

Row 3 :

W 1 r

Row 4 :

*<4s L nx r. W 1 r

Row 5 :

Rep last 2rs x 2

Row 6 :

<3s L nx r. W 1 r*. RC9

Row 7 :

Rep from * to * x 6. Rc57

Row 8 :

<4s L rc58,60

Info :

AT THE SAME TIME ON RT:

Row 9 :

>1s Rt ev 20r x 3. 113s

Row 10 :

Cont to >1s Rt ev 20r to rc160. 108s

Row 11 :

W 1 r

Info :

Shape armhole:

Row 12 :

<1s Rt Rc162

Row 13 :

<2s Rt Rc163

Row 14 :

<6s Rt Rc165

Row 15 :

<25s Rt Rc167

Row 16 :

<10s Rt Rc169. 152s

Row 17 :

<1 st Rt nx and ev 5r x 4. Rc190. 157s

Row 18 :

W to RC196

Info :

Shape shoulder:

Row 19 :

>3s Rt rc197. W 1 r

Row 20 :

>5s Rt nx r then ev 2r to rc251. 4s

Info :

AT THE SAME TIME ON L: W to rc236

Row 21 :

>1s L ev r x 15. Rc251. 4s

Row 22 :

COff rem 4s

β€” Back :

Row 1 :

CO 2 sts

Row 2 :

W in Stst

Row 3 :

W 2r

Row 4 :

*<6s Rt nx r. W 1 r

Row 5 :

Rep last 2rs x 3

Row 6 :

<7s Rt nx r. W 1 r*

Row 7 :

Rep from * to * x 5. Rc62

Row 8 :

<3s Rt rc63. 188s

Row 9 :

W 1 r

Info :

AT THE SAME TIME ON L: >1s L ev 20r to rc60

Row 10 :

Cont >1s L ev 20r to rc160

Info :

AT THE SAME TIME ON RT: >1s Rt rc65

Row 11 :

Then >1s Rt ev 5r x 18. Rc155

Row 12 :

W to rc160. 164s

Info :

Shape armholes:

Row 13 :

<1s Rt Rc161

Row 14 :

<3s L and 1s Rt Rc162

Row 15 :

<2s Rt Rc163

Row 16 :

<6s L Rc164

Row 17 :

<13s Rt Rc165

Row 18 :

<23s L Rc166

Row 19 :

<79s Rt Rc167

Row 20 :

<12s L Rc168. 304 sts

Row 21 :

<1s ee rc170 then ev 5r x 4. 314s

Row 22 :

W to rc197

Info :

Shape shoulders: >5s L rc198 then >5s L ev 2r to rc248 >8s L rc250. W 1 r

Row 23 :

AT THE SAME TIME: *>5s Rt rc201. W 1 r >5s Rt rc203.W 1 r >6s Rt rc205. W 1 r*

Row 24 :

Rep last 6 rs from * to * x 7. Rc248

Row 25 :

>5s Rt rc249,251

Row 26 :

COff rem 38s

β€” Border Band :

Info :

W in Gst

Row 1 :

CO 20s

Row 2 :

W to 72cm. MK for twist at bottom front right corner

Row 3 :

W to 108cm. MK for twist at bottom of side seam right

Row 4 :

W to 200cm. MK for twist at bottom of side seam left

Row 5 :

W to 255cm.MK for twist at bottom front left corner

Row 6 :

W to 327cm

Row 7 :

COff

Info :

Join the shoulders and the side seams of the coat.

Info :

Starting at the middle of the back of neck, stitch the border band to the main body of the coat, matching the MKs with the corners as indicated. When you reach each corner, twist the border band over and continue with the seam on the opposite side of the border band. This helps the border band sit flat with the coat at each corner. Finish by joining the border band at the middle of the back neck opening.

Assembly Instructions

  • Join the shoulders and side seams of the coat using mattress stitch or an invisible seam for a neat finish.
  • Starting at the middle of the back neck, stitch the border band to the main body of the coat, matching the MKs with the corners as indicated.
  • When you reach each corner of the coat, twist the border band over and continue with the seam on the opposite side of the border band so the band sits flat.
  • Finish by joining the border band ends at the middle of the back neck opening and neatly weave in all ends.
  • Pin the border band in place before stitching to ensure the MK twist markers align with the coat corners and prevent shifting during sewing.

Important Notes

  • πŸ’‘Always complete a sample swatch first to check stitch and row gauge and alter tension/needle size accordingly depending on your choice of yarn.
  • πŸ’‘Mark each end of the border band with waste yarn (MK) at the lengths specified to ensure twists align with the coat corners during joining.
  • πŸ’‘Use a row counter and note Rc numbers carefully to maintain accurate shaping for armholes, shoulders and neck.

This Indigo Coat pattern blends simple stocking stitch shaping with a dramatic long border band for a truly wearable designer piece. The pattern includes full schematics, row counters, and detailed joining notes to make assembly straightforward. Make one in Marble DK for beautiful variegated colour transitions. 🧢🧡

You ask,

we answer.

FAQs

What size will the finished piece be?

The pattern is written as One Size with schematics provided; finished measurements are shown in the schematics and will depend on your gauge and yarn choice.

Can I use different yarn weights for this pattern?

Yes, you can substitute yarn weights, but the final size and drape will change; adjust needle size and check gauge to achieve the intended measurements.

Do I need prior knitting experience for this pattern?

This pattern is rated intermediate; familiarity with stocking stitch, increasing/decreasing, casting on/off, and seaming is recommended.

How long does this project typically take to complete?

Most knitters complete this project in 12-15 hours spread over multiple sessions, depending on knitting speed and experience.

How do I match the border band twists to the coat corners?

Place MK markers at the specified border band lengths (72cm, 108cm, 200cm, 255cm) and match these to the coat corners when stitching the border to ensure correct twist placement.