🧢 Beautiful ✨ Detailed πŸ’ Adorable

Ice Cream Turtle Amigurumi Pattern

Ice Cream Turtle Amigurumi Pattern
4.7β˜… Rating
5-7 Hours Time Needed
3.1K Made This
βœ‚οΈ

Intermediate Level

Ideal for those with basic crochet experience, featuring slightly more advanced stitches and techniques to expand your skills.

⏱️

Weekend Treat

Takes 5-7 hours, making it an enjoyable project to finish over a couple of days.

🧸

Cute Companion

An adorable friend to cherish, handcrafted with love to bring comfort and joy for years to come.

About This Ice Cream Turtle Amigurumi Pattern

This pattern creates a plush Ice Cream Turtle amigurumi built from stacked ice cream scoops with a cone topper. You will work small rounds and use fluffy chenille-style yarns for a soft textured finish. The pattern includes clear rounds for legs, tail, head, shell/body and cone, plus assembly guidance.

Ice Cream Turtle Amigurumi Pattern crochet pattern - detailed view of completed project

Designed with bulky chenille yarn in mind, this plush toy has layered scoops and a removable-looking cone detail. Perfect for gifting, decor, or collecting colorful amigurumi companions.

Why You'll Love This Ice Cream Turtle Amigurumi Pattern

I absolutely love this pattern because it combines two of my favorite things: cute animals and sweet dessert themes. I enjoy how the chenille yarn creates a cozy, tactile finish that feels wonderful to hold. I love the simple shaping that produces a charming layered shell that looks like stacked ice cream scoops. I also enjoy the assembly step where the legs and tail are crocheted into the body β€” it makes positioning feel intuitive and secure. Making this pattern always brightens my craft table and makes for a delightful gift.

Ice Cream Turtle Amigurumi Pattern step 1 - construction progress Ice Cream Turtle Amigurumi Pattern step 2 - assembly progress Ice Cream Turtle Amigurumi Pattern step 3 - details and accessories Ice Cream Turtle Amigurumi Pattern step 4 - final assembly and finishing

Switch Things Up

I love customizing this pattern by changing the color palettes for each scoop; try pastels for a soft look or bright neons for a playful version.

You can make it larger or smaller by swapping yarn weight and adjusting your hook size accordingly β€” bulky yarn with a larger hook creates a chunky cuddly toy while thinner yarn makes a tiny keychain-sized friend.

I often add embroidered smiles or freckles to the face to give my turtles more personality instead of safety eyes for baby-safe toys.

Try crocheting the cone in stripes or adding a contrasting rim to the cone to make it stand out as a fun accessory.

For a different texture, you could replace one scoop with a lightly textured stitch pattern or use a boucle yarn for a whimsical effect.

If you want posable limbs, consider inserting thin wire into the legs before attaching them and securing the ends inside the body with extra stuffing.

Use gloss or fabric paint to add tiny sprinkles to the scoops after finishing to make a dessert-inspired design extra sweet.

I also like to make coordinating tiny accessories like a miniature cherry or bow to sew onto the cone for a personalized touch.

To create a matching set, change only the shell colors and keep the cone the same so they read as a family of themed turtles.

Don't be afraid to mix yarn brands β€” as noted, Premier Just Chenille and Bernat Velvet work similarly, so swap shades to use what you have on hand.

Common Mistakes & How to Fix Them

βœ— Skipping stitch markers while working with fluffy/chunky yarn can make rounds hard to find; use stitch markers to mark the start of each round and maintain your place. βœ— Overstuffing the scoops causes distortion and flattened ruffles; add fiberfill gradually and test shape as you go to keep the ruffles defined. βœ— Not changing color securely can cause loose ends in the seam; use a secure color join and weave in ends before finishing to avoid unraveling. βœ— Crocheting too tightly when joining legs and tail will make assembly difficult; use a slightly looser tension for joining and check placement before securing stitches.

Ice Cream Turtle Amigurumi Pattern

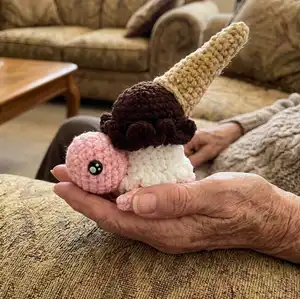
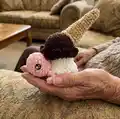
Make an adorable Ice Cream Turtle amigurumi that combines plush chenille yarn with playful details. This pattern walks you through step-by-step rounds for the legs, tail, head, shell/body and cone so you can create a sweet stuffed turtle. Perfect as a handmade gift or colorful decoration, you will enjoy assembling the layers and adding the cone topper.

Intermediate 5-7 Hours

Materials Needed for Ice Cream Turtle Amigurumi Pattern

β€” Main Fabric

  • 01
    Size 5-6 Bulky Yarn (recommended overall weight)
  • 02
    Premier Just Chenille - White (Size 6) - Neapolitan scheme
  • 03
    Premier Just Chenille - Pink (Size 6) - Neapolitan scheme
  • 04
    Estako Velvet - Brown (no size listed) - used for brown scoop in Neapolitan scheme
  • 05
    Premier Just Chenille - Aqua (Size 6) - Cotton Candy scheme
  • 06
    Premier Just Chenille - Lavender (Size 6) - Cotton Candy scheme
  • 07
    Premier Just Chenille - Flamingo (Size 6) - Cotton Candy scheme
  • 08
    Bernat Velvet - Soft Sunshine (Size 5) - tan cone color

β€” Tools Required

  • 01
    Crochet hook size 3.5mm / E
  • 02
    Safety eyes 12mm (2 pieces)
  • 03
    Tapestry needle
  • 04
    Scissors
  • 05
    Poly-Fil stuffing
  • 06
    Stitch markers (recommended)
  • 07
    Pins for assembly (optional)

Progress Tracker

0% Complete

β€” Supplies :

Info :

Hook: 3.5mm / E. Yarn: Size 5-6 Bulky Yarn. ~ Neapolitan Color Scheme: Premier Just Chenille - White and Pink (Size 6), Estako Velvet - Brown (No Size listed, but is similar to the other yarn brands used). ~ Cotton Candy Color Scheme: Premier Just Chenille - Aqua, Lavender, and Flamingo (size 6). ~ Bernat Velvet - Soft Sunshine (Size 5). Note: The Premier Just Chenille yarn is very similar in size to the Bernat Velvet used, it is not a super bulky yarn like what you typically expect with a size 6 yarn. It is much thinner than Bernat Blanket, which is a size 6 as well. Safety Eyes: 12mm. Tapestry Needle, Scissors, Poly-Fil for stuffing.

β€” Finished Size :

Info :

Approximately 6 inches long, 6 inches wide, 7 inches tall

β€” Abbreviations :

Infos :

(US Terms) CH: Chain. MR: Magic Ring. SC: Single Crochet. HDC: Half Double Crochet. INC: Increase. DEC: Decrease. FLO: Front Loops Only. BLO: Back Loops Only. SIST: Slip Stitch. St: Stitch. R: Row. BO: Bind Off. (#): # of stitches in the round. Note: If you are not used to using "Fluffy/Chunky" yarn, I suggest using stitch markers to help you find your stitches and/or rows until you have practiced enough to be able to "feel" for them.

β€” Front Legs :

Info :

Using Pink (Neapolitan) or Lavendar (Cotton Candy). (Make 2)

Round R1 :

8SC in MR

Round R2 :

Inc (16)

Round R3 :

SC, Inc (24)

Round R4 :

3SC, Inc (30)

Info :

SlSt into next St. Fold your circle in half to make a half circle, SC around the half circle through both stitches. BO, there is no need to leave a tail for sewing, you will SC the legs into a round of the body.

β€” Back Legs :

Info :

Using Pink (Neapolitan) or Lavendar (Cotton Candy). (Make 2)

Round R1 :

8SC in MR

Round R2 :

Inc (16)

Round R3 :

SC, Inc (24)

Info :

SlSt into next St. Fold your circle in half to make a half circle, SC around the half circle through both stitches. BO, there is no need to leave a tail for sewing, you will SC the legs into a round of the body.

β€” Tail :

Info :

Using Pink (Neapolitan) or Lavendar (Cotton Candy)

Round R1 :

3SC in MR

Round R2 :

Inc (6)

Round R3-5 :

SC (6)

Info :

SlSt, BO, there is no need to leave a tail for sewing, you will SC the tail piece into a round of the body.

β€” Head :

Info :

Using Pink (Neapolitan) or Lavendar (Cotton Candy)

Round R1 :

8SC in MR

Round R2 :

Inc (16)

Round R3 :

SC, Inc (24)

Round R4 :

3SC, Inc (30)

Round R5-8 :

SC (30)

Round R9 :

SC, Dec (20)

Round R10 :

2SC, Dec (15)

Info :

SlSt, leave a long tail for sewing. I leave about 8-9 inches to be safe, but I usually have a lot left over.

Info :

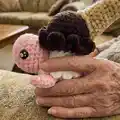
Add eyes and stuff the head. I added my eyes at around rows 5-6 and about 9-10 stitches apart

β€” Shell/Body :

Info :

Begin with the top ice cream scoop color. Brown (Neapolitan) or Flamingo (Cotton Candy)

Round R1 :

8 SC in MR

Round R2 :

Inc (16)

Round R3 :

SC, Inc (24)

Round R4 :

3SC, Inc (30)

Round R5-9 :

SC (30)

Round R10 :

Working in FLO, 3HDC in each stitch, SlSt into the first HDC and BO (90) *You will not touch this row again*

Round R11 :

Attach the same color yarn with a SC into the first stitch of the BLO of R9 and SC around in the rest of the back loops (30)

Round R12 :

SC, Dec (20)

Info :

Color change to the second ice cream scoop color using your preferred method. White (Neapolitan) or Aqua (Cotton Candy). Add stuffing to the first scoop.

Round R13 :

SC (20)

Round R14 :

SC, Inc (30)

Round R15-19 :

SC (30)

Round R20 :

Working in FLO, 3HDC in each stitch, SlSt into the first HDC and BO

Round R21 :

Attach the same color yarn with a SC into the first stitch of the BLO of R19 and SC around in the rest of the back loops (30)

Round R22 :

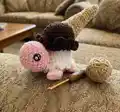
Grab your legs and tail, this is the row you will SC your pieces into. You place your pieces in front of the stitches of the body, pushing your hook through the leg/tail first then through the body stitch. When crocheting the legs on, looking down at your work, you want the curve of the leg on your right for the first two legs and on your left for the second two. See photos to help with placement.

Info :

3SC. Grab a front leg,attach with 3SC. 4SC. Grab a back leg, attach with 2SC. 1SC. Grab the tail, attach with 4SC. 1SC. Grab the second back leg, attach with 2SC. 4SC. Grab the second front leg, attach with 3SC. 3SC. (30)

Round R23 :

SC, Dec (20)

Info :

Add stuffing

Round R24 :

2SC, Dec (15)

Round R25 :

3SC, Dec (12)

Info :

Add any additional stuffing as desired

Round R26 :

Dec (6)

Info :

SlSt, cut yarn leaving a short tail to sew the hole closed. Weave the yarn tail back and forth into the stitches around then pull tight to close. Tie to secure and weave the rest of the yarn tail into the body.

Info :

Sew the head onto the body. I placed the head on the bottom ice cream scoop, underneath the ruffle of the top scoop and evenly in between the two front legs.

β€” Cone :

Info :

Using tan color (Bernat - Soft Sunshine)

Round R1 :

6SC in MR

Round R2-3 :

SC (6)

Round R4 :

SC, Inc (9)

Info :

Begin lightly stuffing as you go

Round R5-7 :

SC (9)

Round R8 :

2SC, Inc (12)

Round R9-10 :

SC (12)

Round R11 :

2SC, Inc (16)

Round R12-15 :

SC (16)

Round R16 :

SC, Inc (24)

Round R17 :

SC in FLO (24)

Info :

SlSt, BO, leave a long tail for sewing. I leave about 8-9 inches to be safe, but I usually have a lot left over. Add any additional stuffing desired.

Info :

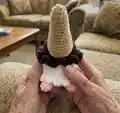
Sew the cone onto the top ice cream scoop slightly off to the side or wherever you prefer. I sew into row 16, so that row 17 is a lip on the cone to add a little more detail, however, feel free to sew into the last row (row 17) if that is your preference.

Assembly Instructions

  • Sew the head onto the body: place the head on the bottom ice cream scoop, underneath the ruffle of the top scoop and evenly between the two front legs, then sew securely.
  • Attach legs and tail on R22 by placing pieces in front of the body stitches, pushing your hook through the leg/tail first then through the body stitch and SC to join in the order listed.
  • Sew the cone onto the top ice cream scoop slightly off to the side or where preferred, attaching into row 16 so row 17 forms a lip, or sew into row 17 if you prefer.
  • Weave the yarn tail back and forth around the opening after R26 to close the hole, pull tight to close, tie to secure and weave ends into the body.
  • Attach safety eyes at around head rows 5-6 and space them about 9-10 stitches apart before stuffing the head fully.

Important Notes

  • πŸ’‘Use stitch markers to keep track of rounds, especially when working with fluffy chenille yarn which hides stitches easily.
  • πŸ’‘Stuff gradually while shaping to maintain the rounded scoop appearance and prevent overfilling which flattens ruffles.
  • πŸ’‘Pin and arrange legs and tail before sewing to ensure correct placement and symmetry on R22.
  • πŸ’‘Leave long sewing tails when indicated (about 8-9 inches) to make assembly easier and to weave in securely.

This Ice Cream Turtle amigurumi blends plush chenille yarn with charming details to create a delightful handmade companion. Whether you make it in Neapolitan or Cotton Candy colors, it will brighten any shelf or gift bag. Finish with a sewn-on cone and personality-packed eyes for a sweet playful finish. 🧢🍦

You ask,

we answer.

FAQs

What size will the finished piece be?

The finished amigurumi measures approximately 6 inches long, 6 inches wide, and 7 inches tall using the recommended yarn and hook.

Can I use different yarn weights for this pattern?

Yes, but changing yarn weight will affect the final size; use an appropriate hook size for your chosen yarn and expect changes in proportions.

Do I need prior crochet experience for this pattern?

This pattern is rated intermediate and assumes familiarity with basic amigurumi techniques including magic ring, increases, decreases and working in FLO/BLO.

How long does this project typically take to complete?

Most crocheters complete this project in about 5-7 hours, though time will vary depending on experience and assembly speed.