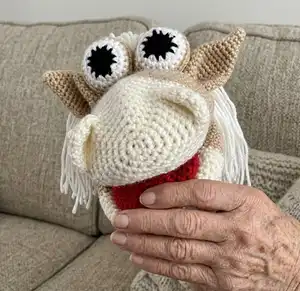
Make a charming Horse Hand Puppet with this detailed crochet amigurumi pattern. You will follow clear step-by-step rounds to create the mouth, eyes, ears, nostrils and mane, and assemble them into a playful puppet. The pattern uses DK yarn and a 2.5mm hook for a neat, professional finish. Perfect for gifting or imaginative play, this project brings character and personality to every stitch.
Progress Tracker
0% Complete
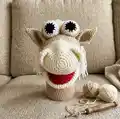
— Tongue :
Round 1 :
6 sc in 2nd ch from hook 6 sts
Round 2 :
inc in all 6 sts 12 sts
Round 3 :
(1 sc, inc in next st) x6 18 sts
Round 4 :
(2 sc, inc in next st) x6 24 sts
Round 5 :
(3 sc, inc in next st) x6 30 sts
Info :
Insert your squeak into the tongue if you are adding one. 15sc through both sides of the tongue to close. Sl last st and finish.
— Top of Mouth :
Round 1 :
6 sc in 2nd ch from hook 6 sts
Round 2 :
inc in all 6 sts 12 sts
Round 3 :
(1 sc, inc in next st) x6 18 sts
Round 4 :
(2 sc, inc in next st) x6 24 sts
Round 5 :
(3 sc, inc in next st) x6 30 sts
Round 6 :
(4 sc, inc in next st) x6 36 sts
Round 7 :
(5 sc, inc in next st) x6 42 sts
Round 8 :
(6 sc, inc in next st) x6 48 sts
Info :
Change to Latte yarn
Round 13-26 :
48 sc 48 sts
Info :
Sl last st, cut yarn.
— Bottom of Mouth :
Round 1 :
6 sc in 2nd ch from hook 6 sts
Round 2 :
inc in all 6 sts 12 sts
Round 3 :
(1 sc, inc in next st) x6 18 sts
Round 4 :
(2 sc, inc in next st) x6 24 sts
Round 5 :
(3 sc, inc in next st) x6 30 sts
Round 6 :
(4 sc, inc in next st) x6 36 sts
Round 7 :
(5 sc, inc in next st) x6 42 sts
Round 8 :
(6 sc, inc in next st) x6 48 sts
Info :
Change to Latte yarn
Round 13-23 :
48 sc 48 sts
Info :
Do not cut yarn, we will now join the mouth and tongue pieces together as follows.
Info :
Place the top and bottom mouth pieces on top of one another with your yarn from the bottom mouth piece at the side. 5 sc through both pieces along what will be the middle seam to join both of the mouth pieces. Place a marker at the 1st st.
Info :
Now it is time to add the tongue, to do this 15 sc through the bottom of mouth, tongue and top of mouth, this will join them altogether along the same middle seam that you had started, now 5 sc through the top and bottom mouth pieces only. This will be the new beginning of your rnds. Replace your marker here.
Info :
You should now have a total of 54 sts around the outside of the puppets mouth.
Round 25 :
(7 sc, dec) x6 48 sts
Round 26-50 :
48 sc 48 sts
Info :
If you would like to make your puppet longer or shorter adjust the amount of rows worked here. Sl last st, tie off and finish.
— Eyes :
Info :
Eyes (Make 2) Using Ebony yarn
Round 1 :
6 sc in 2nd ch from hook 6 sts
Round 2 :
inc in all 6 sts 12 sts
Info :
Change to Frost yarn
Round 3 :
(1 sc, inc in next st) x6 18 sts
Round 4 :
(2 sc, inc in next st) x6 24 sts
Info :
Change to Latte yarn
Round 5 :
(3 sc, inc in next st) x6 30 sts
Round 10 :
(3 sc, dec) x6 24 sts
Round 11 :
(2 sc, dec) x6 18 sts
Round 12 :
(1 sc, dec) x 6 12 sts
Info :
Finish stuffing and close hole, leave enough yarn to sew to puppet later.
— Ears :
Info :
Ears (Make 2) Using Latte Yarn
Round 1 :
6 sc in 2nd ch from hook 6 sts
Round 3 :
(2 sc, inc in next st) x2 8 sts
Round 4 :
(3 sc, inc in next st) x2 10 sts
Round 5 :
(4 sc, inc in next st) x2 12 sts
Round 6 :
(5 sc, inc in next st) x2 14 sts
Round 7 :
(6 sc, inc in next st) x2 16 sts
Round 8 :
(7 sc, inc in next st) x2 18 sts
Round 9 :
(8 sc, inc in next st) x2 20 sts
Round 10 :
(9 sc, inc in next st) x2 22 sts
Round 11 :
(10 sc, inc in next st) x2 24 sts
Round 12 :
(11 sc, inc in next st) x2 26 sts
Round 13 :
(12 sc, inc in next st) x2 28 sts
Round 14 :
(13 sc, inc in next st) x2 30 sts
Round 15 :
(14 sc, inc in next st) x2 32 sts
Info :
Sl last st, cut yarn leaving enough thread to sew to Horse head later.
— Nostril :
Info :
Nostril (Make 2) Using Pearl yarn
Round 1 :
6 sc into the 2nd ch from hook 6 sts
Round 2 :
inc in all 6 sts 12 sts
Round 3 :
(1 sc, inc in next st) x6 18 sts
Info :
Fold nostril in half, 9 sc through both sides, sl last stitch, cut yarn leaving enough thread to sew to head later
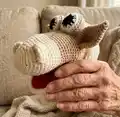
— Making Up :
Info :
Firstly you need to shape the ears, do this by folding the ear in half and with your darning needle sew through both corners of the ear. This will pinch the two sides of the ears together, tie off leaving enough thread to sew to the head.
Info :
Now you can pin the Eyes and Ears onto the top of the Horse head. Try to make them as symmetrical as possible. Check this by putting it on your hand. Once you are happy with the placement you can start to sew them on. Be careful not to sew through both sides of the puppet though as it will close the hole and you won't be able to get your hand in. I sew around twice and also catch the two eyes together up through the back where they meet. Tie off and weave in any loose threads as you go.
Info :
Pin the nostrils to the nose of the puppet, placing the curved side against the puppet. The folded side becomes the front of the nostril.
Info :
Now you can add the Mane
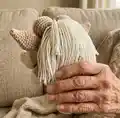
— Mane :
Info :
Using Pearl yarn Cut 60 lengths of yarn 25cm long.
Info :
With your puppet facing away from you start adding pieces of Mane starting on the back from the bottom of the eyes and along the back of the puppet, I used 30 strands for this part (6 rows of 5). Add each strand one at a time, fold your strand in half, push your crochet hook through a stitch, catch the folded strand with your crochet hook and bring it through the stitch, bring the tails through the loop and tighten.
Info :
Now add the other 30 strands to the back of the eyes, 15 on each eye. If you would like a thicker mane simply keep adding more strands.
Info :
Your Horse Puppet is Complete!
This Horse Hand Puppet pattern helps you create a playful, personalized puppet perfect for storytelling and play. The pattern includes full rounds for mouth, eyes, ears, nostrils, and a fun mane technique to finish. Add extra strands for a fuller mane or change colors for a unique look. 🧶🐴