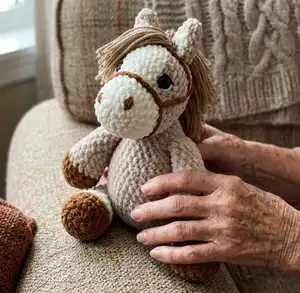
Make a cuddly velvet yarn horse with clear step-by-step instructions and helpful photos. This charming amigurumi features a color-changed muzzle, embroidered details, and a soft mane and tail. Perfect for gifting or decorating nurseries, this pattern guides you through assembly and finishing touches for a polished handmade toy.
Progress Tracker
0% Complete
— Head :
Info :
Start with white yarn
Round 3 :
(1sc, inc)x6 (18)
Round 4 :
(2sc, inc)x6 (24)
Round 5-6 :
24sc (2 rounds)
Round 7 :
(4sc, inc)x4, 4sc (28)
Info :
Add the main yarn. Next alternate stitches in white color (W) and main color (M).
Round 9 :
3sc (M), 6inc (W), 19sc (M) (34) (color changing - photo 1)
Round 10 :
5sc (M), 9sc (W), 20sc (M) (34)
Round 11 :
6sc (M), 7sc (W), 21sc (M) (34)
Round 12 :
7sc (M), 5sc (W), 22sc (M) (34)
Round 13 :
8sc (M), 3sc (W), 23sc (M) (34)
Round 14 :
8sc (M), 3sc (W), 23sc (M) (34)
Info :
Further crochet only with the main yarn.
Round 15 :
(5sc, dec)x4, 6sc (30)
Info :
Insert safety eyes between rounds 9 and 10 (photos 6-8)
Round 17 :
(4sc, dec)x5 (25)
Info :
Stuff in the process.
Round 18 :
(3sc, dec)x5 (20)
Round 19 :
(2sc, dec)x5 (15)
Round 20 :
(1sc, dec)x5 (10)
Round 21 :
2dec, then take a needle with a wide eye and grab the front loop of each stitch, thread the yarn tail and tighten it a little. So the hole is closed, fasten off and weave in the ends. (photos 9-11)
— Color changing :
Info :
Follow photo sequence for color changing on the muzzle and wrong side checks (photos 1-5)
— Securing safety eyes :
Info :
See photos 6-8 for securing safety eyes; ensure washers are locked on the wrong side before final assembly.
— Tighten the hole with a needle :
Info :
Use a needle to tighten remaining hole as shown in photos 9-11.
— Ears :
Info :
Make 2. Start with the main yarn.
Round 2 :
(1sc, inc)x2, 1sc (7)
Round 4 :
1sc (M), inc (W), (1sc, inc, 2sc, inc) (M) (10)
Round 5 :
inc (M), 3sc (W), (inc, 5sc) (M) (12)
Round 6-7 :
2sc (M), 3sc (W), 7sc (M) (12) (2 rounds)
Info :
Fold the ear in half at the base, grab the stitches at the edges of the last round and crochet them together with sl st, as shown in the photo. Leave the yarn tail for sewing pieces. (photos 12-15)
Info :
Sew the ears to the head in the place where the white color ends.
— Needle Sculpting :
Info :
Needle Sculpting: Tightening with white velvet or cotton yarn. Use photos 17-26 as a guide for sculpting around the eyes and muzzle.
— Whites of the eyes :
Info :
Embroider with white velvet yarn to create whites of the eyes as shown in photos 27-29.
— Eyelashes :
Info :
Embroider with a black cotton thread (photos 30-32).
— Nostrils :
Info :
Embroider with brown velvet yarn in rounds 3-4 of the head (photos 33-35).
— Bridle :
Info :
Make with velvet yarn. Use about 50 cm of yarn or thin cord and follow photos 36-38 to position the bridle around the muzzle and head.
— Forelegs :
Info :
Make 2. Start with dark yarn for hooves.
Round 3 :
(1sc, inc)x6 (18)
Round 5-6 :
18sc (2 rounds)
Info :
Change color to white
Round 8 :
(3 sc, dec)x3, 3 sc (15)
Info :
Stuff the leg to the middle (in halfway)
Info :
Change color to the main
Round 10 :
(3sc, dec)x3 (12)
Round 11-18 :
12sc (8 rounds)
Round 19 :
Fold the leg in half and crochet 6 sc through both sides. Leave a small yarn end. (photos 39-41)
— Hind legs :
Info :
Make 2. Start with dark yarn for hooves.
Round 3 :
(1sc, inc)x6 (18)
Round 5-6 :
18 sc (2 rounds)
Info :
Change color to white
Round 8 :
(3sc, dec)x3, 3sc (15)
Info :
Stuff the leg (only 2/3 of it)
Round 10 :
(3sc, dec)x3 (12)
Round 11-13 :
12sc (3 rounds)
Info :
Change color to main
Round 14-18 :
12sc (5 rounds)
Round 19 :
Fold the leg in half and crochet 6 sc through both sides. Leave a small yarn end.
— Body :
Info :
Crochet with the main yarn
Round 3 :
(1sc, inc)x6 (18)
Round 4 :
(2sc, inc)x6 (24)
Round 5 :
(3sc, inc)x6 (30)
Round 6 :
(4sc, inc)x6 (36)
Round 7 :
(5sc, inc)x6 (42)
Round 8 :
6sc, 6sc with the hind leg, 15 sc, 6sc with the second hind leg, 9sc (42) (photos 43-44) (weave in the yarn ends on the wrong side of the body, photo 45)
Round 9-13 :
42sc (5 rounds)
Round 14 :
32sc (3sc, dec)x2 (40)
Round 15 :
3sc, dec, 35sc (39)
Round 16 :
(5sc, dec)x5, 4sc (34)
Round 18 :
(4sc, dec)x5, 4sc (29)
Round 20 :
(3sc, dec)x5, 4sc (24)
Round 21 :
5sc, 6sc with the foreleg, 5 sc, 6sc with the second foreleg, 2sc (24)
Info :
(weave in the ends as described above) Stuff the body in the process
Round 22 :
(2sc, dec)x6 (18)
Round 23-24 :
18sc (2 rounds)
Round 25 :
7sc, 8 sl st, 3sc (18)
Info :
Fasten off, leave a long end for sewing pieces.
— Sew the head to the body :
Info :
Position head on the body opening and sew securely, using photos 46-50 as a guide for placement and orientation.
— Mane & Tail :
Info :
For the mane we need (4ply yarn 50g/160m): 2 bundles of strands 24cm long and 14 bundles of strands 17cm long (1 bundle consists of 10 strands); Cardboard pieces 8.5cm and 12cm wide.
Info :
Fold the strands in half. Attach 2 long bundles 24cm in front of the ears on one line - this will be the bangs. Attach 14 bundles 17 cm each to each other tightly, 2 bundles in a row (the mane will consist of 8 rows).
Info :
For the tail we need 4 bundles of strands 24cm long (1 bundle consists of 10 strands). We will also fold them in half. Attach the bundles in the shape of a rhombus: one on the top, then 2 together and 1 on the bottom. The tail consists of 4 bundles arranged in 4 rows.
Info :
Attach mane and tail strands using a 5 mm hook as shown in photos 53-64, trim and shape as desired.
— Final assembly and finishing :
Info :
Sew ears to head where white color ends, sew legs to the body openings, weave in all ends on the wrong side, embroider eyelashes and nostrils, attach bridle and trim mane/tail to shape. Our horse is ready! (photos 49-64)
This lovable velvet yarn horse makes a beautiful handmade gift or a treasured addition to your own collection. It combines soft textures, playful color details, and thoughtful shaping for a professional finish. Follow the steps, add your finishing touches, and enjoy a delightful companion you made with your hands. 🧶✨