🧢 Beautiful ✨ Detailed πŸ’ Adorable

Sheep No Sew Amigurumi Pattern

Sheep No Sew Amigurumi Pattern
4.8β˜… Rating
2-3 Hours Time Needed
3.7K Made This
βœ‚οΈ

Beginner Friendly Level

Perfect for those just starting their crochet journey, with clear instructions and simple techniques

⏱️

Bite-Sized Project

Finishes in 2-4 hoursβ€”perfect for an afternoon of creative relaxation.

🧸

Cute Companion

An adorable friend to cherish, handcrafted with love to bring comfort and joy for years to come.

About This Sheep No Sew Amigurumi Pattern

This pattern creates a no-sew amigurumi sheep with a textured bobble wool surface and a seamless body-to-head construction. It uses super bulky (Category 6) yarn and a 3.5mm hook to produce a soft, squishy toy that is quick to make. The pattern includes color-change points, facial placement tips, and small accessory instructions to finish your sheep beautifully.

Sheep No Sew Amigurumi Pattern crochet pattern - detailed view of completed project

Clear round-by-round instructions make it easy to follow even if youre new to amigurumi. Photos and placement notes help you position eyes, ears, and the embroidered nose accurately.

Why You'll Love This Sheep No Sew Amigurumi Pattern

I absolutely love this pattern because it turns simple stitches into a delightful textured wool effect that feels like real sheep fur. I adore how quickly the piece takes shape using super bulky yarnβ€”you get a satisfying result in just a few hours. The no-sew construction means less fiddly finishing and more time enjoying crocheting. I also love that small details like embroidered noses and strategically placed safety eyes give each sheep personality and charm. Making this project always brightens my day and makes a lovely handmade gift.

Sheep No Sew Amigurumi Pattern step 1 - construction progress Sheep No Sew Amigurumi Pattern step 2 - assembly progress Sheep No Sew Amigurumi Pattern step 3 - details and accessories Sheep No Sew Amigurumi Pattern step 4 - final assembly and finishing

Switch Things Up

I love customizing these patterns by changing color palettes; try soft pastels for a nursery-friendly baby sheep or bold contrasting patches for a whimsical cow.

I often make mini versions by using lighter-weight yarn and a smaller hook to create pocket-sized keychain friends.

For a chunkier, cuddlier toy, I use a bulkier yarn and a larger hook which gives a plush, huggable result.

I sometimes replace plastic safety eyes with embroidered eyes for a fully child-safe toy and a softer aesthetic.

Adding tiny accessories like a crocheted scarf, ribbon bow, or felt heart makes each toy feel like a finished gift.

I like to experiment with different bobble densities for the sheep wool β€” more bobbles give a fluffier look while fewer bobbles make texture subtler.

Try decorative stitching for the nose and mouthβ€”use contrasting thread colors to change the expression of your amigurumi.

I occasionally add a short piece of wire inside limbs for posability, but only for decorative pieces not meant for children.

If you want a themed set, change colors and tiny accessories to create a matching farm collection with the cow, sheep, and pig.

I recommend practicing the bobble (BO) stitch on a small swatch to get consistent texture before working on the main piece.

Common Mistakes & How to Fix Them

βœ— Skipping stitch markers when working in continuous rounds can cause you to lose track of the beginning of each round; place a marker at the start of every round and move it up as you go. βœ— Forgetting to change yarn color exactly at the indicated row will shift facial features or body contrast; switch yarn at the exact row noted and secure ends inside the work. βœ— Overstuffing the head and body makes shaping difficult and can distort the bobble texture; stuff gradually and shape with small amounts to maintain a smooth surface. βœ— Inserting safety eyes after stuffing without checking placement may result in misaligned eyes; place safety eyes between the recommended rounds and double-check spacing before locking them. βœ— Working inconsistent tension when making bobble or FLO/BLO stitches leads to uneven wool texture; keep your tension consistent and practice bobble stitches on a swatch if needed.

Sheep No Sew Amigurumi Pattern

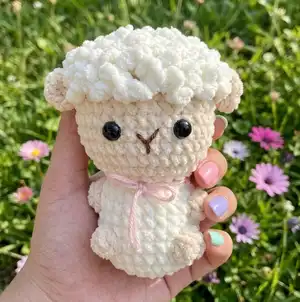
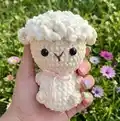
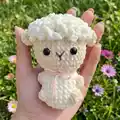
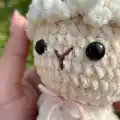
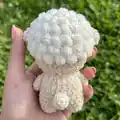
This no-sew sheep amigurumi pattern guides you step-by-step to crochet a cuddly farm friend using super bulky yarn. Youll love how quickly the bobble-style wool and simple shaping come together without any sewing required. Follow clear rounds, color change notes, and finishing tips to create a sweet handmade gift for yourself or someone special. Perfect for quick makes and thoughtful presents.

Beginner Friendly 2-3 Hours

Materials Needed for Sheep No Sew Amigurumi Pattern

β€” Main Fabric

  • 01
    Super Bulky yarn (Category 6) - White - small amount for body/wool
  • 02
    Super Bulky yarn (Category 6) - Skin color (beige/cream) - small amount for head/face
  • 03
    Super Bulky yarn (Category 6) - Black - small amount for cow spots (for cow pattern)
  • 04
    Super Bulky yarn (Category 6) - Brown - small amount for cow nose and horns (for cow pattern)
  • 05
    Super Bulky yarn (Category 6) - Light pink - small amount for pig body (for pig pattern)
  • 06
    Super Bulky yarn (Category 6) - Pink - small amount for pig snout (for pig pattern)
  • 07
    Short piece of brown yarn for nose embroidery

β€” Tools Required

  • 01
    Crochet hook size 3.5mm (E)
  • 02
    Stitch marker
  • 03
    Sewing needle
  • 04
    Scissors
  • 05
    Plastic safety eyes 10mm (2 pieces per toy)
  • 06
    Hot gun glue
  • 07
    Fiberfill stuffing
  • 08
    Optional: Pins for assembly and shaping

Progress Tracker

0% Complete

β€” Sheep (CROCHET FROM THE BODY UP TO THE HEAD - NO SEW) :

Round 1 :

6 SC in an MR (6)

Round 2 :

6 INC (12)

Round 3 :

(SC, INC) 6 times (18)

Round 4 :

(2 SC, INC) 6 times (24)

Round 5 :

8 SC, BO, 6 SC, BO, 8 SC (24)

Round 6 :

8 SC, SC into the stitch's BO, 6 SC, SC into the stitch's BO, 8 SC (24)

Round 7 :

24 SC (24)

Round 8 :

6 SC, BO, 10 SC, BO, 6 SC (24)

Round 9 :

6 SC, SC into the stitch's BO, 10 SC, SC into the stitch's BO, 6 SC (24)

Round 10 :

(SC, DEC) 8 times (16)

Info :

Change to skin color yarn

Round 11 :

FLO, (SC, INC) 8 times (24)

Round 12 :

(SC, INC) 12 times (36)

Round 13-18 :

36 SC (36)

Round 19 :

BLO, (2 SC, DEC) 9 times (27)

Info :

*Stuffing*

Round 20 :

BLO, (SC, DEC) 9 times (18)

Round 21 :

BLO, (SC, DEC) 6 times (12)

Round 22 :

BLO, 6 DEC (6)

Info :

Weave in the yarn end and cut

β€” Sheep's Wool :

Info :

Crochet in the FLO from row 21, and continue seamlessly from row 21 down to row 18. (3 ch, Slst) 93 times.

β€” EARS (MAKE 2) :

Info :

Use Skin color yarn. Crochet the ears onto the stitches at row 18.

Ears :

2 Ch, 3 DC, 2 Ch, Slst in one st.

Info :

Attach eyes on rows 15 and 16, spaced 6 stitches apart. Use a short of brown yarn to embroider the nose.

β€” Cow (CROCHET FROM THE BODY UP TO THE HEAD - NO SEW) :

Round 1 :

6 SC in an MR (6)

Round 2 :

6 INC (12)

Round 3 :

(SC, INC) 6 times (18)

Round 4 :

(2 SC, INC) 6 times (24)

Round 5 :

8 SC, BO, 6 SC, BO, 8 SC (24)

Round 6 :

15 SC, 4SC, 5 SC (24)

Round 7 :

13 SC, 8SC, 3SC (24)

Round 8 :

6 SC, BO, 6 SC, 4SC, BO, 3SC, 3SC (24)

Round 9 :

15SC, 4SC, 5SC (24)

Round 10 :

(SC, DEC) 8 times (16)

Round 11 :

FLO, (SC, INC) 8 times (24)

Round 12 :

(SC, INC) 12 times (36)

Round 13-15 :

36 SC (36)

Round 16 :

(2SC, DEC) 2 times, (2 SC, DEC) 7 times (27)

Round 17 :

9SC, 16SC, 2SC (27)

Round 18 :

12SC, 13SC, 2SC (27)

Round 19 :

12SC, 15SC (27)

Info :

*Stuffing*

Round 20 :

SC, DEC, (SC, DEC) 3 times, (SC, DEC) 5 times (18)

Round 21 :

(SC, DEC) 6 times (12)

Round 22 :

6 DEC (6)

Info :

Weave in the yarn end and cut

β€” Cow EARS: MAKE 2 :

Info :

Begin with white yarn. Make 5 chains start with the second chain from the hook: 3SC, 3SC in the last stitch, 2SC, INC.

Info :

Attach the ear point straight from the arm going up with 2 SLST at R18-19. Make one piece like this with black yarn.

β€” HORN: MAKE 2 :

Info :

Begin with brown yarn. Crochet ears between R20-21. The starting point is straight from the ears going up. Two horns between are 9 stitches: 3CH, DC, Picot, 2CH, and SLST in the next stitch. Cut the yarn.

β€” Cow NOSE :

Info :

Use brown yarn. Make 5 chains start with the second chain from the hook: INC, 2SC, 4SC in the last stitch, 2SC, INC. Cut the yarn.

Info :

Attach the nose in the head at R14-15. Attach the eyes in the head at R16, 5st apart.

β€” Pig (CROCHET FROM THE HEAD UP TO THE BODY - NO SEW) :

Round 1 :

6 SC in an MR (6)

Round 2 :

6 INC (12)

Round 3 :

(SC, INC) 6 times (18)

Round 4 :

(2 SC, INC) 6 times (24)

Round 5 :

24SC (24)

Round 6 :

(3 SC, INC) 6 times (30)

Round 7 :

30SC (30)

Round 8 :

3SC, BO, 22SC, BO, 3SC (30)

Round 9 :

7SC, INC, 14SC, INC, 7SC (32)

Round 10-12 :

32SC (32)

Round 13 :

3SC, BO, 24SC, BO, 3SC (32)

Round 14 :

7SC, DEC, 14SC, DEC, 7SC (30)

Round 15 :

(3 SC, DEC) 6 times (24)

Round 16 :

(2 SC, DEC) 6 times (18)

Info :

*Stuffing*

Round 17 :

SC, DEC 6 times (12)

Round 18 :

DEC 6 times (6)

Info :

Weave in the yarn end and cut

β€” Pig TAIL :

Info :

Use pink yarn. Crochet ears at R15. Make 10CH, start with the second chain from the hook: 9 SLST, SLST in the same stitch. Cut the yarn.

β€” Pig EARS (MAKE 2) :

Info :

Use light pink yarn. Crochet ears at R6: 2CH, DC in the same stitch, CH, Picot, DC in the next stitch, 2CH, SLST in the same stitch, 7 stitches apart.

β€” Pig NOSE :

Info :

Use pink yarn. Make 4CH, start with the second chain from the hook: 2SC, INC in the last stitch, SC, INC. Cut the yarn.

Info :

Sew two white lines to create holes in the shape (as photo). Attach the nose in the head at R1-R2. Attach the eyes in the head at R3, apart 7 stitch.

Assembly Instructions

  • Attach eyes to the sheep between rounds 15 and 16, spacing them 6 stitches apart, then embroider the nose with a short piece of brown yarn.
  • For the cow, attach ears at rounds 18-19 with 2 SLST from the arm going up, add the two horns between rounds 20-21, and sew the nose at rounds 14-15.
  • For the pig, attach the nose at rounds 1-2, position safety eyes at round 3 spaced 7 stitches apart, and attach the tail at round 15 using the 10-chain SLST tail piece.
  • Sew ears in place for each toy according to the instructions for ear placement (sheep row 18, cow rows 18-19, pig row 6) and make sure to pin and check symmetry before fastening off.
  • Weave in all yarn ends inside the toy, hide tails through stuffing, and use hot glue sparingly to reinforce safety eyes if desired for non-child-safe decorative toys.

Important Notes

  • πŸ’‘Switch yarn colors exactly at the rows indicated to keep the face and body color changes aligned correctly.
  • πŸ’‘Use stitch markers to mark the beginning of each round and any special placement rows for eyes or ears.
  • πŸ’‘Stuff gradually and shape as you go; adding small amounts of fiberfill at a time ensures a smooth, even finish.
  • πŸ’‘Always check safety eye placement before fastening them into place and consider embroidering eyes for toys intended for young children.

This sweet no-sew sheep (plus cow and pig variations) pattern was designed to be quick, adorable, and satisfying to make. Whether youre gifting a tiny friend or keeping it for yourself, these farm pals add charm to any space. Happy crocheting and enjoy every bobble and stitch! πŸ§ΆπŸ‘

You ask,

we answer.

FAQs

What size will the finished piece be?

Finished amigurumi sizes vary by animal, but using super bulky yarn and a 3.5mm hook each toy measures roughly 8-12 cm tall depending on stuffing and tension.

Can I use different yarn weights for this pattern?

Yes, you can use different yarn weights but this will change the final size; if using a different weight, adjust the hook size and be aware that the bobble texture may appear different.

Do I need prior crochet experience for this pattern?

This pattern is rated beginner friendly, so basic knowledge of single crochet, increases, decreases, and simple bobble/FLO techniques is recommended for best results.

How long does this project typically take to complete?

Most crocheters finish a single toy in about 2-3 hours using the recommended materials and hook size, though time may vary by experience and finishing details.