🧢 Beautiful ✨ Detailed πŸ’ Adorable

Hogwarts House Scarf Pattern

Hogwarts House Scarf Pattern
4.9β˜… Rating
5-7 Hours Time Needed
1.5K Made This
βœ‚οΈ

Beginner Friendly Level

Perfect for those just starting their crochet journey, with clear instructions and simple techniques

⏱️

Weekend Treat

Takes 5-7 hours, making it an enjoyable project to finish over a couple of days.

🧣

Snug Essential

Everyday comfort with practical charm, designed for both functionality and style through changing seasons.

About This Hogwarts House Scarf Pattern

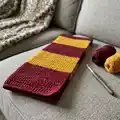
This pattern creates a long, circular Hogwarts house scarf worked in the round with alternating dark and light stripes. It includes instructions for house color choices (Gryffindor, Slytherin, Ravenclaw, Hufflepuff) and a simple method for adding fringe tassels. The scarf is designed to be warm, wearable, and easy to customize.

Hogwarts House Scarf Pattern crochet pattern - detailed view of completed project

Worked on short circular needles, the tube-style scarf is knit in the round for a seamless finish. Stripes are formed by knitting 22 rows in each color, producing bold banding approximately 3 inches long.

Why You'll Love This Hogwarts House Scarf Pattern

I absolutely love this pattern because it combines straightforward knitting techniques with bold, iconic colorwork that makes a real statement. I enjoy how quickly the stripes build upβ€”22-row bands give a satisfying rhythm to the knitting. The finished cowl is both cozy and versatile, perfect for everyday wear or as a thoughtful handmade gift. I also love the simple fringe finishing method; it transforms the tube into a polished, finished scarf with a little extra personality.

Hogwarts House Scarf Pattern step 1 - construction progress Hogwarts House Scarf Pattern step 2 - assembly progress Hogwarts House Scarf Pattern step 3 - details and accessories Hogwarts House Scarf Pattern step 4 - final assembly and finishing

Switch Things Up

I love how easy it is to customize this pattern β€” try swapping house colors to make a set of scarves for friends.

If you want a chunkier look, use bulkier yarn and larger circular needles to make a warm, plush version that works up faster.

For a mini or child-sized cowl, use a finer yarn and smaller needles and reduce the cast-on to fit smaller neck measurements.

I often change the stripe width by knitting 11 rows of each color instead of 22 for a subtler striping effect; it shortens the stripes and creates a different rhythm.

Consider embroidering a small house initial or crest using duplicate stitch after blocking for a personalized touch.

To make a flat traditional scarf, knit the same stitch count flat on straight needles instead of joining in the round and add fringe at both ends.

Experiment with ombre or gradient yarns for the MC and a solid CC to create a softer transition between stripes.

I sometimes add a thin metallic strand held with the MC for a subtle sparkle on special occasion scarves.

Vary your tassel length or use braid instead of tassels for a neater finish; you can also add pom-poms for a playful alternative.

If you want a reversible look, carry the unused color up the inside of the tube and pick up the float periodically to hide ends, but be mindful of tension changes.

Common Mistakes & How to Fix Them

βœ— Joining the round too tightly can create a visible seam or twist; before joining, ensure your cast-on edge is not twisted and place the marker loosely to allow the stitches to settle. βœ— Carrying the contrast color incorrectly will cause puckering at the color join; tie the CC around the inside of the tube as instructed and leave matching tails to secure and weave in later. βœ— Not counting your 22-row stripes can lead to the wrong number of stripes; mark every 22nd row with a separate marker or keep a row counter to ensure you reach ten dark and nine light stripes. βœ— Skipping blocking will leave uneven width along the scarf; block the scarf width-wise and gently stretch it until the entire piece is the same width to achieve a professional finish. βœ— Making fringe pieces inconsistent in length makes the ends look messy; measure your fringe using a 7.5 inch book or cardboard template and cut all pieces to the same length before assembling tassels.

Hogwarts House Scarf Pattern

Make a cozy Hogwarts House scarf in your favorite house colors with simple circular knitting and bold stripes. This pattern guides you through knitting a long, wearable cowl with easy color changes and a neat fringe finish. Perfect for gifting or wearing to show house pride, with clear step-by-step instructions to follow.

Beginner Friendly 5-7 Hours

Materials Needed for Hogwarts House Scarf Pattern

β€” Main Fabric

  • 01
    Equal amounts of light and dark colored yarn (amount sufficient to knit a 65-70" / 165.1 cm - 177.8 cm long scarf)
  • 02
    Main color (MC) examples: Scarlet for Gryffindor, Green for Slytherin, Blue for Ravenclaw, Black for Hufflepuff
  • 03
    Contrast color (CC) examples: Gold for Gryffindor, Grey for Slytherin & Ravenclaw (film), Bronze for Ravenclaw (book), Yellow for Hufflepuff
  • 04
    Each stripe is approximately a little more than 3" (7.6 cm) long; plan yarn quantities accordingly

β€” Tools Required

  • 01
    Circular needle US 6 (4 mm) or US 8 (5 mm), 12-16" (30.5 cm - 40.6 cm) length, size dependent on gauge
  • 02
    Size I (6 mm) or K (6.5 mm) crochet hook, for pulling fringe through ends
  • 03
    Circular stitch marker, to mark beginning of each round
  • 04
    Yarn needle

Progress Tracker

0% Complete

β€” Supplies :

Infos :

us 6 (4 mm) or us 8 (5 mm) 12-16" (30.5 cm - 40.6 cm) circular needle, size dependent on gauge. equal amounts of light and dark colored yarn. size i (6 mm) or k (6.5 mm) crochet hook, for pulling fringe through ends. circular stitch marker, to mark beginning of each round. yarn needle.

β€” Gauge :

Info :

20 sts and 24 rows per 4" (10 cm)

β€” Scarf Measurements :

Info :

65-70" (165.1 cm - 177.8 cm) long and 7-8" (17.8 cm - 20.3 cm) wide

Info :

each stripe is a little more than 3" (7.6 cm) long.

β€” Instructions :

Info :

cast on 70 stitches in the main color [mc] (scarlet for gryffindor, green for slytherin, blue for ravenclaw, black for hufflepuff).

Info :

before joining the ring, slip the marker onto the needle.

Info :

knit in the round for 22 rows.

Info :

after the 22 rows, tie the contrast color [cc] (gold for gryffindor, grey for slytherin & ravenclaw (film), bronze for ravenclaw (book), yellow for hufflepuff) around the dark yarn on the inside of the tube, leaving a 2-inch (5.1 cm) tail of cc; trim the mc to have the same length tail. now, knit 22 rows in the lighter yarn.

Info :

alternate knitting 22 rows of mc, then 22 rows of cc until you have knitted ten dark and nine light stripes.

Info :

cast off.

β€” Finishing :

Info :

weave the yarn tails from cast-on and cast-off into the scarf.

Info :

wash the scarf according to your yarn's instructions; dry it flat on the floor/table on top of towels. be sure to align all the color changes along one side fold of the scarf (they're less noticeable that way).

Info :

block the scarf by stretching it width-wise until the entire thing is the same width.

β€” Fringe :

Info :

when the scarf is dry, it's time to add the fringe. i've found that the us hardcover of sorcerer's stone is a good size to measure fringe with - if you don't have a copy, use a piece of cardboard 7.5 inches wide. just wrap the yarn around the book width-wise (y'know, the short way), then cut the wound yarn at the edge of the book/cardboard so it forms several individual pieces of yarn.

Info :

to make one tassel, take 7 pieces of yarn and fold them in half together. push the crochet hook through both thicknesses of scarf in the first row of knitting at one end, loop the folded ends of the yarn around the hook, and pull the yarn loops halfway through the scarf. remove the hook, pass the cut yarn ends through the loop, and tighten the tassel. there are five light and six dark tassels evenly spaced on each end of the scarf; i usually do the middle light tassel first, then the dark end tassels, and eye the rest.

Info :

now, put on your scarf and show off

Assembly Instructions

  • Weave the yarn tails from the cast-on and cast-off edges into the inside of the scarf so they are hidden and secure.
  • When adding fringe, measure and cut all fringe pieces using a 7.5 inch book or cardboard template to ensure equal length before attaching tassels.
  • Attach tassels by folding 7 pieces of yarn in half, pulling the folded loop through the first row at the scarf end with a crochet hook, then pulling cut ends through the loop and tightening.
  • Space five light tassels and six dark tassels evenly across each end of the scarf, placing the middle light tassel first then the dark end tassels as a guide.
  • After weaving ends and adding fringe, block the scarf width-wise to even out edges and ensure the scarf lays flat and consistent in width.

Important Notes

  • πŸ’‘Place a circular stitch marker before joining the cast-on to mark the beginning of the round and avoid twisting the cast-on edge.
  • πŸ’‘Weave in and trim matching tails at each color change to secure stripes neatly and prevent unraveling at the inside of the tube.
  • πŸ’‘Align all color changes along one side fold of the scarf during blocking to make stripe transitions less noticeable on the outside.
  • πŸ’‘Measure fringe pieces consistently using a book or cardboard template to achieve even tassels and a tidy finished edge.

This cozy Hogwarts House scarf is perfect for showing your house pride with classic stripes and a neat fringe finish. It knits up as a seamless tube for a polished look you can wear right away. Make one in your house colors, block it flat, add tassels, and enjoy a warm handmade accessory. 🧢🧣

You ask,

we answer.

FAQs

What size will the finished piece be?

The finished scarf measures approximately 65-70" (165.1 cm - 177.8 cm) long and 7-8" (17.8 cm - 20.3 cm) wide when using the recommended needles and gauge.

Can I use different yarn weights for this pattern?

Yes, you can use different yarn weights, but this will affect the final size and gauge; adjust your needle size accordingly and swatch to match 20 sts and 24 rows per 4" (10 cm) if you want to keep the stated measurements.

Do I need prior knitting experience for this pattern?

This pattern is beginner friendly and requires only basic skills: casting on, knitting in the round, joining circularly, and simple color changes every 22 rows.

How long does this project typically take to complete?

Most knitters finish this scarf in about 5-7 hours, though time will vary based on experience, yarn weight, and how quickly you work the long tube and fringe.