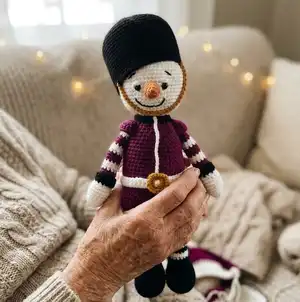
Create a charming Henry the Guard amigurumi with this detailed crochet pattern just for you. Follow clear, photo-assisted steps to make the head, body, limbs, hat and accessories. Perfect for gifting or seasonal decor, this pattern brings a whimsical guard to life. Gather your yarn and hooks and enjoy a creative, hands-on project.
Progress Tracker
0% Complete
— Head :
Round 3 :
[1 sc, inc] x 6 (18)
Round 4 :
[2 sc, inc] x 6 (24)
Round 5 :
[3 sc, inc] x 6 (30)
Round 6 :
[4 sc, inc] x 6 (36)
Round 7 :
[5 sc, inc] x 6 (42)
Round 8 :
[6 sc, inc] x 6 (48)
Round 9 :
[7 sc, inc] x 6 (54)
Round 10 - 20 :
54 sc (54)
Round 21 :
[7 sc, dec] x 6 (48)
Round 22 :
[6 sc, dec] x 6 (42)
Round 23 :
[5 sc, dec] x 6 (36)
Round 24 :
[4 sc, dec] x 6 (30)
Round 25 :
[3 sc, dec] x 6 (24)
Info :
Eye placement moment. Going for embroidered eyes? Finish the head and continue on the next pages.
Round 26 :
[2 sc, dec] x 6 (18)
Round 27 :
[1 sc, dec] x 6 (12)
Info :
Close up and weave in the end.
Info :
Placing the safety eyes: Fill up with fiberfill and place the eyes between rounds 15-16 with 8 stitches in between. You can choose to indent the eyes a bit. Take a piece of yarn in the same color as you're working with. Insert the needle in the same stitch where the eye is placed and pull it through the head to the other eye. Stick the needle back in a stitch to the side and pull through to the other side. Do this again so you will have a piece of yarn on both sides of the head and pull as tightly as you seem fit. Then pull both ends through the stitch and knot them together. Keep filling up the head as you go.
Info :
Lazy eyes: Use white thread underneath the eyes. To make the lazy eyes, use white yarn and ch 3 cut off the yarn and place it over the eye and use the ends to sew it to the head. Place eyebrows with black thread.
— Nose :
Round 3 :
[1 sc, inc] x 3 (9)
Info :
Fasten off and leave a long tail to sew to the head. Stuff before sewing.
Info :
Placement of the nose: With safety eyes, between rounds 14 - 18. With embroidery eyes between round 15-19.
— Mouth :
Info :
For the mouth you can use pins to see where you want to place it. Once you are satisfied, use a black thread and sew it alongside the pins.
— Embroidery Eyes :
Info :
Make a long black stripe with black embroidery yarn, between rounds, 2 stitches long. Repeat 4-5 times.
Info :
With a strand of white, make a long stitch next to the black.
Info :
Insert your needle at the top of the eye and bring it out in the middle of the black.
Info :
Reinsert your needle at the top of the eye and pull through. Secure the ends and hide them inside the head.
Info :
Using a strand of black cotton, start the eyelashes with one angled stitch and one straight stitch above the eye. Make eyebrows with black thread above the eye.
— Puffs (make two) :
Round 3 :
[1 sc, inc] x 6 (18)
Round 4 :
[5 sc, inc] x 3 (21)
Info :
Flatten the puff and sc through both sides. Leave a long tail to sew to the body.
— Legs (make two) :
Info :
Start with Black. Chain 6 and start in the 2nd from the hook.
Round 1 :
4 sc, 3 sc in the last stitch. Continue on the other side 3 sc, inc (12)
Round 2 :
Inc, 3 sc, [inc x 3], 3 sc, [inc x 2] (18)
Round 3 :
1 sc, inc, 3 sc, [1 sc, inc] x 3, 3 sc, [1 sc, inc] x 2 (24)
Round 4 :
2 sc, inc, 3 sc, [2 sc, inc] x 3, 3 sc, [2 sc, inc] x 2 (30)
Round 8 :
7 sc [dec x 6] 11 sc (24)
Round 9 :
4 sc [dec x 6] 8 sc (18)
Round 10 :
4 sc [dec x 3] 8 sc (15)
Info :
Do not cut the Black yarn. Make sure you keep it on outside of the shoe (see the pictures).
Info :
Stuff the foot firmly.
Round 12 :
[3 sc, dec] x 3 (12)
Round 13 - 15 :
12 sc (12)
Info :
If you have not cut out of the Black yarn we will start with the trim of the boot now. If you have cut the yarn you can continue with the leg first and then go back for the boot. Continue with the leg, change to Black and keep switching with White after three rounds.
Round 16 - 30 :
12 sc (12)
Info :
Stuff the leg lightly. You might want to add a sc to make sure the feet point forward. Flatten the leg and sc through the 6 stitches. Leave a long tail to sew to the body.
— Boots :
Info :
Use the Black yarn attached at round 11.
Round 2 :
[4 sc, inc] x 3 (18)
Info :
Fasten off and weave in the end.
— Arms (make two) :
Round 2 :
[1 sc, inc] x 3 (9)
Round 3 :
[2 sc, inc] x 3 (12)
Round 4 :
[3 sc, inc] x 3 (15)
Round 6 :
[4 sc, inc] x 3 (18)
Round 10 :
[1 sc, dec] x 6 (12)
Info :
Stuff the hand firmly.
Round 11 :
BLO, 12 sc (12)
Info :
Change to Red and keep switching with white after three rounds.
Round 12 - 29 :
12 sc (12)
Info :
Stuff the rest of the arm slightly until round 23. Fold the arm and crochet with red through both sides (6). Fasten off and cut the yarn, leave a tail to sew to the body.
Info :
Rounds in White: 15,16,17,21,22,23,27,28,29. Rounds in Red: 12,13,14,18,19,20,24,25,26.
— Cuffs :
Info :
Yarn used: Black. Insert the hook like the image.
Round 1 :
sc 12 stitches in the FL you created in round 11 of the arm, add one more stitch to close the round. Ch1 and turn.
Row 2 :
12 sc, ch1 and turn.
Row 3 :
12 sc, ch1, fasten off and weave in the ends.
— Body :
Round 3 :
[1 sc, inc] x 6 (18)
Round 4 :
[2 sc, inc] x 6 (24)
Round 5 :
[3 sc, inc] x 6 (30)
Round 6 :
[4 sc, inc] x 6 (36)
Round 7 :
[5 sc, inc] x 6 (42)
Round 8 :
[6 sc, inc] x 6 (48)
Round 9 :
[7 sc, inc] x 6 (54)
Round 10 :
[8 sc, inc] x 6 (60)
Round 11 - 15 :
60 sc (60)
Round 18 :
[8 sc, dec] x 6 (54)
Round 19 - 21 :
54 sc (54)
Round 22 :
[7 sc, dec] x 6 (48)
Round 23 - 25 :
48 sc (48)
Round 26 :
[6 sc, dec] x 6 (42)
Round 27 - 28 :
42 sc (42)
Round 29 :
[5 sc, dec] x 6 (36)
Round 30 - 31 :
36 sc (36)
Round 32 :
[4 sc, dec] x 6 (30)
Round 33 - 34 :
30 sc (30)
Round 35 :
[3 sc, dec] x 6 (24)
Info :
Fasten off and leave a long tail to sew to the head.
— Front loops and coat flap :
Info :
Start in the front loops you created in round 17 of the body. Place the hook as shown in the pictures. Start in the front of the body in the middle.
Row 1 :
60 sc Do not close the round, ch1 and turn
Row 2 :
60 sc, ch1 and turn
Row 3 :
6 sc, inc, 22 sc, inc, 23 sc, inc, 6 sc (63)
Row 4 - 8 :
63 sc, ch1 and turn
Row 9 :
62 sc, inc, continue along side the border and inc in the other corner, fasten off and weave in the end.
— Collar :
Info :
Yarn used: Black. In the front loops you created in round 37 of the body. Insert the hook like the image.
Round 1 :
24 sc, close with a slip stitch, fasten off and weave in the end.
— Belt :
Info :
Yarn used: White. Start with a long tail for sewing.
Instruction :
Chain 36 and start in the 2nd from the hook
Row 1 :
35 sc, chain 1 and turn (35)
Info :
Fasten off and leave a long tail for sewing. The belt will not be completely around the body.
Info :
Coat Line, in white: Start at the bottom of the coat and sc along the coat flap until you reach the body. When you have reached the body you will sc in a straight line until the last round of the body. You can also sew the line if that has your preference.
— Buckle :
Instruction :
Chain 12 and close the round with a slipstitch.
Round 1 :
3 sc in every 3th stitch, 1 sc in the other stitches (20)
Info :
Fasten off and use a needle to go through the middle loop like the picture (go through the back) and go back and forth until you have three strings. Fasten off and weave in the end. Now you have a moveable belt buckle. Make sure you have attached the buckle before sewing on. Sew the belt ends to the body just above the jacket. Sew the belt ends to the body just above where the coat flaps start.
— Hat :
Round 3 :
[1 sc, inc] x 6 (18)
Round 4 :
[2 sc, inc] x 6 (24)
Round 5 :
[3 sc, inc] x 6 (30)
Round 6 :
[4 sc, inc] x 6 (36)
Round 7 :
[5 sc, inc] x 6 (42)
Round 8 :
[6 sc, inc] x 6 (48)
Round 9 :
[7 sc, inc] x 6 (54)
Round 10 :
[8 sc, inc] x 6 (60)
Round 11 - 17 :
60 sc (60)
Round 18 :
[18 sc, dec] x 3 (57)
Round 19 - 24 :
57 sc (57)
Round 25 :
[17 sc, dec] x 3 (54)
Info :
Try the hat on the head to make sure it fits on the head, if its too tight change round 25 to 57 sc instead of decreases. Fasten off and weave in the end. Stuff the hat slightly so it keeps its shape.
Info :
Make the band around the head. I made a chain of 30 sc and attached that to the hat with give or take 20 stitches in between.
— Assembly :
Info :
Place the eyebrows slightly tilted.
Info :
Make sure the body is stuffed with fiberfill and keep adding if needed when sewing on the head. Pin the head to the body and use the tail of the body to sew them together. Make sure the belt is on the front.
Info :
Place the arms on each side of the body between rounds 33-35, with a slight tilt to the front and sew them on.
Info :
Place the puffs over the arms and sew them secure. Only the rounding see page 6.
Info :
Place the legs between rounds 10-11 with around 8 stitches apart and sew them onto the body.
Thank you for choosing this Henry the Guard pattern — I hope he brings a touch of handmade charm to your home this season. Enjoy the process of stitching his little uniform and adding personality through the embroidered face. Share your finished Henry and spread the crochet joy! 🧶✨