🧢 Beautiful ✨ Detailed πŸ’ Adorable

Harry Potter Ear Saver Pattern

Harry Potter Ear Saver Pattern
4.7β˜… Rating
2-3 Hours Time Needed
3.9K Made This
βœ‚οΈ

Beginner Friendly Level

Perfect for those just starting their crochet journey, with clear instructions and simple techniques

⏱️

Bite-Sized Project

Finishes in 2-4 hoursβ€”perfect for an afternoon of creative relaxation.

🧣

Snug Essential

Everyday comfort with practical charm, designed for both functionality and style through changing seasons.

About This Harry Potter Ear Saver Pattern

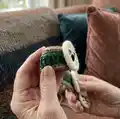
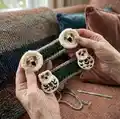
This pattern creates a handy ear saver with decorative owl buttons inspired by Harry Potter motifs. It includes two button options: a simple owl face and a fuller owl body, plus a comfy band. The pattern is compact, machine-wash friendly, and easy to customize with color choices and yarn weights.

Harry Potter Ear Saver Pattern crochet pattern - detailed view of completed project

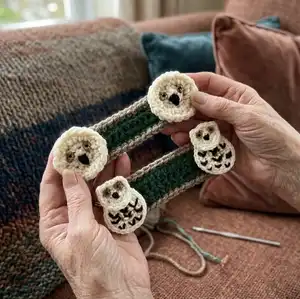
Complete step-by-step rounds are provided for each button type and for the band, with clear assembly instructions. Ideal for gifts, quick makes, or bulk-making for caregivers.

Why You'll Love This Harry Potter Ear Saver Pattern

I absolutely love this pattern because it turns a practical accessory into a playful, handmade gift. I enjoy the small, quick wins of finishing a project in an afternoon and the way the owl buttons add personality. The pattern is versatile so I can easily switch yarn weights and colors to create different looks. I also appreciate that it is machine-wash friendly and designed with simple construction for fast assembly.

Harry Potter Ear Saver Pattern step 1 - construction progress Harry Potter Ear Saver Pattern step 2 - assembly progress Harry Potter Ear Saver Pattern step 3 - details and accessories Harry Potter Ear Saver Pattern step 4 - final assembly and finishing

Switch Things Up

I love changing up the colors to match fandoms or seasons β€” try deep maroon and gold for Gryffindor vibes.

I often swap the white buttons for pastel shades to make softer, child-friendly versions.

To make the ear saver larger or smaller, I change the number of starting chains for the band until it measures the fit I want.

I like to use a thicker yarn and a larger hook when I want a chunky, fast-to-make version that is super durable.

For tiny keychain or pocket versions, I use thinner yarn and a smaller hook to scale down the design.

I sometimes embroider initials or small motifs onto the band for personalization before attaching the buttons.

I like to add a drop of fabric glue under sewn button knots for extra security if the item will be heavily used.

I experiment with mixed fibers β€” cotton for washability and acrylic for bright color choices β€” depending on the intended use.

I occasionally make matching sets, crocheting several bands in the same color and swapping button styles for variety.

I also try different button placements; moving the buttons slightly inward or outward changes how the elastic sits and how comfortable it feels.

Common Mistakes & How to Fix Them

βœ— Skipping the stitch marker in the continuous spiral can make rounds hard to track; use a marker at the last stitch of each round and move it as you go. βœ— Using the wrong hook for your yarn weight can change the button and band size; match hook size to the recommended yarn weight or adjust stitches accordingly. βœ— Not leaving long tails when fastening off buttons makes sewing them to the band awkward; leave generous tails for secure sewing and finishing. βœ— Sewing button edges closed can prevent the mask elastic from fitting under the button; attach buttons securely but avoid sewing over the outer edge so elastic will slip underneath.

Harry Potter Ear Saver Pattern

Make a practical and charming Harry Potter themed ear saver that keeps mask elastic off your ears. This pattern includes two button styles (an owl face and a full owl) and a simple band you can crochet in under a few hours. Youll get clear, step-by-step rounds, material lists, and assembly details so you can finish a polished accessory for yourself or to gift. Perfect for making quick, machine-washable ear protectors with decorative crochet buttons.

Beginner Friendly 2-3 Hours

Materials Needed for Harry Potter Ear Saver Pattern

β€” Main Fabric

  • 01
    Medium weight yarn (#4) - Scarlet: approx 3 yds / 2.7 m - 0.06 oz / 1.7 g (for band)
  • 02
    Medium weight yarn (#4) - Gold: approx 2.7 yds / 2.5 m - 0.05 oz / 1.4 g (for band accents)
  • 03
    White yarn, medium weight (#4): approx 4.6 yds / 4.2 m - 0.09 oz / 2.6 g (Owl Face Buttons version 1, make 2)
  • 04
    Gold yarn, medium weight (#4): approx 1 yd / 0.9 m - 0.02 oz / 0.57 g (Owl Face Buttons version 1 detailing)
  • 05
    White yarn, fine weight (#2): approx 6.5 yds / 5.9 m - 0.07 oz / 2 g (Full Owl Buttons version 2, make 2)
  • 06
    Gold yarn, medium weight (#4): approx 0.5 yd / 0.46 m - 0.01 oz / 0.28 g (Full Owl Buttons version 2 detailing)
  • 07
    Black thread: approx 1 yd / 0.9 m (for pupils, beak and feather detail)

β€” Tools Required

  • 01
    Crochet hook size 5.0 mm (H/8) for medium weight work
  • 02
    Crochet hook size 2.5 mm for fine weight details (full owl buttons)
  • 03
    Scissors
  • 04
    Sewing needle
  • 05
    Tapestry needle
  • 06
    Stitch marker (if desired)
  • 07
    Black sewing thread for facial details

Progress Tracker

0% Complete

β€” Buttons - Version 1 - Owl Face :

Info :

Working with white medium weight (4) yarn and 5 mm hook:

Round 1 :

Rnd 1: 4 sc into a magic ring. (4)

Round 2 :

Rnd 2: inc in each st around. (8)

Round 3 :

Rnd 3: using BLO - inc in each st around. (16)

Round 4 :

Rnd 4: using FL left from previous rnd - inc in each st around. (16)

Info :

Fasten off, leaving a tail of approx 12 in/30 cm.

Info :

Using the tail of yarn, whip stitch through both sets of sts created in rnds 3 and 4.

β€” Buttons - Version 2 - Full Owl :

Info :

Working with white fine weight (2) yarn and 2.5 mm hook

Item Name (Head) :

Rnd 1: 4 sc into a magic ring. (4)

Round 2 :

Rnd 2: inc in each st around. (8)

Round 3 :

Rnd 3: (sc, ch 2, sl) in next st, sl inc in next 3 sts, (sl, ch 2, sc) in next st, inc in each st around. (20)

Info :

Fasten off, leaving a long tail for sewing.

Item Name (Body) :

Rnd 1: 6 sc into a magic ring. (6)

Round 2 :

Rnd 2: using BLO - inc in each st around. (12)

Round 3 :

Rnd 3: using FL left from previous rnd - inc in each st around. (12)

Round 4 :

Rnd 4: working though both sets of sts from rnds 3 and 4 - inc around. (24)

Info :

Fasten off, leaving a long tail for sewing.

β€” Band :

Info :

Working with scarlet yarn and 5 mm hook:

Round 1 :

Rnd 1: ch 21. (21)

Round 2 :

Rnd 2: beginning in 2nd ch from hook - sc 19, sc 3 in next st. Moving up the other side of chain - sc 18, inc in last ch. (42)

Info :

Switching to gold yarn:

Round 4 :

Rnd 4: inc, sc 18, inc, sc, inc, sc 18, inc, sc. (46)

Info :

Fasten off.

β€” Assembly :

Owl Face Buttons and Band :

With a double strand of gold yarn, create two french knots for the owl's eyes. With black thread and a sewing needle, create the owl's pupils and beak.

Info :

Using long tails left after fastening off buttons, attach buttons securely at each end of band. Working around the outside of the center indent of the button (containing the eyes and nose) secures the button well while still allowing room for mask elastic to fit under buttons.

Info :

Weave in ends.

Full Owl Buttons and Band :

With head slightly in front of and overlapping the body, attach head to body using long tails left after fastening off head. With a single strand of gold yarn, create two french knots for the owl's eyes. With black thread and a sewing needle, create the owl's pupils, beak, and feather detail.

Info :

Using long tails left after fastening off owl bodies, and working between the feather details so they do not get covered up, attach buttons securely at each end of band. Make sure not to sew edges since mask elastic needs to fit underneath buttons.

Info :

Weave in ends.

Assembly Instructions

  • With a double strand of gold yarn, create two french knots for the owl's eyes and use black thread to stitch the pupils and beak, then attach owl face buttons at each end of the band using long tails left after fastening off.
  • Working around the outside of the center indent of the owl face button secures the button while leaving room for mask elastic to fit under the button. Sew through both sets of stitches created in rnds 3 and 4 where indicated.
  • For full owl buttons, attach the head to the body using the long tails left after fastening off, then add french knot eyes with single strand gold and stitch pupils, beak, and feather detail with black thread.
  • Attach full owl buttons to the band using long tails left after fastening off, working between feather details so they are not covered; avoid sewing the outer edges so elastic fits beneath.
  • Weave in all ends after buttons and band are securely attached to ensure a neat finish and wash-ready accessory.

Important Notes

  • πŸ’‘Use a stitch marker to track the last stitch of each round when working in a continuous spiral for accurate round counting.
  • πŸ’‘Cotton or washable yarn is recommended if you expect the ear protectors to be machine washed frequently, though any yarn will work for occasional use.
  • πŸ’‘Adjust the number of chains in the band to change the overall length so the ear saver fits your head circumference comfortably.
  • πŸ’‘Leave long tails when fastening off buttons and parts to make sewing and secure attachment to the band easier.

This Harry Potter Ear Saver Pattern is a fun, useful accessory combining comfort and charm. It includes two owl button styles and a simple band that you can customize with colors and yarn weights. Make a set for yourself or gift them to friends to keep ears comfortable during long mask wear. 🧢✨

You ask,

we answer.

FAQs

What size will the finished piece be?

The finished ear saver measures approximately 5.5 in / 14 cm long and 1.5 in / 4 cm wide using the recommended yarn and hook sizes.

Can I use different yarn weights for this pattern?

Yes, you can use different yarn weights but this will affect the finished size; adjust hook size and chain count for the band to achieve the desired length.

Do I need prior crochet experience for this pattern?

This pattern is beginner friendly, so basic crochet knowledge (sc, inc, ch, working in the round) is recommended for best results.

How long does this project typically take to complete?

Most crafters finish this ear saver in about 2-3 hours, depending on experience and which button version you choose.