🧢 Beautiful ✨ Detailed πŸ’ Adorable

Grumpy Mini Octopus Amigurumi Pattern

Grumpy Mini Octopus Amigurumi Pattern
4.7β˜… Rating
2-3 Hours Time Needed
4.1K Made This
βœ‚οΈ

Intermediate Level

Ideal for those with basic crochet experience, featuring slightly more advanced stitches and techniques to expand your skills.

⏱️

Bite-Sized Project

Finishes in 2-4 hoursβ€”perfect for an afternoon of creative relaxation.

🧸

Cute Companion

An adorable friend to cherish, handcrafted with love to bring comfort and joy for years to come.

About This Grumpy Mini Octopus Amigurumi Pattern

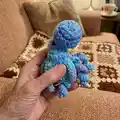
This pattern creates a tiny, grumpy mini octopus amigurumi with a pronounced nose and curled arms. It uses variegated Red Heart Super Saver yarn for beautiful color pooling and personality. The design includes four arm variations that you repeat for a full set of eight arms and simple assembly instructions for finishing.

Grumpy Mini Octopus Amigurumi Pattern crochet pattern - detailed view of completed project

Perfect as an ornament or small toy, the octopus measures only a few inches across and top-to-bottom. The pattern includes clear abbreviations and tips for eye placement, stuffing, and sewing the nose in place.

Why You'll Love This Grumpy Mini Octopus Amigurumi Pattern

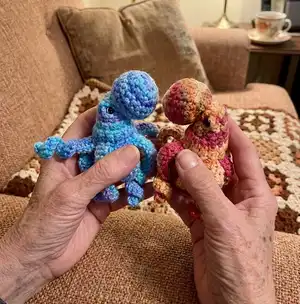
I absolutely love this pattern because it turns a few simple stitches into a character full of attitude and charm. I enjoy how the variegated yarn creates unique color patterns on every octopus, so no two are the same. The curled arms add a lot of personality with minimal extra work, which I find very satisfying. I also love that it is small and quick to make, perfect for gifts or craft market items.

Grumpy Mini Octopus Amigurumi Pattern step 1 - construction progress Grumpy Mini Octopus Amigurumi Pattern step 2 - assembly progress Grumpy Mini Octopus Amigurumi Pattern step 3 - details and accessories Grumpy Mini Octopus Amigurumi Pattern step 4 - final assembly and finishing

Switch Things Up

I love swapping yarn colors to make each octopus unique; try pastel variegated yarns for a softer look or neon for a bold statement.

You can change the size easily by using thicker yarn and a larger hook for a chunkier octopus or thinner yarn and a smaller hook for a tiny keychain version.

I sometimes replace safety eyes with embroidered eyes for a softer, child-safe toy that is perfect for babies.

For ornaments, add a small jump ring or crochet a short loop into the top chain before closing so you can hang the octopus on a branch.

Add wire inside the arms if you want posable limbs that can wrap around items or hold poses for display.

Embroider different expressions with the eyelids and mouth placement to turn the grumpy octopus into sleepy, surprised, or happy characters.

Try beads or tiny sequins sewn onto the body to mimic barnacles or add a sparkly accent for a festive version.

Make a matching set in coordinated colors to create a themed gift box or an advent calendar collection of sea creatures.

If you prefer, crochet shorter or longer arm chains and adjust the increases in the arm base to change how tightly they curl.

I also enjoy adding tiny crocheted accessories like a hat or a tiny scarf to give each octopus personality and story.

Common Mistakes & How to Fix Them

βœ— Skipping the magic circle start for the nose can create a messy center; always begin with a proper MC and pull tight to close cleanly. βœ— Placing safety eyes without counting stitches leads to uneven placement; position eyes between rounds 2 and 3 about 4 to 5 stitches apart and check alignment before securing. βœ— Overstuffing the body will make the octopus too round and lose its flat profile; stuff the body lightly and gradually until somewhat flat as instructed. βœ— Working arm chains with inconsistent tension makes arms curl irregularly; maintain even tension on each chain and check curl direction after finishing each arm to match appearance. βœ— Forgetting to leave a long tail for sewing the nose will make attachment difficult; leave the long tail and use it to sew the nose securely into place between the eyes. βœ— Not reattaching to the correct loop (FLO/BLO) when instructed can change the texture; follow the BLO/FLO instructions exactly to get the intended look and eye placement.

Grumpy Mini Octopus Amigurumi Pattern

Make a tiny, grumpy-looking octopus amigurumi you can use as an ornament or a small toy. This playful mini uses variegated yarn for lovely color changes and curled arms for character. Clear step-by-step rounds, arm patterns, and assembly instructions help you complete a charming little sea friend. Perfect for gifting or making a collection of sea creatures.

Intermediate 2-3 Hours

Materials Needed for Grumpy Mini Octopus Amigurumi Pattern

β€” Main Fabric

  • 01
    Red Heart Super Saver (variegated colorways such as Ocean, Marrakesh, Stillwater Pooling) - approx 2 oz (small skein or scraps are sufficient)
  • 02
    Variegated or single-color medium/worsted weight yarn (weight #4) - small amounts for each octopus

β€” Tools Required

  • 01
    Crochet hook size 3.5 mm (or what you prefer with your yarn choice)
  • 02
    6mm Safety Eyes (2 pieces)
  • 03
    Scissors
  • 04
    Yarn needle / tapestry needle for sewing and weaving ends
  • 05
    Embroidery needle for attaching the nose
  • 06
    Stitch markers (optional)
  • 07
    Polyester stuffing

Progress Tracker

0% Complete

β€” Nose :

Round 1 :

6 sc in a mc

Round 2 :

(inc) 6 times (12)

Round 3 :

(1 sc, inc) 6 times (18)

Round 4-5 :

1 sc in each st around (18)

Round 6 :

(1 sc, dec) 6 times (12)

Round 7 :

(2 sc, dec) 3 times (9)

Info :

TO but do not close, leave long tail for sewing. Stuff the nose at this time. Set aside.

β€” Body :

Round 1 :

Ch 9 slst into first chain to close

Round 2-3 :

1 sc in each st around (9)

Round 4 :

(2 sc, inc) 3 times (12)

Round 5 :

(2 sc, inc) 4 times (16)

Round 6 :

BLO 1 sc in each st around (16)

Info :

Add eyes between rows 2 and 3 about 4 to 5 stitches apart (See Picture A). At this time you can add the eye lids in a 'V' shape to make it appear a bit grumpy (See Picture B).

Info :

Stuff the body but not too much as it should be some what flat.

Round 7 :

(dec) 8 times (8)

Info :

Close then reattach to FLO from round 6

Round 6 :

FLO 1 sc in each st around (16)

Round 7-8 :

1 sc in each st around (16)

Info :

We will begin making the Octopuses arms now.

β€” Arms :

Info :

Arms can be done in any number of ways. If you work the arms Clockwise they will curl up, if you work the arms counterclockwise they will curl down (See pictures C and D). Either way is fine and gives you a unique look! I prefer working counter clockwise so they curl down, if I can figure out how to alternate to get them curling in both directions I will update the pattern!!

Info :

Here are 4 arm patterns. Once you complete Arm 4 go back and repeat all arms again to get 8 arms.

Arm 1 (P1) :

Ch 20 turn, slst into 2nd chain from hook, 5 sc, sc3tog, 2 sc, 5 hdc, 3dc (should be at base of chain), skip st, sc into next st.

Arm 2 (P1) :

Ch 15 turn, slst into 2nd chain from hook, 7 sc, 6 hdc, skip st, sc into next st.

Arm 3 (P1) :

Ch 18 turn, slst into 2nd chain from hook, 3 sc, hdc3tog, 7 hdc, 3 dc, skip st, sc into next st.

Arm 4 (P1) :

Ch 20 turn, slst into 2nd chain from hook, 4 sc, 3 hdc, hdc3tog, 5 hdc, 3 dc, skip st, sc into next st.

Info :

Once you have 8 arms slst into 1st chain of 1st arm. TO leave tail. Using a needle and the tail go around and close hole left from skipping a stitch (See picture E). Weave in ends.

β€” Assembling :

Info :

Using the tail from the nose and an embroidery needle, sew the nose on. I start at the top of the head sewing the opening closed and tucking in any extra starting tail from the first chain. Try to center it between the eyes with the eyelids positioned so it is looking towards the nose. Weave in any loose ends.

Info :

Enjoy your Grumpy Octopus!

Assembly Instructions

  • Sew the nose to the center front of the head using the long tail from the nose and an embroidery needle, starting at the top of the head and closing the opening while tucking in any starting tail.
  • Position the safety eyes between rounds 2 and 3 about 4 to 5 stitches apart and add 'V' shaped eyelids before sewing the nose to create the grumpy expression.
  • After making four arm patterns, repeat them to create eight arms, slip stitch into the first chain of the first arm, then use the tail and needle to close the hole left by skipping a stitch and weave in ends.
  • Stuff the nose firmly before setting aside and stuff the body lightly so it remains somewhat flat; adjust stuffing as you attach the nose and arms for the desired shape.

Important Notes

  • πŸ’‘Leave a long tail on the nose to make sewing it to the head easy and secure.
  • πŸ’‘Stuff the body lightly rather than firmly to maintain the flattened shape described in the pattern.
  • πŸ’‘Place eyes between rounds 2 and 3, spaced about 4 to 5 stitches apart, and add eyelids before final assembly for the grumpy look.
  • πŸ’‘Work arms clockwise to curl up or counterclockwise to curl down and be consistent across arms for a cohesive appearance.

This Grumpy Mini Octopus pattern turns small scraps of variegated yarn into a whimsical little sea friend you will adore. It is perfect for ornaments, little gifts, or a playful desk companion. Make a school of colorful octopuses to brighten any space! πŸ§ΆπŸ™βœ¨

You ask,

we answer.

FAQs

What size will the finished piece be?

The finished octopus measures approximately 2 inches from the top of the nose to the bottom of the body and about 4-5 inches from nose to end of arms depending on yarn and tension.

Can I use different yarn weights for this pattern?

Yes, you can use different yarn weights but the size will change; adjust your hook to match the yarn and expect a larger or smaller finished octopus.

Do I need prior crochet experience for this pattern?

This pattern is rated intermediate because it uses magic circles, increases and decreases, and working in BLO/FLO; basic crochet skills and reading rounds are recommended.

How do I make the arms curl in different directions?

Work the arm chains clockwise to make them curl up or counterclockwise to make them curl down; be consistent across arms or intentionally alternate for varied curls.