🧢 Beautiful ✨ Detailed πŸ’ Adorable

Calico Cat Amigurumi Pattern

Calico Cat Amigurumi Pattern
4.7β˜… Rating
5-7 Hours Time Needed
2.5K Made This
βœ‚οΈ

Intermediate Level

Ideal for those with basic crochet experience, featuring slightly more advanced stitches and techniques to expand your skills.

⏱️

Weekend Treat

Takes 5-7 hours, making it an enjoyable project to finish over a couple of days.

🧸

Cute Companion

An adorable friend to cherish, handcrafted with love to bring comfort and joy for years to come.

About This Calico Cat Amigurumi Pattern

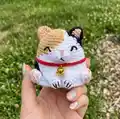
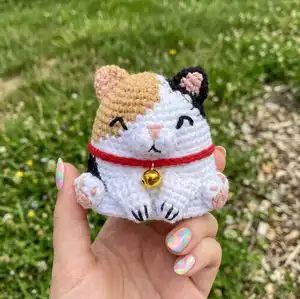
This pattern creates a small, rounded calico cat amigurumi with embroidered features and removable accessories. It uses simple amigurumi construction with color changes to create calico markings. The pattern includes instructions for ears, muzzle, paws, tail, and an optional fish accessory.

Calico Cat Amigurumi Pattern crochet pattern - detailed view of completed project

Includes clear rounds, finishing tips, and an assembly guide to place parts accurately. Suitable for making single or reversible versions using the joining instructions provided.

Why You'll Love This Calico Cat Amigurumi Pattern

I absolutely love this pattern because it captures a lot of personality in a very small plush. I enjoy the color-change technique that produces charming calico markings without complicated shaping. I also love how the small accessories like the bell and fish add character and make each cat unique. The pattern balances simple rounds with tiny finishing details that make the finished toy feel special.

Calico Cat Amigurumi Pattern step 1 - construction progress Calico Cat Amigurumi Pattern step 2 - assembly progress Calico Cat Amigurumi Pattern step 3 - details and accessories Calico Cat Amigurumi Pattern step 4 - final assembly and finishing

Switch Things Up

I love how versatile this pattern is β€” you can change colors to make many different cat breeds and personalities.

Try using pastel shades to create a soft, nursery-friendly version of the cat for baby gifts.

Switch to bulky yarn and a larger hook to make a chunky, cuddly version that finishes much faster and feels squishy.

Make a tiny keyring-sized mini by using thinner yarn and a smaller hook for a cute portable charm.

I often add embroidered eyebrows or different mouth shapes to change the expression of the cat dramatically.

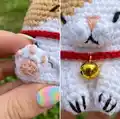
Replace the small bell with a tiny crochet flower or bow to customize the collar for a special recipient.

Make matching sets by crocheting several cats in different colorways and display them together for a charming collection.

Use felt for paw pads and nose if you prefer a different texture instead of embroidery; glue or sew them in place securely.

To make the toy posable, add a short length of thin wire inside the tail or legs, but be sure to cover wire ends and keep it away from toys for small children.

If you want a reversible toy, follow the pattern note about leaving a 50 cm (20") starting tail and practice the joining technique; it adds a delightful surprise to your project.

Common Mistakes & How to Fix Them

βœ— Skipping stitch markers during continuous spiral rounds leads to losing the beginning of a round; mark the first stitch of every round to stay on track. βœ— Working too loosely when using tapestry color changes for reversible amigurumi can cause floppy fabric; maintain consistent tension and consider cutting and starting a new yarn for each color section. βœ— Forgetting to stuff progressively causes lumps or awkward shaping; stuff small amounts as you shape the body and head to keep an even, round silhouette. βœ— Not doing the invisible finish correctly will leave a visible hole at closure; follow the invisible finish instructions and pull the tail through the loop to draw the opening closed neatly. βœ— Pulling embroidery yarn too tight when adding facial details will distort the shape; use gentle tension and adjust placement before securing permanently. βœ— Attaching limbs without pinning can result in uneven placement; pin and check symmetry before sewing each piece in place.

Calico Cat Amigurumi Pattern

Make an adorable calico cat amigurumi with complete step-by-step instructions. This pattern guides you through color changes, small details, and finishing touches so your kitty looks polished. Perfect for gifts, decorations, or collecting cute handmade companions. Youll love the charming shape and tiny embroidered details that bring this cat to life.

Intermediate 5-7 Hours

Materials Needed for Calico Cat Amigurumi Pattern

β€” Main Fabric

  • 01
    4-ply cotton blend yarn (recommended), assorted colors depending on variant: white (main), tan, black, red (collar), peach (paws/nose)
  • 02
    Alternative colorways shown: grey, pink, light beige, brown, dark brown, orange for other cat versions
  • 03
    Use yarn of the same thickness for all parts (I used 4 ply cotton blend throughout)
  • 04
    Small additional yarn for embroidery (black 1-ply for eye/whisker details)
  • 05
    Small amount of contrasting yarn for accessories (peach or pink for paw pads and nose)

β€” Tools Required

  • 01
    Crochet hook size 2.0 mm (or size suitable for your yarn)
  • 02
    Tapestry needle and embroidery needle
  • 03
    Scissors
  • 04
    Stitch markers or a piece of scrap yarn
  • 05
    Polyester stuffing (fiberfill)
  • 06
    Small golden bell, diameter 7 mm
  • 07
    Small circular piece of cardboard or rigid plastic for base (optional, to help toy stand)
  • 08
    Pins for assembly

Progress Tracker

0% Complete

β€” Head and Body :

Info :

Leave a long starting yarn tail, approximately 10 cm (4"). This tail will be used to join 2 cats to make a reversible amigurumi. If you are making a single toy you do not need a long yarn tail.

Round 1 :

6sc in MR (6)

Round 2 :

6inc (12)

Round 3 :

[sc, inc]x6 (18)

Round 4 :

[sc, inc, sc]x6 (24)

Round 5 :

[3sc, inc]x6 (30)

Round 6 :

[2sc, inc, 2sc]x6 (36)

Round 7 :

[5sc, inc]x6 (42)

Round 8 :

42sc (42)

Round 9 :

[3sc, inc, 3sc]x6 (48)

Round 10-13 :

48sc (48)

Round 14 :

[7sc, inc]x6 (54)

Round 15 :

BLO 54sc (54)

Round 16-19 :

54sc (54)

Round 20 :

[4sc, inc, 4sc]x6 (60)

Round 21-22 :

60sc (60)

Info :

Fasten off, cut the yarn and do invisible finish. Stuff the body with fiberfill as you go. Prepare a circular piece of cardboard or rigid plastic to fit inside the bottom of the body to help the base stay flat if desired. Sew the base to the BL of the last round of the body if using a separate base.

β€” Ears (make 2) :

Info :

We will crochet ears using two colors alternately depending on the variant. Leave the last stitch unworked on the final row to give a natural shape. Fasten off and leave a long tail for sewing. Do invisible finish.

Round 1 :

6sc in MR (6)

Round 2 :

sc, inc, sc, inc, sc, inc (9)

Round 3 :

2sc, inc, sc, sc, inc, 2sc, inc (12)

Round 4 :

3sc, inc, sc, 2sc, inc, 3sc (13) leave the last st unworked

β€” Muzzle :

Info :

Start with white yarn. Make 6sc in MR, tighten the MR and join with a sl st to the first st. Fasten off and cut the yarn. With a new piece of white yarn, make another 6sc in MR, tighten the MR, sl st to the first st. Do not fasten off. Join the two circles: continue your work by joining it to the first circle with a sc. Work 5 more sc at the first circle, then continue with 6sc at the second circle. Fasten off. Leave a long tail for sewing and do the invisible finish.

β€” Front Legs (make 2) :

Round 1 :

8sc in MR (8)

Round 2 :

8sc (8)

Round 3 :

8sc (8)

Round 4 :

3sc, inc, 4sc (9)

Round 5 :

4sc, inc, 4sc (10)

Round 6 :

No need to stuff. Last round: flatten and work through both stitches 5sc (5)

Info :

Fasten off, leaving a long tail for sewing.

β€” Paws (make 2) :

Round 1 :

6sc in MR (6), join to the first sc with a sl st. Change to white. Cut the peach yarn leaving about 20 cm long tail.

Round 2 :

BLO, loosely 6sl st (6), join to the first st with a sl st. Make 1ch.

Round 3 :

3inc, loosely 3sl st (9), join to the first sc with a sl st.

Round 4 :

[bobble st, sl st]x3 (6), leave remaining stitches unworked

Info :

Fasten off, leave a long tail for sewing, do invisible finish. Using the peach tail, embroider paw pads on every bobble stitch.

β€” Tail :

Info :

Start with black (or the variant primary tail color). Work every sl st below a little bit loosely to create a flexible tail.

Round 1 :

5sc in MR (5)

Round 2-3 :

5sc (5)

Round 4 :

2sl st, 3sc (5)

Round 5 :

5sc (5)

Round 6 :

Change color (tan): 2sl st, 3sc (5)

Round 7 :

5sc (5)

Round 8 :

2sl st, 3sc (5)

Round 9-10 :

Change to black: 5sc (5)

Round 11-12 :

Change to tan: 5sc (5)

Round 13 :

sl st, 3sc, sl st (5)

Round 14 :

5sc (5)

Round 15 :

sl st, 3sc, sl st (5)

Info :

Fasten off, leave a long tail for sewing. Do invisible finish.

β€” Fish (accessory) :

Info :

Start with peach yarn. Work the fish body first then continue with the tail. Fasten off and leave a long tail for sewing.

Instructions :

Make 5ch. Start from the second loop from the hook: sc (this will be called the first st*), hdc, dc, inc3 at the last ch. Continue at the other side of the chain: dc, hdc, sc, then sl st at the first st*. Then continue to work the tail: [3ch, start from the second loop from the hook: sc, sl st]x2, then sl st to the first st*. Fasten off. Leave a long tail for sewing. Using black yarn (1 ply only) and embroidery needle, embroider the eye.

β€” Base (single toy) :

Round 1 :

6sc in MR (6)

Round 2 :

6inc (12)

Round 3 :

[sc, inc]x6 (18)

Round 4 :

[sc, inc, sc]x6 (24)

Round 5 :

[3sc, inc]x6 (30)

Round 6 :

[2sc, inc, 2sc]x6 (36)

Round 7 :

[5sc, inc]x6 (42)

Round 8 :

[3sc, inc, 3sc]x6 (48)

Round 9 :

[7sc, inc]x6 (54)

Round 10 :

[4sc, inc, 4sc]x6 (60)

Info :

Fasten off. Leave a long tail for sewing. Stuff the body with fiberfill (you can continue stuffing while sewing the base). Place the cardboard/rigid plastic into the bottom and sew the base to the BL of the last round to secure the bottom if desired.

β€” Special Stitches and Finishes :

Infos :

Invisible Finish: After completing the last stitch, cut the yarn and pull on the loop to draw out the tail. Using the tapestry needle skip the next st, insert the needle from front to back under both loops, go back to the last st and insert the needle through the back loop of this st, pull on the tail to close neatly. Bobble stitch: make 3 incomplete dc in same st and join them together at the top. Surface slip stitches: insert hook from front to back, pull up a loop and proceed as instructed to form a surface chain.

Assembly Instructions

  • Attach the muzzle on the head between R11-13, 5st wide. No need to stuff the muzzle.
  • Attach the ears on the head between R4-8, spacing them evenly and sew securely using the long tails left from the ears.
  • Attach the front legs on the body between R17-22 with a slightly tilted position for a natural pose.
  • Attach the paws on the body between R18-22, right beside the front legs; embroider paw pads using the peach tail.
  • Attach the tail at the back of the body at R21 and sew firmly so the tail is secure.
  • Attach the fish accessory to the bottom of the muzzle and also to one of the front legs to fix the position if desired.

Important Notes

  • πŸ’‘Use stitch markers to keep track of your rounds, especially during color changes and shaping sections.
  • πŸ’‘Work with consistent tension throughout and avoid working too tightly if you plan to make the reversible version.
  • πŸ’‘Stuff gradually while shaping to avoid lumps and to achieve a smooth rounded silhouette.
  • πŸ’‘Pin all parts in place before sewing to ensure correct positioning and symmetry.

This charming Calico Cat Amigurumi pattern brings adorable personality to a small handmade toy with sweet embroidered features and tiny accessories. The step-by-step rounds, color-change tips, and finishing techniques are all included so you can create a polished little companion. Perfect as a gift, shelf friend, or part of a cutest-of-collection series. 🧢🐱✨

You ask,

we answer.

FAQs

What size will the finished piece be?

The finished amigurumi measures about 6 cm (2.3") tall when using 4-ply cotton blend yarn and a 2.0 mm hook as recommended.

Can I use different yarn weights for this pattern?

Yes, you can use different yarn weights, but the final size will change; choose a hook appropriate for your yarn and expect a larger or smaller toy.

Do I need prior crochet experience for this pattern?

This pattern is rated intermediate; basic knowledge of single crochet, increases, decreases, and working in continuous spiral rounds is recommended.

How long does this project typically take to complete?

Most crocheters complete this project in 5-7 hours, depending on experience, color changes, and finishing details.

Is it possible to make a reversible amigurumi using this pattern?

Yes β€” the pattern includes notes about leaving a longer starting yarn tail (about 50 cm/20") and instructions for joining two cats to make a reversible toy.

How do I make the base stable so the toy stands?

Prepare a circular piece of cardboard or rigid plastic to fit inside the bottom of the body and sew the base to the back loops of the last round to help the toy stand flat.