🧢 Beautiful ✨ Detailed πŸ’ Adorable

Goose Mittens Pattern

Goose Mittens Pattern
4.5β˜… Rating
2-4 Hours Time Needed
2.8K Made This
βœ‚οΈ

Beginner Friendly Level

Perfect for those just starting their crochet journey, with clear instructions and simple techniques

⏱️

Bite-Sized Project

Finishes in 2-4 hoursβ€”perfect for an afternoon of creative relaxation.

🧣

Snug Essential

Everyday comfort with practical charm, designed for both functionality and style through changing seasons.

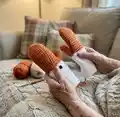
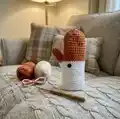
About This Goose Mittens Pattern

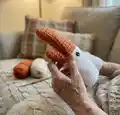
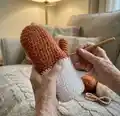
This pattern creates a pair of whimsical Goose Mittens worked top-down in the round using two strands held together for a thick, cozy fabric. You will learn how to shape the mitten, create a thumb hole, add a thumb, and change color for the lower wrist. The pattern is customizable for teen and adult sizes and requires only basic stitches.

Goose Mittens Pattern crochet pattern - detailed view of completed project

Clear step-by-step rounds guide you through every stage, with tips for sizing and finishing. Perfect for a quick handmade gift or a cozy personal project.

Why You'll Love This Goose Mittens Pattern

I absolutely love this pattern because it turns a simple mitten into a playful, characterful accessory that makes people smile. I designed it to be fast and satisfying β€” you can finish a pair in an afternoon while still getting a polished result. The two-strand technique gives the mittens a plush, durable fabric I personally rely on for warmth and durability. I also enjoy how easy it is to customize the thumb hole and length to fit different hands, which makes these mittens versatile gifts.

Goose Mittens Pattern step 1 - construction progress Goose Mittens Pattern step 2 - assembly progress Goose Mittens Pattern step 3 - details and accessories Goose Mittens Pattern step 4 - final assembly and finishing

Switch Things Up

I love changing the color blocking to give these mittens different personalities; try pastel shades for a soft look or high-contrast colors for a bold goose.

You can easily adjust the size by adding or removing rounds before the thumb hole; I often add two extra rounds for a more relaxed fit.

If you want a thicker mitten, use a bulkier yarn and a larger hook while keeping two strands together; this creates an extra-warm fabric I adore.

Swap the safety eyes for embroidered eyes or small crocheted circles if you want a fully washable mitten without hardware.

Make a matching set by crocheting a hat or scarf in the same two-strand technique for coordinated winter accessories.

I sometimes add a small pom-pom to the cuff or a little felt beak at the thumb for extra goose character β€” it makes the mittens extra playful.

Try adding ribbed cuffs by working front and back post stitches around the wrist edge for a snug, finished look.

For a mini keychain version, use a lighter weight yarn and a smaller hook to create tiny mittens that work as ornaments or gifts.

If you want posable thumbs, insert a short piece of craft wire inside the thumb before closing the top to hold a bend.

I also experiment with textured stitches on the orange top section, like crab stitch or a bronze seed stitch, to add tactile interest and visual depth.

Common Mistakes & How to Fix Them

βœ— Skipping stitch markers when making the thumb hole can cause misplaced openings; mark the start of your thumb chain and the adjacent stitches so you can identify where to join again. βœ— Changing color without securing ends can lead to loose joins and gaps; weave in or secure your color change tail neatly and slip stitch to anchor the new color. βœ— Making the magic ring too tight or leaving the end loose can distort the center; tighten the magic ring to close the center and weave in the tail to secure. βœ— Not checking mitten width before proceeding down the hand can cause poor fit; try the mitten on often as you work and add or remove rounds to reach the proper width. βœ— Overstuffing the thumb area shape before closing can make the tip bulky; decrease gradually and stuff lightly only as needed for shape.

Goose Mittens Pattern

Make a pair of playful Goose Mittens that are cozy, quick to crochet, and perfect for autumn gifts. This pattern uses two strands held together for a plush, warm fabric and includes clear step-by-step instructions so you can customize sizing for teens and adults. You will work top-down in the round and add a charming thumb and eye detail to finish. Great for crafters who enjoy a fast, satisfying project.

Beginner Friendly 2-4 Hours

Materials Needed for Goose Mittens Pattern

β€” Main Fabric

  • 01
    1 skein (364 yards) of worsted weight yarn in orange (Use two strands held together)
  • 02
    1 skein (364 yards) of worsted weight yarn in white (Use two strands held together)
  • 03
    Small amounts of contrasting yarn for any added details (optional)

β€” Tools Required

  • 01
    Crochet hook J-6mm
  • 02
    Yarn needle
  • 03
    12mm flat back safety eyes (or small black buttons) or small crocheted circles
  • 04
    Scissors
  • 05
    Stitch markers (optional for thumb placement)
  • 06
    Pins for positioning eyes (optional)

Progress Tracker

0% Complete

β€” Before we begin :

Info :

These mittens will be made to fit the wearers hands. You will be creating these mittens from the top down in the round. At the end of the round, you will not be joining stitches (It is worked in a spiral, as done in amigurumi projects). Afterwards, you will create the thumb while attaching it to the glove.

β€” Making the Top of the Mitten :

Info :

With 2 Strands of Orange:

Round 1 :

Start 10 sc in a magic ring (10)

Round 2 :

Sc around (10)

Round 3 :

Sc around (10) 'Weave in magic ring end'

Round 4 :

Inc in each st around (20)

Info :

See how the glove is fitting so far, if you have medium to large size hands, you may want to do several more rounds of (sc in st, inc in next) repeat around

Round 5-14 :

Sc around (20)

Info :

After reaching the proper width for your hand, continue to make rounds of sc until the glove reaches the crook of your hand. (If you slip on the mitten, it should be just touching the space in between your thumb and index finger)

Round 15 :

Thumb hole round: Sc in the first stitch of the round, chain 6 * 'not too loose or tight', skip the next two stitches in the round and sc in the next st. Sc around until you get back to that first stitch that had the chain 6. Fasten off, weave ends.

Info :

Note: You can chain more stitches in an even number to create a larger thumb hole

β€” Making the Lower Hand and Wrist of the Mitten :

Info :

With 2 Strands of White:

Round 16 :

Slip st and then sc into that same st 3 sts away from the thumb hole. (You can choose anywhere in the round if you would like, this color change will be hardly visible.) Sc around. (24)

Round 17 :

You may notice a gap at the beginning of this next round from where the color change happened. We are going to start this next round without any joining, just sc in the first stitch (skip the slip st) and sc around. (24)

Round 18 :

Sc around (24)

Info :

Note: From here on forward with the pattern, you can continue to sc around without any decreasing to have looser fitting mittens. Or, you can choose to shape them by decreasing as they go down your hand and your wrist for a snug fit. (Test mittens are made with a snug fit). So, wherever you see fit to make the mitten tighter, repeat for each round (Sc in 2sts, decrease in next st)

Round 19 :

(Sc in 2sts, decrease in next) (18)

Round 20-28 :

Sc around (18)

Info :

Fasten off. You can add some ribbing to the end of the mitten if you wish.

β€” Making the Thumb :

Info :

With 2 Strands of Orange:

Info :

Flip glove inside out, and you will be crocheting from the inside of the circle (See image)

Round 1 :

Slip st yarn into any chain around the thumb hole. Sc in the same st. Then in traditional and non-traditional spaces, work 12 sts around. (12)

Round 2-3 :

Sc around

Info :

See how the thumb hole is fitting so far, if you have medium to large size hands and long fingers, you may want to do a few more rounds of sc. Stop making sc rounds when you reach slightly past your thumb knuckle.

Round 4 :

Decrease in all sts (6)

Info :

If you added more chains than 6 when you made the thumb hole, continue to decrease in each st until you reach 6 sts in the round.

Round 5-7 :

Sc around (6)

Info :

Fasten off and weave top of thumb shut.

β€” Placing the Eyes :

Info :

Flip the glove right side out and place your goose eyes (Can be flat back eyes that are then melted at the sharp end, also buttons, or small crocheted circles) on the inner corner of the glove, with the test gloves, the eyes were placed between the 2nd and 3rd round of white.

Info :

The mittens are complete! Honk!

Assembly Instructions

  • Place the thumb by working into the chains created for the thumb hole and work the thumb rounds from the inside out, then fasten off and weave the thumb top shut securely.
  • Change to white yarn for the lower hand and wrist by slip stitching 3 sts away from the thumb hole, then work in rounds to create the white lower section.
  • Position the flat back safety eyes or buttons on the inner corner of the glove between the 2nd and 3rd round of white and secure them according to the manufacturer's instructions.
  • Weave in all ends and close the magic ring end after round 3 of the top; ensure the join and tails are neatly hidden inside the mitten.
  • Add optional ribbing to the cuff after fastening off by picking up stitches evenly around the wrist edge and working a ribbing pattern if desired.

Important Notes

  • πŸ’‘Work in a continuous spiral without joining at the end of rounds to keep the fabric smooth and seamless.
  • πŸ’‘Try the mitten on as you go so you can add or remove rounds to adjust the width and length for a perfect fit.
  • πŸ’‘When changing colors, slip stitch into the chosen change spot and work the next round starting in the next stitch to minimize gaps.
  • πŸ’‘Use two strands held together as specified for the same gauge and fabric density, and maintain consistent tension for uniform results.

These Goose Mittens are a fun, cozy project that make delightful gifts or a special treat for yourself. They combine easy stitches with playful styling for an eye-catching result. Enjoy customizing size and color to match your style β€” happy hooking! 🧢🧀

You ask,

we answer.

FAQs

What size will the finished piece be?

The finished mittens are custom sized; the test mittens are approximately a teen/women's small when using two strands of worsted yarn and a J-6mm hook.

Can I use a different hook or yarn weight?

Yes, you can substitute yarn weights and hooks, but the final size and fabric density will change; try a gauge swatch and adjust rounds to fit the wearer.

Do I need to join rounds when working?

No, this pattern is worked in a continuous spiral without joining stitches, similar to amigurumi techniques.

How long does this project typically take to complete?

Most crafters complete a pair of mittens in about 2-4 hours, though time may vary with experience and sizing adjustments.