🧢 Beautiful ✨ Detailed πŸ’ Adorable

Floral headband Pattern

Floral headband Pattern
4.3β˜… Rating
5-7 Hours Time Needed
2.6K Made This
βœ‚οΈ

Intermediate Level

Ideal for those with basic crochet experience, featuring slightly more advanced stitches and techniques to expand your skills.

⏱️

Weekend Treat

Takes 5-7 hours, making it an enjoyable project to finish over a couple of days.

🧣

Snug Essential

Everyday comfort with practical charm, designed for both functionality and style through changing seasons.

About This Floral headband Pattern

This pattern teaches you how to crochet a floral headband using raffia yarn to create poppies, camomiles and cornflowers. You will learn petal construction, centres, and finishing techniques to assemble the flowers onto a plastic headband. The instructions include clear photo steps and glue/assembly tips so you can achieve a neat, professional look. It is perfect for making festival crowns, gifts, or decorative accessories.

Floral headband Pattern crochet pattern - detailed view of completed project

The pattern uses accessible materials like raffia and a 3 mm hook and is ideal for crafters who enjoy mixed media finishing. Follow the step-by-step corolla and centre instructions for each flower, then glue and decorate to complete your headband.

Why You'll Love This Floral headband Pattern

I absolutely love this pattern because it combines crochet with tactile materials like raffia to create vibrant, three-dimensional flowers. The photos and clear round-by-round instructions make it easy to follow while still allowing room for creative choices. I enjoy how each flower type has its own character β€” poppies are bold, camomiles delicate, and cornflowers textured. Making the centres and adding glitter or beads gives every piece a handmade signature that I find deeply satisfying.

Floral headband Pattern step 1 - construction progress Floral headband Pattern step 2 - assembly progress Floral headband Pattern step 3 - details and accessories Floral headband Pattern step 4 - final assembly and finishing

Switch Things Up

I love how easily this headband can be customized by changing raffia colors; try soft pastels for a spring look or deep jewel tones for fall.

You can make larger or smaller flowers by switching yarn thickness and hook size β€” bulky raffia creates showy blooms while thinner raffia makes delicate petals.

I often embroider tiny details or add beads to the flower centres for extra shine and texture; try seed beads or small pearls for a dressy finish.

Try attaching the flowers to a fabric-wrapped headband instead of a plastic one for a softer, more comfortable fit.

Make a matching set of hair clips or a brooch by mounting single flowers on barrettes or brooch pins using the same gluing method.

For a rustic vibe, add natural elements like dried grasses or twine accents alongside the raffia flowers.

I sometimes mix in felt leaves or crocheted leaves to add greenery and fullness to the arrangement; pin or glue them under the flowers.

To create a portable mini version, use thinner raffia and a smaller headband or hair clip to make a petite floral accent.

If you want posable petals, add a thin craft wire inside folded petals before closing them, then shape gently for the desired curve.

Don't be afraid to experiment with different centre treatments β€” wrapped raffia, tiny pom-poms, or painted beads all change the character of the flower.

Try alternating flower types and sizes along the band to get a more organic, balanced composition instead of repeating identical flowers.

Common Mistakes & How to Fix Them

βœ— Not tightening the first chain or closing the round securely can cause loose centres and gaps; always tighten the starting chain and secure the final stitch before hiding ends. βœ— Cutting the raffia fringe too short will prevent the centre from looking full and textured; leave the recommended uncut middle length and trim only after gluing and shaping. βœ— Skipping the step to steam and shape the corolla can result in flat petals; use an iron to steam and shape the corolla gently as instructed for a lifted, natural look. βœ— Applying too much PVA glue when attaching small pieces can make the raffia stiff and messy; use a small amount, dab carefully, and remove excess before it dries. βœ— Failing to hide and knot ends on the wrong side can leave visible knots on the finished flower; always tuck tails into the wrong side and secure with a tight knot before trimming.

Floral headband Pattern

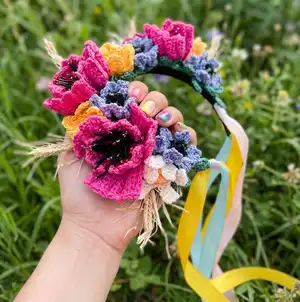
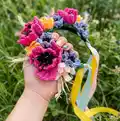
Create a beautiful boho floral headband using raffia yarn and simple crochet techniques. This pattern guides you step-by-step to make poppies, camomiles and cornflowers and assemble them into a striking headpiece. Perfect for gifts, festivals, or adding a handmade touch to your wardrobe. Follow the clear photo instructions and craft a unique floral crown you'll be proud to wear.

Intermediate 5-7 Hours

Materials Needed for Floral headband Pattern

β€” Main Fabric

  • 01
    Raffia yarn for poppies - 66 yards (60 m)
  • 02
    Raffia yarn for camomiles, cornflowers and leaves - 22 yards (20 m) each
  • 03
    Raffia yarn for spikelets - 11 yards (10 m)
  • 04
    Raffia yarn for centres - 6 yards (5 m)
  • 05
    Example yarns used: raffia Ispie and Fibranatura
  • 06
    Additional small amounts of black raffia (for poppy centres) and other accent raffia colors as needed

β€” Tools Required

  • 01
    Crochet hook size 3 mm
  • 02
    Plastic headband, width - 10 mm
  • 03
    33 adjustable plastic clamps, length 4-5 inches (10-12 cm)
  • 04
    Gold spray paint (or nail polish)
  • 05
    Little glitter
  • 06
    5 beads, diameter 10-15 mm (optional)
  • 07
    3 tapes of 2 1/5 yards (2 m) each (optional)
  • 08
    PVA glue and glue gun
  • 09
    Scissors
  • 10
    Iron for steaming corollas
  • 11
    Yarn needle for sewing and hiding ends
  • 12
    Pins for assembly

Progress Tracker

0% Complete

β€” Crochet the camomile :

Corolla (base) :

Crochet 2 CH.

1 row :

Crochet 6 SC in the 2nd loop from the hook.

2 row :

1 Inc*6 = 12, SlSt.

3 row :

(6 CH, 3 DC from the 3rd loop of the hook, 1 SC, skip one loop of the 2nd row, SlSt)*6.

Info :

Cut the thread, pull out the end. Tighten the end in the 1st CH of the row to the wrong side. Tie the knot, hide the ends.

Info :

Slightly compress the centre so that it takes the shape of a ball. Steam the corolla with an iron. Glue on the centre with the PVA glue.

Info :

Crochet four more camomiles.

β€” Camomile centre :

Centre :

Crochet 2 CH.

1 row :

6 SC in the 2nd loop from the hook, SlSt.

2 row :

1 Inc*6 in the hole (= 12).

Info :

Cut the thread, pull out the end. Close this row: Insert the hook under the 1st loop of the row, pull out the end, tighten the end back to the wrong side. Strengthen and hide the end.

Info :

Slightly compress the centre so that it takes the shape of a ball. Steam the corolla with an iron. Glue on the centre with the PVA glue.

β€” Crochet the poppy :

Corolla 1 :

Crochet 2 CH.

1 row :

6 SC in the 2nd loop from the hook.

2 row :

1 Inc*6 = 12, SlSt.

3 row :

(8 CH, 7 SC on the back loop only from the 2nd loop of the hook, SlSt in the loop of the 2nd row)*6.

Detail :

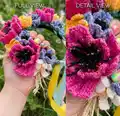
3 DC from the 3rd loop of the hook, 1 SC, skip one loop of the 2nd row, SlSt)*6. (As shown in photos.)

Info :

Cut the thread, pull out the end. Tighten the end in the 1st CH of the row to the wrong side. Tie the knot, hide the ends.

Corolla 1 petals :

7 SC on the back loop only from the 2nd loop of the hook, SlSt in the loop of the 2nd row, turn, 7 SC on the back loop only, CH, 7 SC on the back loop only, SlSt, 7 SC on the back loop only, CH, 7 SC on the back loop only, SlSt, 7 SC on the back loop only, CH, 7 SC on the back loop only, SlSt)*3.

Info :

Cut the thread, pull out the end. Tighten the end in the 1st CH of the row to the wrong side. Tie the knot, hide the ends.

Corolla 2 :

Crochet 2 CH.

1 row :

6 SC in the 2nd loop from the hook.

2 row :

(1 SC, 1 Inc)*3 = 9, SlSt.

3 row :

(6 CH, 5 SC on the back loop only from the 2nd loop of the hook, SlSt in the loop of the 2nd row, turn, 5 SC on the back loop only, CH, 5 SC on the back loop only, SlSt, 5 SC on the back loop only, CH, 5 SC on the back loop only, SlSt)*3.

Info :

Cut the thread, pull out the end. Tighten the end in the 1st CH of the row to the wrong side. Tie the knot, hide the ends.

Centre :

Crochet similarly to the centre of the camomile.

Fringe :

Take two pieces of the raffia yarn of 2 inches (5 cm) each. Straighten both pieces. Cut the fringe on both sides, leaving 10 mm uncut in the middle.

Assembly of poppy centre :

Glue on the pieces from below to the centre crosswise. Dip the ends in the PVA glue and immediately in the glitter. Glue on the centre in the 2nd corolla, then the 2nd corolla - in the 1st corolla with the PVA glue.

Info :

Crochet two more poppies.

β€” Crochet the cornflower :

Corolla :

Crochet 4 CH. Connect in the circle with SlSt.

1 row :

(3 CH, 3 DC in the hole, turn, 3 CH, SlSt, 3 CH, SlSt, 3 CH, SlSt, turn, fold the petal in half and connect with SlSt, SlSt in the hole)*6.

Info :

Cut the thread, pull out the end. Tie the knot on the wrong side, hide the ends.

Centre :

Wrap two fingers four times with a piece of the raffia yarn.

Finish centre :

Grab in the middle with the loop. Wrap the fold with the ends. Cut the ends of the tassel.

Info :

Glue on the centre to the corolla as shown in photos. Secure with PVA glue as needed.

Assembly Instructions

  • Glue the flower centres into the corollas using PVA glue; press gently and allow to dry before further handling.
  • Attach flowers to the plastic headband using the adjustable plastic clamps to position each element before final gluing or sewing.
  • Secure poppy fringe centres by gluing the trimmed raffia pieces crosswise into the centre, dipping ends into PVA glue and glitter as shown.
  • Spray paint or use nail polish to color the inside of the clamps or beads gold, then glue them into place as decorative accents.
  • Tie tapes to the ends of the headband and hide any yarn tails or knots on the wrong side; use glue gun sparingly to fix any loose pieces.

Important Notes

  • πŸ’‘Use PVA glue sparingly and allow each glued piece to dry before moving on to prevent shifting and mess.
  • πŸ’‘Steam the corolla pieces gently with an iron to shape petals and achieve a more natural flower silhouette.
  • πŸ’‘Hide ends on the wrong side and tighten the starting chain endings to avoid visible knots on the finished flowers.
  • πŸ’‘Trim raffia fringe only after gluing and securing to maintain full, even texture and prevent accidental over-cutting.

This floral headband pattern brings handmade charm to any outfit with raffia flowers that pop with texture and color. 🌸 Follow the step-by-step corolla and centre instructions to craft poppies, camomiles and cornflowers, then assemble them into a stunning headpiece. Whether for festivals, gifts, or your own wardrobe, these flowers are a delightful, tactile project to make and share. 🧢✨

You ask,

we answer.

FAQs

What size will the finished piece be?

The finished headband dimensions depend on the plastic headband used, but the completed flower elements create a headband approximately 4 inches high at the tallest flowers with tape lengths of about 39 inches for ties as noted in materials.

Can I use different yarn weights for this pattern?

Yes, you can substitute different yarns but the pattern is written for raffia yarn and a 3 mm hook; swapping yarn weight will change the look and size of flowers, so adjust hook size accordingly.

Do I need prior crochet experience for this pattern?

This pattern is rated intermediate; basic crochet stitches like CH, SC, DC and increases are used, along with finishing techniques and careful assembly, so some experience is recommended.

How long does this project typically take to complete?

Most crafters complete this project in 5-7 hours depending on the number of flowers and the time spent on assembly and gluing.