🧢 Beautiful ✨ Detailed πŸ’ Adorable

Gnome - organizer Amigurumi Pattern

Gnome - organizer Amigurumi Pattern
4.2β˜… Rating
5-7 Hours Time Needed
2.2K Made This
βœ‚οΈ

Intermediate Level

Ideal for those with basic crochet experience, featuring slightly more advanced stitches and techniques to expand your skills.

⏱️

Weekend Treat

Takes 5-7 hours, making it an enjoyable project to finish over a couple of days.

🧸

Cute Companion

An adorable friend to cherish, handcrafted with love to bring comfort and joy for years to come.

About This Gnome - organizer Amigurumi Pattern

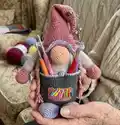
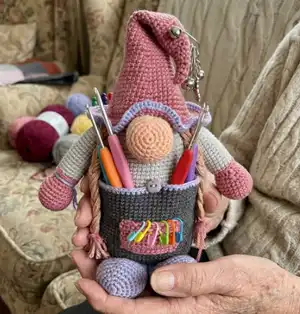
This pattern creates a practical Gnome Organizer amigurumi with pockets for tools and supplies. You will crochet the body, pants with pockets, hat, hands, legs, nose and small accessories. The design includes tips for weighting the base and assembling all parts to make the gnome stand securely.

Gnome - organizer Amigurumi Pattern crochet pattern - detailed view of completed project

The pattern uses simple amigurumi techniques like magic ring, increases and decreases, plus some front/back loop work for the pants edge. Clear round-by-round instructions make it easy to follow and customize.

Why You'll Love This Gnome - organizer Amigurumi Pattern

I absolutely love this pattern because it combines a playful amigurumi gnome with a very useful organizerβ€”it's both decorative and functional. I enjoy the shaping of the tall hat and the satisfaction of adding pockets that actually hold tools. The project lets me play with color combinations and tiny accessories for a unique finished piece. It's a great way to use scrap yarn and practice garment-like shaping in amigurumi.

Gnome - organizer Amigurumi Pattern step 1 - construction progress Gnome - organizer Amigurumi Pattern step 2 - assembly progress Gnome - organizer Amigurumi Pattern step 3 - details and accessories Gnome - organizer Amigurumi Pattern step 4 - final assembly and finishing

Switch Things Up

I love experimenting with colors on this gnome β€” try swapping the pink hat for mustard or teal for a totally different vibe.

You can make the gnome bigger or smaller by changing yarn weight and hook size; bulky yarn with a larger hook gives a chunky version while finer yarn creates a mini organizer.

I often add embroidered motifs or felt patches to the pockets to personalize the organizer for the recipient.

For a weighted adult desktop organizer, I add heavier glass beads or pebbles in a sealed bag inside the base for extra stability.

If you want the gnome to be washable, I recommend using machine-washable acrylic and hand-sewing small parts securely before washing.

I sometimes replace the braided pigtails with simple tassels or yarn pom-poms for a quicker finishing option.

Try adding tiny button closures or Velcro to the pockets if you plan to store heavier items in them.

To make a seasonal version, I change the hat and pocket colors and add small thematic appliques like hearts, stars or leaves.

I also like to make a set of gnomes in matching colors for a themed craft room display β€” they look great together on a shelf.

Don’t be afraid to experiment with different yarn textures and fiber blends; the shape is forgiving and you can create unique looks easily.

Common Mistakes & How to Fix Them

βœ— Skipping the cardboard or plastic circle base can make the organizer collapse; cut a circle the same size as the crocheted base and insert it before stuffing to keep the shape stable. βœ— Forgetting to add glass balls for weight will make the gnome tip over easily; put 5 to 10 glass balls or similar weight at the bottom before stuffing the rest to ensure it stands well. βœ— Not stuffing gradually causes lumps or uneven shape; add stuffing in small amounts while checking shape and firmness for a smooth finish. βœ— Missing stitch counts after increases or decreases leads to incorrect shaping; count your stitches after each round, especially at shaping rounds and color changes.

Gnome - organizer Amigurumi Pattern

Create a charming Gnome Organizer that doubles as a cute amigurumi and a practical storage pocket for tools and notions. This pattern guides you step-by-step through crocheting the body, hat, pockets and accessories so you can make a functional decorative piece. The finished organizer measures about 25 cm / 10 in and is full of personality β€” perfect for gifting or keeping on your craft table.

Intermediate 5-7 Hours

Materials Needed for Gnome - organizer Amigurumi Pattern

β€” Main Fabric

  • 01
    Acrylic yarn 50 g / 125 m (multiple colors: grey, white, pink, purple, beige, brown) - quantities depend on color use but one skein (50 g) per color recommended
  • 02
    Grey yarn - approx 50 g for body/pants
  • 03
    White yarn - approx 50 g for body upper section
  • 04
    Pink yarn - approx 50 g for hat and accents
  • 05
    Purple yarn - approx 25-50 g for pockets, legs, needle ball
  • 06
    Beige yarn - small amount for nose
  • 07
    Brown yarn - small amount for pigtails
  • 08
    Fiberfill (polyester stuffing) - small bag
  • 09
    Glass balls or beads - 5 to 10 pieces for base weighting
  • 10
    Hard cardboard or plastic circle - cut to same size as crocheted circle for base

β€” Tools Required

  • 01
    Crochet hook size 2.5 mm
  • 02
    Scissors
  • 03
    Yarn/tapestry needle for sewing and weaving ends
  • 04
    Stitch markers
  • 05
    Pins for positioning parts
  • 06
    Polyester stuffing (fiberfill)
  • 07
    Small glass balls or beads (5-10) for weighting the base
  • 08
    Hard cardboard or plastic circle for the base
  • 09
    Embroidery thread for details
  • 10
    Optional: small button for pants front

Progress Tracker

0% Complete

β€” Body :

Round 1 :

(6 sc) into MR

Round 2 :

(inc) x 6 = 12 sc

Round 3 :

(1sc, inc) x 6 = 18

Round 4 :

(2sc, inc) x 6 = 24

Round 5 :

(3sc, inc) x 6 = 30

Round 6 :

(4sc, inc) x 6 = 36

Round 7 :

(5sc, inc) x 6 = 42

Round 8 :

(6sc, inc) x 6 = 48

Round 9 :

(7sc, inc) x 6 = 54

Round 10 :

(8sc, inc) x 6 = 60

Round 11 :

(9sc, inc) x 6 = 66

Round 12 :

(10sc, inc) x 6 = 72

Round 13 :

BLO = 72 sc

Round 14-15 :

= 72 sc (2 rounds)

Info :

Cut a circle out of hard cardboard or plastic. The size of the circle should be the same size as the crocheted circle.

Info :

Also put 5 to 10 glass balls inside. See the photo. This is necessary for the doll to stand well.

Info :

In the process of crocheting, put filler inside the body.

Round 16-42 :

= 72 sc (27 rounds) (change to white yarn in round 16)

Round 43 :

(10sc, dec) x 6 = 66

Round 44-45 :

= 66 sc (2 rounds)

Round 46 :

(9sc, dec) x 6 = 60

Round 47-48 :

= 60 sc (2 rounds)

Round 49 :

(8sc, dec) x 6 = 54

Round 50-51 :

= 54 sc (2 rounds)

Round 52 :

(7sc, dec) x 6 = 48

Round 53 :

(6sc, dec) x 6 = 42

Round 54 :

(5sc, dec) x 6 = 36

Round 55 :

(4sc, dec) x 6 = 30

Round 56 :

(3sc, dec) x 6 = 24

Round 57 :

(2sc, dec) x 6 = 18

Round 58 :

(1sc, dec) x 6 = 12

Round 59 :

(6 dec) = 6

Info :

To break yarn.

β€” Pants (grey yarn) :

Info :

Attach yarn in 13 round

Round 1 :

FLO (5sc, inc) x 12 = 84

Round 2-27 :

= 84 sc (26 rounds)

Purple yarn :

Round 28 = 84 sc. To break yarn.

β€” Hat (pink yarn) :

Round 1 :

(3 sc) into MR

Round 2 :

= 3 sc

Round 3 :

(inc) x 3 = 6 sc

Round 4-5 :

= 6 sc (2 rounds)

Round 6 :

(1sc, inc) x 3 = 9

Round 7-8 :

= 9 sc (2 rounds)

Round 9 :

(2sc, inc) x 3 = 12

Round 10-11 :

= 12 sc (2 rounds)

Round 12 :

(3sc, inc) x 3 = 15

Round 13-14 :

= 15 sc (2 rounds)

Round 15 :

(4sc, inc) x 3 = 18

Round 16-17 :

= 18 sc (2 rounds)

Round 18 :

(5sc, inc) x 3 = 21

Round 19-20 :

= 21 sc (2 rounds)

Round 21 :

(6sc, inc) x 3 = 24

Round 22-23 :

= 24 sc (2 rounds)

Round 24 :

(7sc, inc) x 3 = 27

Round 25-26 :

= 27 sc (2 rounds)

Round 27 :

(8sc, inc) x 3 = 30

Round 28-29 :

= 30 sc (2 rounds)

Round 30 :

(9sc, inc) x 3 = 33

Round 31-32 :

= 33 sc (2 rounds)

Round 33 :

(10sc, inc) x 3 = 36

Round 34-35 :

= 36 sc (2 rounds)

Round 36 :

(5sc, inc) x 6 = 42

Round 37-38 :

= 42 sc (2 rounds)

Round 39 :

(6sc, inc) x 6 = 48

Round 40-41 :

= 48 sc (2 rounds)

Round 42 :

(7sc, inc) x 6 = 54

Round 43 :

= 54 sc

Round 44 :

(8sc, inc) x 6 = 60

Round 45 :

= 60 sc

Round 46 :

(9sc, inc) x 6 = 66

Round 47 :

= 66 sc

Round 48 :

(5sc, inc) x 11 = 77

Round 49 :

(6sc, inc) x 11 = 88

Purple yarn :

Round 50. (1 sc, 1inc) x 44 = 132. To break yarn. To weave in ends.

β€” Hands (2 parts) :

Pink yarn Round 1 :

(6 sc) into MR

Round 2 :

(inc) x 6 = 12 sc

Round 3 :

(1sc, inc) x 6 = 18

Round 4 :

(2sc, inc) x 6 = 24

Round 5-9 :

= 24 sc (5 rounds)

Round 10 :

(2sc, dec) x 6 = 18

Round 11 :

(1sc, dec) x 6 = 12

Round 12 :

(1sc, inc) x 6 = 18

Round 13 :

= 18 sc

White yarn Round 14 :

= BLO 18 sc

Round 15-31 :

= 18 sc (17 rounds)

Info :

Put the filler inside not completely.

Info :

Fold the part in half. Crochet 9 sc. To break yarn. To weave in ends.

Info :

Attach hands to the body.

β€” Legs (2 parts) :

Purple yarn Round 1 :

(6 sc) into MR

Round 2 :

(inc) x 6 = 12 sc

Round 3 :

(1sc, inc) x 6 = 18

Round 4 :

(2sc, inc) x 6 = 24

Round 5 :

(3sc, inc) x 6 = 30

Round 6-10 :

= 30 sc (5 rounds)

Round 11 :

(3sc, dec) x 6 = 24

Round 12 :

= 24 sc

Round 13 :

(2sc, dec) x 6 = 18

Round 14 :

= 18 sc

Info :

Put the filler inside not completely.

Info :

Fold the part in half. Crochet 9 sc. To break yarn. To weave in ends.

Info :

Attach legs to the body.

β€” Nose (beige yarn) :

Round 1 :

(6 sc) into MR

Round 2 :

(inc) x 6 = 12 sc

Round 3 :

(1sc, inc) x 6 = 18

Round 4 :

(2sc, inc) x 6 = 24

Round 5 :

(3sc, inc) x 6 = 30

Round 6-9 :

= 30 sc (4 rounds)

Round 10 :

(3sc, dec) x 6 = 24

Round 11 :

(2sc, dec) x 6 = 18

Info :

In the process of crocheting, put filler inside the nose.

Info :

Fold the part in half. Crochet 9 sc. To break yarn. To weave in ends.

Info :

Attach nose to the body.

β€” Needle ball (purple yarn) :

Round 1 :

(6 sc) into MR

Round 2 :

(inc) x 6 = 12 sc

Round 3 :

(1sc, inc) x 6 = 18

Round 4 :

(2sc, inc) x 6 = 24

Round 5 :

(3sc, inc) x 6 = 30

Round 6-9 :

= 30 sc (4 rounds)

Round 10 :

(3sc, dec) x 6 = 24

Round 11 :

(2sc, dec) x 6 = 18

Round 12 :

(1sc, dec) x 6 = 12

Round 13 :

(6 dec) = 6

Info :

In the process of crocheting, put filler inside the needle ball.

Info :

To break yarn. To weave in ends. Attach thread to tie to hand.

β€” Pigtails (brown) :

Info :

Yarn length for a 3-ply braid 15 cm / 6 in.

β€” Pockets (3 parts) :

Front pocket (1 part) pink yarn :

R1. 13 ch, crochet into the 2nd ch from the hook 12 sc, turn knit

Round R2-R8 :

12 sc, turn knit (7 rounds)

Info :

To break yarn.

Back pockets (2 parts) purple yarn R1 :

14 ch, crochet into the 2nd ch from the hook 13 sc, turn knit

Round R2-R10 :

13 sc, turn knit (9 rounds)

Info :

To break yarn. Attach pockets to the pants.

Info :

Attention, pockets are sewn only to the pants. Not to pants and body!

Info :

Attach the button to the front of the pants and body.

Assembly Instructions

  • Insert a hard cardboard or plastic circle into the crocheted base before stuffing to provide a firm bottom and maintain shape.
  • Place 5 to 10 glass balls inside the bottom, then add stuffing to achieve weight and stability so the gnome stands well.
  • Pin and sew the legs to the bottom front of the body, spacing them evenly and securing with a whipstitch.
  • Attach the hands at the sides of the body and secure the needle ball to one hand with a tied thread as shown in photos.
  • Sew the nose to the center of the face area and position pigtails on either side of the head, securing with stitches under the hat.
  • Sew pockets to the pants only, then attach the pants to the lower body and sew on the button to the front of the pants and body.

Important Notes

  • πŸ’‘Use stitch markers to keep track of rounds and beginning of rows, especially during increases and decreases.
  • πŸ’‘Add glass balls or other weights at the bottom before stuffing to ensure the gnome stands upright and stable.
  • πŸ’‘Stuff parts gradually and check shape often to avoid overstuffing which can distort shaping.
  • πŸ’‘Pin parts in place before sewing to ensure correct placement and symmetry when stitching pieces together.
  • πŸ’‘Weave in ends and break yarn at indicated points to finish parts cleanly and securely.

This Gnome Organizer pattern is a delightful mix of cute amigurumi and practical storage β€” perfect for your craft table or as a handmade gift. The pockets and needle ball add function while the tall hat and braided pigtails bring charm to every detail. Make one to brighten your workspace or to give as a thoughtful, useful present. 🧢✨

You ask,

we answer.

FAQs

What size will the finished piece be?

The finished organizer measures approximately 25 cm / 10 inches tall when made with the recommended yarn and 2.5 mm hook.

Can I use different yarn weights for this pattern?

Yes, but using a different yarn weight will change the final size and may require a different hook; make a gauge swatch and adjust hook size accordingly.

Do I need prior crochet experience for this pattern?

This pattern is rated intermediate, so basic familiarity with amigurumi techniques, increases, decreases and working in the round is recommended.

How long does this project typically take to complete?

Most crocheters complete this project in about 5-7 hours, though time can vary depending on experience and the amount of detailing you add.