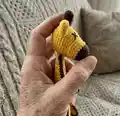
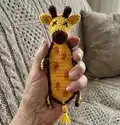
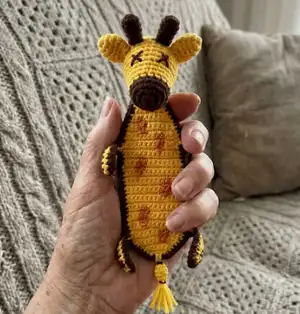
About This Giraffe Bookmark Amigurumi Pattern
This pattern creates a flat giraffe bookmark with a crocheted head, curled legs, ears and horns—perfect for gifting or personal use. You will work mostly in rows and rounds to shape the snout and a long body that slips into books. The design finishes with embroidered eyes and hand-drawn spots for personality.
Clear numbered rounds and short rows make the pattern easy to follow step by step. Materials are simple: YarnArt Jeans yarn, a 2.5 mm hook, and a small silicone fill ball.
Why You'll Love This Giraffe Bookmark Amigurumi Pattern
I absolutely love this pattern because it transforms a few simple stitches into a charming, usable object that readers will adore. I enjoy how the curled legs give the bookmark personality with just a little shaping. The finishing touches—embroidered eyes and crayon spots—allow me to add custom character every time I make one. This pattern is satisfying to crochet quickly and makes a lovely handmade gift.
Switch Things Up
I love customizing this bookmark by changing yarn colors to match seasons or gift themes.
I often switch to pastel yarns for a baby shower gift or bright shades for kids.
If you want a chunkier bookmark, try a bulkier yarn and increase hook size to make a larger version.
To make a tiny keychain, use finer yarn and a smaller hook and shorten the body rows accordingly.
I sometimes embroider different facial expressions to give each giraffe its own personality before securing eyes.
Try adding a small loop at the top to turn it into a hanging ornament instead of a bookmark.
Use felt spots or tiny crocheted circles sewn on for raised spots rather than coloring with a pencil.
For a more durable bookmark, reinforce the long body by adding a layer of interfacing or thin cardboard inside during finishing.
I also like to make matching sets by creating several bookmarks with coordinated colors for gift bundles.
Play with horn and ear shapes to create stylized characters, such as longer horns or floppy ears for different looks.
Common Mistakes & How to Fix Them
✗ Skipping stitch markers during rounds can cause you to lose the start of the round; place a marker at the first stitch to maintain correct counts.
✗ Forgetting to stuff the head before closing results in a flattened shape; stuff gradually and firmly before finishing the decreases.
✗ Incorrect color changes make the neck look uneven; change color at the end of a round and weave in the starting tail securely.
✗ Not counting increases and decreases carefully will change the stitch total; count after each shaping round to ensure correct stitch counts.