🧢 Beautiful ✨ Detailed πŸ’ Adorable

Drooping Leave Crochet Pattern

Drooping Leave Crochet Pattern
4.8β˜… Rating
5-7 Hours Time Needed
4.1K Made This
βœ‚οΈ

Intermediate Level

Ideal for those with basic crochet experience, featuring slightly more advanced stitches and techniques to expand your skills.

⏱️

Weekend Treat

Takes 5-7 hours, making it an enjoyable project to finish over a couple of days.

🏑

Cozy Accent

A warm touch for your space that transforms ordinary corners into inviting nooks filled with handmade charm.

About This Drooping Leave Crochet Pattern

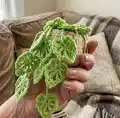
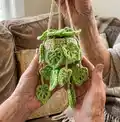
This pattern teaches you how to crochet a hanging pot with drooping Monstera-like leaves. It includes step-by-step instructions for the pot, soil piece, and individual leaves with photos to guide you. The finished piece makes a lovely home decor accent or a thoughtful handmade gift.

Drooping Leave Crochet Pattern crochet pattern - detailed view of completed project

You will learn shaping techniques like increases, decreases and working in BLO, plus simple picot details for leaf texture. The pattern is photo-rich to help with assembly and placement of the leaves.

Why You'll Love This Drooping Leave Crochet Pattern

I absolutely love this pattern because it brings a touch of greenery indoors without the upkeep of a real plant. I enjoy the way the little leaves cascade and how satisfying it is to see the pot fill out as you attach each leaf. I also love that it uses small, portable components so you can work on leaves while traveling or waiting. This project lets me combine simple crochet stitches into a charming three-dimensional decorative piece that always delights friends and family.

Drooping Leave Crochet Pattern step 1 - construction progress Drooping Leave Crochet Pattern step 2 - assembly progress Drooping Leave Crochet Pattern step 3 - details and accessories Drooping Leave Crochet Pattern step 4 - final assembly and finishing

Switch Things Up

I love customizing this pattern by changing the leaf colors to match seasonal palettes; try deep green for a classic look or mint and pastel greens for a softer vibe.

I often make the pot in a contrasting color to make the leaves popβ€”cream pot with bright green leaves looks especially modern.

I sometimes vary the leaf sizes by changing hook size for a few leaves to create depth and a more natural drape.

If you want a more whimsical plant, I add tiny crocheted flowers or embroidered veins on some leaves for extra detail.

To make a mini keychain version, switch to a finer yarn and a smaller hook and reduce the number of leaves.

For a chunkier, cozy version, use bulky yarn with a larger hook; this also speeds up the project if you want a bold statement piece.

I like to experiment with different hanging rope stylesβ€”braided yarn, macrame cord, or twisted crochet chains each give a different finish.

Try adding a small loop of wire inside some leaf tails if you want posable leaves that hold shape and direction.

I recommend embroidering subtle spots or speckles on leaves to mimic real Monstera patterns if you want a realistic touch.

Finally, I sometimes arrange leaves in clusters and vary stitch counts slightly to give each leaf a unique silhouette and more natural overall movement.

Common Mistakes & How to Fix Them

βœ— Skipping the slip stitch at the end of each row as noted; follow the note carefully and always join with a slip stitch at row ends to maintain even edges. βœ— Forgetting to work in BLO on the pot row indicated; remember to work back loop only on that round to create a defined rim. βœ— Overstuffing the soil piece which distorts the pot shape; stuff gradually and check fit inside the pot before adding more filling. βœ— Not counting increases and decreases precisely during shaping; recount every round to ensure the correct stitch totals and shape. βœ— Failing to leave long tails when instructed for sewing pieces together; leave a generous tail and use it to stitch parts securely in place.

Drooping Leave Crochet Pattern

Create a charming hanging Monstera-style plant with drooping leaves using this detailed crochet pattern. You will make a small pot, soil ball, and many delicate leaves to assemble into a cascading decoration. The pattern is photo-supported and perfect for gifting or decorating small spaces.

Intermediate 5-7 Hours

Materials Needed for Drooping Leave Crochet Pattern

β€” Main Fabric

  • 01
    Super fine yarn, approximately 1.8 oz (50 g) per skein β€” main colors: green, beige and brown
  • 02
    Green yarn (main leaf color) β€” approx 25-50 g
  • 03
    Beige yarn (pot color) β€” approx 50 g
  • 04
    Brown yarn (soil color) β€” approx 25 g
  • 05
    Small amounts of contrast colors for details if desired

β€” Tools Required

  • 01
    Crochet hook size 2.5-3.0 mm
  • 02
    Stitch marker
  • 03
    Sewing needle
  • 04
    Scissors
  • 05
    Cotton filling (polyester stuffing)
  • 06
    Yarn needle for sewing leaves and parts
  • 07
    Pins for assembly (optional)

Progress Tracker

0% Complete

β€” Pots :

Info :

Note : for newbie. Slip stitch in the first stitch in every time a row ends and begin a chain in every time a new row starts example : single crochet begin 1 chain 1, double crochet begin chain 2

Round 1 :

row 1 : MR, chain 1, 8SC (8 sts)

Round 2 :

row 2 : chain 1, 8SC inc (16 sts)

Round 3 :

row 3 : chain 1, (1SC, 1 inc) 8 time (24 sts)

Round 4 :

row 4 : chain 1, (2SC, 1inc) 8 time (32 sts)

Round 5 :

Row 5 : (3 SC, 1 inc) 8 time (40 sts)

Round 6 :

Row 6 : (BLO) 40 SC (40 sts)

Round 7 :

Row 7 : 40 DC(40 sts)

Round 8 :

Row 8 : 40 SC(40 sts)

Round 9 :

Row 9 : 40 DC(40 sts)

Round 10 :

Row 10 : 40 SC (40 sts)

Round 11 :

Row 11 : 40 SC (40 sts)

Info :

For the hanging pot, continue crocheting chain 30 (make 3) and tie it to the rim of the pot plant. The distance of each hanging rope is 12-13 sts

β€” The Soil :

Round 1 :

Row 1 : mr 8SC (8sts)

Round 2 :

Row 2 : 8 SC inc (16sts)

Round 3 :

Row 3 : (1 SC + 1 inc ) 8 tomes ( 24sts)

Round 4 :

Row 4 : (2SC + 1inc) 8 times (32sts)

Round 5-8 :

Row 5-8 : SC in each st to end

Round 9 :

Row 9 : (2 SC + 1 dec) 8 times (24sts)

Round 10 :

Row 10 : (1 SC + 1 dec) 8 times (16sts) (stuffing)

Round 11 :

Row 11 : 8 dec (8sts) cut yarn and leave a long tail for sew, close off the hole.

β€” Leaves (1) :

Round 1 :

ROW 1 : Chain 4, slip stitch in the first chain from the hook to make an MR.

Info :

All st crochet of row 1 into the MR β€’ Chain 3, 1DC + 3 Chain, 1HDC + 3 Chain, 1DC + 3 Chain β€’ 1DC + 3 Chain, 1HDC + 3 Chain, 1DC + 3 Chain

β€” Leaves (2) :

Round 2 :

ROW 2 : Now we have total 7 spaces

Round 2a :

1st - 3rd space : 3SC, 1 slip st

Round 2b :

4th space : 1SC, 1picot, 1SC, 1 slip st

Round 2c :

5-7th space : 3SC, 1 slip st

Info :

When you're done with the leaf, chain 10 and again slip st in the 4th chain from the hook to make an MR, and begin making the next leaf.

β€” Assembly :

Item :

Now we have toal of this. Sew every drooping leaves into the soil. Put the soil inside the pot.

Assembly Instructions

  • Sew every drooping leaf into the soil piece by inserting the leaf tail into the soil and securing with small whipstitches so leaves sit naturally around the soil.
  • Place the finished soil ball inside the pot and position as desired, then sew or tack the soil to the inner rim to keep it stable.
  • For the hanging pot, make three chains of 30 and tie each to the rim; space each hanging rope about 12-13 stitches apart for even hanging.
  • Leave long tails when finishing the soil and pot pieces; use these tails to sew pieces together and close holes securely.
  • Pin leaf clusters in place before permanently sewing to check placement and achieve a balanced drooping arrangement.

Important Notes

  • πŸ’‘Use a stitch marker to mark the beginning of each round, especially when working in continuous rounds to avoid miscounting.
  • πŸ’‘Work the BLO round exactly where indicated to form a defined rim for the pot and ensure a neat finish.
  • πŸ’‘Stuff the soil piece gradually and check fit inside the pot to avoid overstuffing and distorting the shape.
  • πŸ’‘Leave long yarn tails when cutting to sew pieces together; these make assembly much easier and stronger.
  • πŸ’‘Pin leaves in place before sewing so you can arrange them symmetrically and create natural-looking drape.

Thank you for making this little drooping Monstera β€” your handmade plant will brighten any corner! 🌿 This pattern combines small, satisfying parts into a joyful hanging decoration you can be proud of. 🧢 Enjoy the assembly and the way each leaf adds personality to your pot β€” happy crocheting! πŸͺ΄

You ask,

we answer.

FAQs

What size will the finished piece be?

The finished hanging plant measures roughly 10-15 cm in pot height with leaves extending further, depending on yarn weight and hook size used.

Can I use different yarn weights for this pattern?

Yes, you can use different yarn weights but the final size will change; a thicker yarn and larger hook will produce a chunkier pot and larger leaves while thinner yarn creates a delicate mini version.

Do I need prior crochet experience for this pattern?

This pattern is rated intermediate because it uses increases, decreases, BLO, picot details, and small assembly steps; basic crochet skills are recommended.

How long does this project typically take to complete?

Most crocheters complete this project in about 5-7 hours, though time may vary based on experience and how many leaves you make.