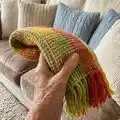
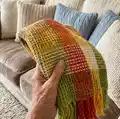
Create a stylish gingham crochet blanket with soft, cashmere-feel DK yarn and a textured front-post/back-post stitch pattern. This intermediate pattern guides you through the stitch techniques, colour sequencing and surface crochet slip-stitch grid that forms the classic gingham look. Includes full row-by-row instructions, yarn substitution notes, and step-by-step photos for finishing with tassels so you can make a polished blanket you will love.
Progress Tracker
0% Complete
— Yarn Substitutions :
Info :
The thickness of the yarn used for this pattern is called DK in some countries and Light Worsted in other countries. It is classified as a Light (3) yarn according to the Craft Yarn Council's Standard Yarn Weight System (https://www.craftyarncouncil.com/standards/yarn-weight-system). Here are the exact specifications of the yarn used in this pattern to help you find a substitute: Weight: Light (3). Wraps per inch: 11 wpi. Meterage: 273 yards / 250 meters. Unit Weight: 3.53 ounces / 100 grams. Gauge / Tension: 22 stitches & 28 rows = 4 x 4 inches. Knitting Needle size: US 4-7 or 3.5-4.5mm. Crochet Hook size: US G or 4mm. Fibers: 100% Acrylic.
Info :
You will find a wide variety of yarns that are similar on www.lovecrafts.com, where you can search by yarn weight. They also ship to almost anywhere in the world! Here are also suggestions for current similar yarns. There are subtle differences though, some are just a little thicker or a little thinner, so I recommend that you make a swatch to ensure that the blanket size would be what you aim for: Rico Essentials Acrylic Antipilling DK, King Cole Cherished Baby DK, Stylecraft Bambino DK, Lion Brand Jeans, Lion Brand Mandala Ombre, Lion Brand Jamie, Lion Brand Vanna's Style, Schachenmayr Original Soft and Easy, Schachenmayr Bravo, Red Heart Baby Hugs Light, Scheepjes Softfun, Scheepjes Colour Crafter, Scheepjes Softfun Denim.
— Tips and Extra Information :
Info :
The blanket in the pictures was made using 3 colours, but you can use 2 colours, or as many as you like - however, the colours tend to get a bit lost if you use too many colours, between 2 and 5 is ideal. You can place the colours in any order you wish, you don't have to follow my colour sequence. Where necessary, extra information in the pattern is printed in italics, this aims to make the pattern more understandable. Photo's are placed at the end of this document so that you have the option to print only the written instructions and consult the photo's on your tablet or computer. This pattern is written in US terminology.
— Customizing the Blanket Size :
Info :
* If you don't want to change the size, skip this part and go straight to the pattern Instructions on page 4 * The pattern is written for a medium size blanket. However, you can customize the size of the blanket to any size you want by consulting Table 1 to determine the number of starting chains, and Table 2 to determine the number of rows you need to work to achieve your specific size (the amount of yarn specified in Materials is based on the medium size blanket). If you use a different yarn weight, the sizes specified in Table 1 & 2 will not apply anymore, but you can still use the number of chains and number of rows in these tables to make a blanket to your specifications.
— Table 1 :
Info :
Number of Starting Chains: 142 - Number of FPdc after Row 2: 69 - Colour Panels: 7 - Width: 66.5cm / 26.2 inches. Number of Starting Chains: 162 - Number of FPdc after Row 2: 79 - Colour Panels: 8 - Width: 76cm / 29.9 inches. Number of Starting Chains: 182 - Number of FPdc after Row 2: 89 - Colour Panels: 9 - Width: 85.5cm / 33.6 inches. Number of Starting Chains: 202 - Number of FPdc after Row 2: 99 - Colour Panels: 10 - Width: 95cm / 37.4 inches. Number of Starting Chains: 222 - Number of FPdc after Row 2: 109 - Colour Panels: 11 - Width: 104.5 / 41.1 inches. Number of Starting Chains: 242 - Number of FPdc after Row 2: 119 - Colour Panels: 12 - Width: 114 / 44.9 inches.
— Table 2 :
Info :
Total number of rows: 110 - Colour Panels: 11 - Length: 82.5cm / 32.5 inches. Total number of rows: 120 - Colour Panels: 12 - Length: 90cm / 35.4 inches. Total number of rows: 130 - Colour Panels: 13 - Length: 97.5cm / 38.4 inches. Total number of rows: 140 - Colour Panels: 14 - Length: 105cm / 41.3 inches. Total number of rows: 150 - Colour Panels: 15 - Length: 112.5cm / 44.3 inches. Total number of rows: 160 - Colour Panels: 16 - Length: 120cm / 47.2 inches.
— Special Stitches & Techniques :
Info :
Surface crochet: Slip stitches are worked on the surface of the finished blanket to form the gingham pattern (photos 25-33).
Info :
Front Post and Back Post double crochet: These stitches are not made in the top of the previous row's stitches, but around the post of the indicated stitch. When the stitch is made around the front of the post, it is called a front post stitch and when it is made around the back of the post, it is called a back post stitch.
Info :
Instructions for Front Post double crochet (FPdc): YOH (photo 2), insert H FROM THE FRONT towards the back, move the H behind the post of the indicated st and let the H come out in front again, YOH (photo 3), pull up a loop at the front of your work (3 loops on H), YOH (photo 4) and pull through 2 loops (photo 5), YOH and pull through last 2 loops (photo 6, 7-11).
Info :
Instructions for Back Post double crochet (BPdc): YOH (photo 14), insert H FROM THE BACK towards the front, move the H in front of the post of the indicated st (photo 15) and let the H come out in the back again, YOH, pull up a loop at the back of your work (3 loops on H), YOH (photo 16) and pull through 2 loops, YOH and pull through last 2 loops (photos 17-18).
— Instructions :
Info :
Instructions are written for a medium size blanket, consult Table 1 on page 3 for number of starting chains for smaller or bigger blanket sizes. This pattern tends to curl in the beginning, don't worry when that happens, the surface crochet stitches added at the end will flatten it out.
Row 0 :
Ch 182 with colour A and 5mm H
Row 1 :
hdc in fourth ch from H, ch 1, skip 1 st, *hdc in next st, ch 1, skip 1 st, rep from * to end of row, end with a hdc in last ch, turn (photo 1 shows the first few hdc's)
Row 2 :
(WS) ch 3, skip first st, *FPdc around next st, ch 1, rep from * to end of row, hdc around ch3-tc, turn (see photos 2-11 for FPdc, photos 12-13 for last hdc - you should now have 89 FPdc and one hdc at the end of your row)
Row 3 :
(RS) ch 3, skip first st, *BPdc around next st, ch 1, rep from * to end of row, hdc around ch3-tc, turn (see photos 14-18)
Row 4 :
(WS) ch 3, skip first st, *FPdc around next st, ch 1, rep from * to end of row, hdc around ch3-tc, turn
Rows 5-10 :
rep rows 3-4 another 3 times
Rows 11-20 :
Change to colour B (photos 20-21, do this in the last st of row 10), rep rows 3-4 five times
Rows 21-30 :
Change to colour C, rep rows 3-4 five times
Rows 31-40 :
Change to colour B, rep rows 3-4 five times
Rows 41-50 :
Change to colour A, rep rows 3-4 five times
Rows 51-60 :
Change to colour B, rep rows 3-4 five times
Rows 61-70 :
Change to colour C, rep rows 3-4 five times
Rows 71-80 :
Change to colour B, rep rows 3-4 five times
Rows 81-90 :
Change to colour A, rep rows 3-4 five times
Rows 91-100 :
Change to colour B, rep rows 3-4 five times
Rows 101-110 :
Change to colour C, rep rows 3-4 five times
Rows 111-120 :
Change to colour B, rep rows 3-4 five times
Rows 121-130 :
Change to colour A, rep rows 3-4 five times. Fasten Off.
— Surface Crochet :
Info :
Turn the blanket so that the WS is facing you. The BPdc and FPdc form vertical rows (photo 22), while the RS has horizontal rows (photo 23). When the WS is facing you, these horizontal rows almost look like the rungs of a ladder behind the BPdc and FPdc vertical rows (photo 24). The surface slip stitches are worked around these "rungs" of the ladder, with the WS facing you.
Info :
Make a slipknot with colour C and place it around the 7mm crochet hook (make sure you leave a long yarn tail, you are not going to work your yarn ends away, you can leave these tails in the tassels you are going to add). Join colour C with a slip stitch on the right side of the first "vertical row" formed by the BPdc and FPdc, around the first bottom horizontal row (photo 25-26). Make sure that your working yarn is BEHIND the blanket. Make a slip stitch around the next horizontal row right above the bottom row. Keep making slip stitches around the horizontal rows (photo 27) until you reach the top and fasten off (remember to leave a long yarn tail, photo 32 = wrong side, photo 33 = right side).
Info :
Begin the second vertical row by making slip stitches between the next two rows of BPdc and FPdc (remember to keep your working yarn BEHIND the blanket). Fasten off. Make 10 such slip stitch-rows in colour C. Continue making 10 slip stitch rows in each colour (see photo 28-31 for first row in colour B), following the same colour sequence: First with C, then B, A, B, C, B, A, B, C.
— Finishing :
Info :
Use your hook to pull the yarn tail of every second row into the adjacent space, where you will add your tassel (photo 34). Make 20 tassels of each colour and tie five at the bottom and five at the top of each of the vertical slip stitch columns in the same colour as the vertical slip stitches (one tassel every second row). Use your hook to pull the mid-section of your tassel through the same space as your 2 yarn tails (photo 35), open it a bit wide with your fingers and pull the tail end of the tassel through (photo 36). Once you've added all the tassels, trim them to an even length.
This gingham blanket pattern brings a classic plaid look to crochet with a modern textured twist and tassel finish. Whether you make it for your bed, couch or as a thoughtful gift, it adds warmth and handcrafted charm to any space. Follow the step-by-step photos and detailed rows to achieve a beautiful, professional finish. 🧶✨