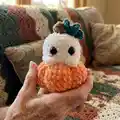
About This Ghost In Pumpkin Amigurumi Pattern
This pattern creates a tiny ghost peeking out of a round pumpkin using plush yarn and bobble stitch texture. It includes step-by-step rounds for the stem, head, pumpkin body, and clear sewing instructions for the pumpkin ribs. The design is small, adorable, and perfect for seasonal decorations or pocket-sized gifts.
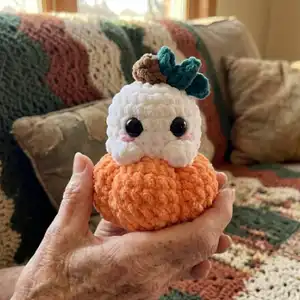
You will learn color changes, working in the front loop only for ridges, and how to sew ribs for that classic pumpkin look. Photos and notes guide you through placement of eyes and final finishing touches.
Why You'll Love This Ghost In Pumpkin Amigurumi Pattern
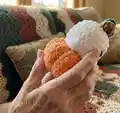
I absolutely love this pattern because it takes simple shapes and textures to create an irresistibly cute seasonal amigurumi. The bobble stitches give the ghost a delightful bumpy texture that really stands out against the plush pumpkin. I enjoy how quick this project is — you can finish one in an afternoon and still have time for finishing details. Sewing the ribs is a satisfying finishing step that transforms a round ball into a recognizably pumpkin shape and I always smile when the little tendril comes together.
Switch Things Up
I love changing up the colors for different looks; try soft pastels for a whimsical version or deep autumn tones for a classic pumpkin.
I often switch the yarn weight and hook size to make miniature keychain versions or larger plushies; thicker yarn gives a chunkier pumpkin.
I sometimes replace safety eyes with embroidered eyes for a baby-safe toy option — it's super simple and soft.
I add tiny accessories like a crocheted scarf or hat to give each ghost personality and a seasonal theme.
I experiment with the number of ribs: adding or removing ribs changes the look dramatically, so try 4-7 ribs to find your favorite.
I like to make tendrils longer and curl them by wrapping around a pencil and steaming lightly for a playful vine effect.
I add embroidered mouth or cheeks in different placements to give different expressions — playful, surprised, or sleepy.
I sometimes use variegated or speckled yarns for the pumpkin to add depth without extra stitching work.
I recommend trying metallic or sparkly yarn accents on the tendril or stem for a festive touch during holidays.
I also enjoy grouping several sizes together to create a little pumpkin patch display — mix minis and medium sizes for a charming arrangement.
Common Mistakes & How to Fix Them
✗ Failing to secure color changes correctly can leave loose loops; when changing color leave two loops on the hook, pull through the new color and tie the small tails to secure.
✗ Not stuffing the head evenly causes lumps and misshapen features; stuff gradually and firmly, checking shape as you work to maintain a smooth head.
✗ Skipping placement checks for safety eyes can misalign the face; place 12mm eyes between rounds 8-9 with 2-3 visible stitches between and double-check before securing.
✗ Forgetting to close the hole properly leaves gaps in the pumpkin; insert the needle into the FLO of each stitch and pull to close the hole completely, then weave in the tail.