🧶 Beautiful ✨ Detailed 💝 Adorable

Gatitos Amigurumi Pattern

Gatitos Amigurumi Pattern
3.9★ Rating
2-3 Hours Time Needed
1.5K Made This
✂️

Beginner Friendly Level

Perfect for those just starting their crochet journey, with clear instructions and simple techniques

⏱️

Bite-Sized Project

Finishes in 2-4 hours—perfect for an afternoon of creative relaxation.

🧸

Cute Companion

An adorable friend to cherish, handcrafted with love to bring comfort and joy for years to come.

About This Gatitos Amigurumi Pattern

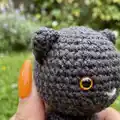
This pattern creates a small, sweet amigurumi cat (gatito) worked in continuous rounds with single crochet. You will make a head, ears, body, four legs and a small tail, then embroider the nose and eye details. The design is compact and perfect for using up scraps or making a set of tiny cats.

Gatitos Amigurumi Pattern crochet pattern - detailed view of completed project

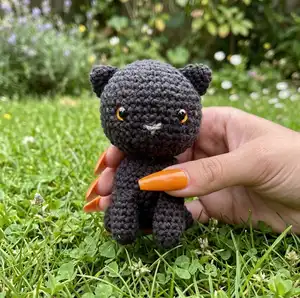
Simple stitches and clear shaping make this friendly for beginners, while photo-guided embroidery helps you add personality. The finished toy is small, adorable, and highly customizable.

Why You'll Love This Gatitos Amigurumi Pattern

I absolutely love this pattern because it turns simple stitches into a charming little companion you can finish in an afternoon. I love how easy it is to customize with different colors and facial details to give each gatito a unique personality. The embroidered nose and eye accents make a big difference, and I enjoy how a few stitches can create so much expression. Sharing these tiny toys always brings smiles, and I hope you feel the same joy making them.

Gatitos Amigurumi Pattern step 1 - construction progress Gatitos Amigurumi Pattern step 2 - assembly progress Gatitos Amigurumi Pattern step 3 - details and accessories Gatitos Amigurumi Pattern step 4 - final assembly and finishing

Switch Things Up

I love changing up the colors to give each gatito a new personality; try stripes, two-tone faces, or speckled yarn.

I sometimes use a slightly thicker yarn and a larger hook to make a chunkier, cuddly version that is great for small children.

If you want a tiny keychain, use thinner thread and a smaller hook to scale the pattern down and add a keyring.

I enjoy embroidering different noses and mouths—experiment with longer or shorter stitches to alter the expression.

You can replace safety eyes with embroidered eyes for a fully soft toy, which is safer for babies.

Try adding tiny crocheted accessories like bows, scarves, or little hats to create a set with distinct looks.

For a poseable version, consider inserting small wire in the limbs before sewing them closed to tweak the posture.

Change the tail shape by working fewer chains for a stubby tail or more chains with a slight curl for a playful look.

Mix fibers like cotton for the main body and a fuzzy yarn for accents (ears or tail tip) to add texture contrast.

I often collect leftover yarns and make a whole family of gatitos in coordinating palettes for a charming display.

Common Mistakes & How to Fix Them

✗ Skipping the magic ring tight closure can leave a visible hole at the start; pull the ring tightly closed and weave the starting tail into the first rounds. ✗ Forgetting to leave a long tail when finishing with a slip stitch makes sewing parts together harder; always leave plenty of yarn length for assembly and sewing. ✗ Not stuffing evenly causes lumps and distortion in the head or body; stuff gradually, shaping as you go and adding small amounts to maintain roundness. ✗ Placing safety eyes without checking symmetry results in a crooked face; mark eye placement with pins before inserting and compare both sides carefully.

Gatitos Amigurumi Pattern

Make an adorable little crocheted cat you can gift or keep. This pattern guides you through creating a tiny, huggable gatito with clear rounds and simple finishing instructions. You will embroider the nose and eye details for a charming expression. Perfect for customizing in any color you love.

Beginner Friendly 2-3 Hours

Materials Needed for Gatitos Amigurumi Pattern

— Main Fabric

  • 01
    80g fine cotton yarn (3-ply) or similar fingering/sport weight yarn, approximately 80 grams
  • 02
    Colors of your choice - small amounts for main body and contrasting eye/nose details
  • 03
    Embroidery thread or small amount of yarn for nose and eye detailing (color as desired)
  • 04
    Safety eyes size no.6 (as listed in pattern; typically around 6mm) - 2 pieces

— Tools Required

  • 01
    Tapestry needle (Aguja lanera)
  • 02
    Safety eyes no.6 (as listed)
  • 03
    Scissors
  • 04
    Stitch marker (recommended)

Progress Tracker

0% Complete

— Cabeza :

Round 1 :

6 pb en Anillo Mágico (6pb)

Round 2 :

6 aum seguidos *6 veces (12pb)

Round 3 :

(1 pb, aum) (18pb)

Round 4 :

(2 pb, aum) (24pb)

Round 5 :

(3 pb, aum) (30pb)

Round 6 :

(4 pb, aum) (36pb)

Round 7 :

(5 pb, aum) (42pb)

Round 8 - 14 :

solo pb (42pb)

Infos :

*Colocar ojos, bordar detalles y rellenar*

Round 15 :

(5pb, dism) (36pb)

Round 16 :

(4pb, dism) (30pb)

Round 17 :

(3pb, dism) (24pb)

Round 18 :

(2pb, dism) (18pb)

Round 19 :

(1pb, dism) (12pb)

Round 20 :

(6 dism seguidas) (6pb)

Info :

Terminar con punto deslizado y cortar el hilo con suficiente longitud para pasar con una aguja de coser por los 6pb. Tirar del hilo. Hacer un nudo

— Orejas x2 :

Round 1 :

6 pb en Anillo Mágico (6pb)

Round 2 :

(solo pb) (6pb)

Round 3 :

6 aum seguidos *6 veces (12pb)

Round 4 :

(solo pb) (12pb)

Info :

Terminar con punto deslizado y cortar el hilo con suficiente longitud para usar este mismo hilo para coser la oreja a la cabeza

— Cuerpo :

Round 1 :

6 pb en Anillo Mágico (6pb)

Round 2 :

6 aum seguidos *6 veces (12pb)

Round 3 :

(1 pb, aum) (18pb)

Round 4 :

(2 pb, aum) (24pb)

Round 5 :

(3 pb, aum) (30pb)

Round 6 :

(4 pb, aum) (36pb)

Round 7 - 12 :

(solo pb) (36pb)

Round 13 :

(4pb, dism) (30pb)

Round 14 :

(3pb, dism) (24pb)

Infos :

*Colocar ojos, bordar detalles y rellenar*

Info :

Terminar con punto deslizado y cortar el hilo con suficiente longitud para coser el cuerpo a la cabeza

— Bordado en la cara (Hocico y parte del ojo) :

Info :

1 calculamos el lugar donde va a ir nuestra nariz

Info :

2 metemos la aguja en un punto un poco alejado de donde va a ir nuestra nariz

Info :

3 sacamos la aguja en uno de los puntos marcados

Info :

4 metemos la aguja en nuestro segundo punto y sacamos la aguja en el primer punto

Info :

5 comenzamos a envolver este hilo hacemos tantas vueltas como nos parezca

Info :

6 pasamos la aguja al centro de la nariz y bordamos una linea vertical, luego pasamos la aguja hacia donde metimos la aguja la primera vez. Hacemos un nudo con ambos hilos y los escondemos dentro del tejido

Info :

Bordamos desde uno de los extremos de arriba (●) o abajo (●) hacia el medio (●) y luego desde el medio (●) hacia el extremo de abajo (●) o arriba (●)

— Patas de adelante :

Round 1 :

5 pb en Anillo Mágico (5pb)

Round 2 :

5 aum seguidos *5 veces (10pb)

Round 3 - 8 :

(solo pb) (10pb)

Info :

Terminar con punto deslizado y cortar el hilo con suficiente longitud para usar este mismo hilo para coser las patas al cuerpo

— Patas de atrás :

Round 1 :

5 pb en Anillo Mágico (5pb)

Round 2 :

5 aum seguidos *5 veces (10pb)

Round 3 - 4 :

(solo pb) (10pb)

Info :

Terminar con punto deslizado y cortar el hilo con suficiente longitud para usar este mismo hilo para coser las patas al cuerpo

— Cola :

Info :

Hacemos 12 cadenas. saltamos la ultima y la anteúltima cadena que realizamos y pasamos a hacer pm desde la cadena que sigue, en la cual vamos a hacer 3pm, pasamos a la cadena siguiente y hacemos 3pm después hacemos 6pm seguidos (uno en cada cadena) para que nos queden libres las ultimas 2cds donde vamos a hacer en cada una nuevamente 3pm

Info :

Terminamos con pd, y cortamos el hilo. Con ese mismo hilo cosemos la cola al cuerpo.

Assembly Instructions

  • Sew ears to the top of the head using the tail left from finishing the ear; use the same yarn tail to ensure secure attachment.
  • Attach the front legs to the lower/front part of the body using the long tails left from finishing each paw, spacing them evenly.
  • Sew the back legs to the bottom/back of the body using the tails left after finishing; position them so the cat can sit upright.
  • Use the long tail left after finishing the body to sew the body to the head securely, matching the head opening and stuffing level.
  • Attach the tail to the lower back of the body using the tail left after finishing the tail and secure with several passes for stability.

Important Notes

  • 💡Terminar con punto deslizado y dejar suficiente longitud de hilo para coser cada parte con el mismo hilo.
  • 💡Colocar ojos y bordar detalles antes de cerrar completamente la cabeza para facilitar el acceso y el posicionamiento.
  • 💡Rellenar gradualmente y probar la forma mientras se avanza para evitar bultos y mantener una silueta uniforme.
  • 💡Usa marcadores de punto o alfileres para alinear y posicionar las piezas antes de coser para una colocación sim�trica.

These tiny Gatitos are perfect for gifting, collecting, or making a whole family of colors. They're quick to crochet and delightful to personalize with embroidered noses and bright eyes. Share your finished friends and spread handmade joy! 🧶🐾

You ask,

we answer.

FAQs

What size will the finished piece be?

The finished amigurumi measures approximately 8-10 cm tall when using fine cotton yarn (3-ply) and an appropriately sized hook; final size depends on yarn and tension.

Can I use different yarn weights for this pattern?

Yes, you can use different yarn weights, but this will change the final size; choose an appropriate hook for your yarn and adjust stuffing accordingly.

Do I need prior crochet experience for this pattern?

This pattern is rated beginner friendly and uses basic single crochet, increases, and decreases, but familiarity with the magic ring and continuous rounds is helpful.

How long does this project typically take to complete?

Most crocheters complete one gatito in 2-3 hours, depending on experience, stitching speed, and the time spent on embroidery.