🧢 Beautiful ✨ Detailed πŸ’ Adorable

Toby - The Siamese Cat Amigurumi Pattern

Toby - The Siamese Cat Amigurumi Pattern
4.4β˜… Rating
5-7 Hours Time Needed
2.5K Made This
βœ‚οΈ

Intermediate Level

Ideal for those with basic crochet experience, featuring slightly more advanced stitches and techniques to expand your skills.

⏱️

Weekend Treat

Takes 5-7 hours, making it an enjoyable project to finish over a couple of days.

πŸ₯

Charming Critter

Delightful animal designs with sweet details that capture the essence of your favorite woodland and farmyard friends.

About This Toby - The Siamese Cat Amigurumi Pattern

This pattern teaches you how to crochet Toby, a tiny Siamese cat amigurumi with colorblocked face and paws. You will work in continuous spirals and make separate pieces for head, body, legs, ears, tail, and a decorative collar. The pattern features clear round-by-round instructions and helpful photo references for assembly. It creates a small, charming collectible around 4.3 inches tall.

Toby - The Siamese Cat Amigurumi Pattern crochet pattern - detailed view of completed project

Designed with color changes for the Siamese markings and a playful ruffled collar detail. Includes sewing and finishing notes to help you assemble a neat, professional-looking toy.

Why You'll Love This Toby - The Siamese Cat Amigurumi Pattern

I absolutely love this pattern because it captures the sweet personality of a Siamese cat in a compact, giftable amigurumi. I enjoyed designing the color transitions on the face and paws to give Toby a realistic look while keeping construction simple. The tiny collar and bell add a delightful finishing touch that makes each finished piece feel special. I also appreciate the step-by-step photos includedβ€”those little visuals really help when placing legs and ears.

Toby - The Siamese Cat Amigurumi Pattern step 1 - construction progress Toby - The Siamese Cat Amigurumi Pattern step 2 - assembly progress Toby - The Siamese Cat Amigurumi Pattern step 3 - details and accessories Toby - The Siamese Cat Amigurumi Pattern step 4 - final assembly and finishing

Switch Things Up

I love customizing this pattern by changing colors β€” try pastel shades for a soft, baby-friendly version or bold tones for a playful look.

I sometimes swap the Yarnart Jeans for a slightly thicker yarn and larger hook to make a chunkier, cuddlier Toby.

I often add embroidered eyelashes, a little ribbon bow, or felt accents to give each cat a unique personality.

I recommend experimenting with eye size; glass or larger safety eyes will give a different expression than the 9mm eyes in the pattern.

I sometimes make the collar longer and add a tiny crocheted bow for a different neck accessory look.

I also like to change the bell to a small charm or wooden bead for a rustic finish.

I occasionally add a touch of needle-felted blush to the cheeks for a sweet, shaded look.

I recommend trying surface crochet to add stripes or spots for other cat breeds using the same construction method.

I will sometimes insert a short piece of wire into the tail for a posable finish if the toy is for display rather than a child’s playmate.

I find making a whole family in different colorways is a fun way to practice and produce a charming set of toys.

Common Mistakes & How to Fix Them

βœ— Not marking the start of the body chain can lead to lopsided shaping; place a stitch marker after the first stitch of the chain to keep rounds aligned. βœ— Forgetting to insert safety eyes at the specified rounds will make eye placement inaccurate; attach safety eyes between rounds 18-19 with 7 stitches apart as instructed. βœ— Overstuffing the head before closing can distort facial features; stuff gradually and shape as you go to maintain smooth contours. βœ— Cutting the yarn before crocheting the legs will interrupt seamless joining; follow instructions and do not cut the yarn after finishing the body until legs are worked. βœ— Skipping invisible decreases causes visible gaps in shaping; practice invisible decrease technique for a neater finish as recommended in the note. βœ— Not leaving long tails for sewing can make attachment difficult; leave the specified long tails (about 15cm for legs, 50cm for stomach sewing) for secure sewing.

Toby - The Siamese Cat Amigurumi Pattern

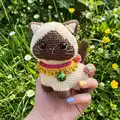
Make an adorable Toby the Siamese Cat with this detailed crochet amigurumi pattern. You will enjoy color changes, tiny details, and a cute ruffled collar for extra charm. The pattern gives clear step-by-step rounds, photos, and finishing tips so you can create a beautiful small collectible. Perfect for gifting or adding a handmade friend to your collection.

Intermediate 5-7 Hours

Materials Needed for Toby - The Siamese Cat Amigurumi Pattern

β€” Main Fabric

  • 01
    Yarnart Jeans yarn (160m/50g) - Brown (70)
  • 02
    Yarnart Jeans yarn (160m/50g) - Light brown (40)
  • 03
    Yarnart Jeans yarn (160m/50g) - Cream (05)
  • 04
    Yarnart Jeans yarn (160m/50g) - White (01)
  • 05
    Yarnart Jeans yarn (160m/50g) - Honey (84)
  • 06
    Yarnart Jeans yarn (160m/50g) - Red (51)
  • 07
    Yarnart Jeans yarn (160m/50g) - Black (53)
  • 08
    Fiberfill for stuffing (quantity as needed)

β€” Tools Required

  • 01
    Crochet hook size 2.0mm
  • 02
    One pair of safety blue ocean eyes 9mm
  • 03
    One bell 13mm
  • 04
    One wooden button 10mm
  • 05
    Scissors
  • 06
    Yarn needle for sewing
  • 07
    Stitch markers
  • 08
    Pins for assembly (optional)

Progress Tracker

0% Complete

β€” Head :

Round 1 :

8sc into magic ring (8)

Round 2 :

8inc (16)

Round 3 :

(sc, inc)*8 (24)

Round 4 :

(2sc, inc)*8 (32)

Round 5 :

(3sc, inc)*8 (40)

Round 6 :

(4sc, inc)*8 (48)

Round 7 :

(5sc, inc)*8 (56)

Round 8 :

56sc (56)

Round 9 :

(6sc, inc)*8 (64)

Round 10 :

64sc (64)

Round 11 :

36sc, 3sc, 25sc (64)

Round 12 :

35sc, 5sc, 24sc (64)

Round 13 :

34sc, 7sc, 23sc (64)

Round 14 :

33sc, 9sc, 22sc (64)

Round 15 :

31sc, 13sc, 20sc (64)

Round 16 :

30sc, 15sc, 19sc (64)

Round 17 :

15sc, (sc, inc)*7, sc, inc, 14sc, sc, inc, (sc, inc)*7, 3sc (80)

Round 18 :

35sc, 6sc, mark the point, 9sc, mark the point, 6sc, 24sc (80)

Round 19 :

34sc, 23sc, 23sc (80)

Round 20-22 :

33sc, 25sc, 22sc (80)

Round 23 :

(8sc, dec)*3, 3sc, 5sc, dec, 8sc, dec, 8sc, dec, (8sc, dec)*2 (72)

Round 24 :

(7sc, dec)*3, 4sc, 3sc, dec, 7sc, dec, 7sc, dec, (7sc, dec)*2 (64)

Round 25 :

(6sc, dec)*3, 5sc, sc, dec, 6sc, dec, 6sc, dec, (6sc, dec)*2 (56)

Round 26 :

(5sc, dec)*4, sc, 4sc, dec, 4sc, sc, dec, (5sc, dec)*2 (48)

Round 27 :

(4sc, dec)*8 (40)

Round 28 :

BLO (3sc, dec)*8 (32)

Infos :

Insert the safety eyes between round 18-19 with 7 sts apart. Stuff the head. Use white yarn to sew mouth and whiskers between round 20-22. Use white and black yarn to sew eyelid. Use orange blush on the nose. Now continue to crochet body.

β€” Body :

Round 1 :

Make a chain of 10ch, start in the 2nd chain from hook, place the stitch marker after crocheting the 1st stitch, this is the 1st stitch of round 1 of body: inc, 8sc, 32sc on the head, work on the other side of the chain: 8sc, inc. (photo 4, 5) (52)

Round 2 :

2inc, 48sc, 2inc (56)

Round 3 :

(sc, inc)*2, 15sc, inc, 16sc, inc, 15sc, (sc, inc)*2 (62)

Round 4 :

(sc, inc, sc)*2, 7sc, inc, 34sc, inc, 7sc, (sc, inc, sc)*2 (68)

Round 5 :

(3sc, inc)*2, 52sc, (3sc, inc)*2 (72)

Round 6 :

(11sc, inc)*6 (78)

Round 7 :

(12sc, inc)*6 (84)

Round 8-13 :

84sc (84)

Round 14 :

(12sc, dec)*6 (78)

Round 15-17 :

78sc (78)

Info :

Don't cut the yarn, now we start to crochet the legs.

β€” Legs :

Info :

2sc, chain 10, skip 14sts, 7sc, chain 10, skip 14sts, 4sc, chain 10, skip 14sts, 7sc, chain 10, skip 14sts, slst. Fasten off, weave in the yarn end. (photo 8, 9, 10, 11) There are 4 holes and we crochet 4 legs in there. Start with the 1st leg. (photo 12, 13)

Round 1 :

14sc, 10sc on the chain (24)

Round 2-4 :

Change to light brown yarn 24sc (24)

Round 5 :

Change to brown yarn 24sc (24)

Round 6 :

(sc, dec)*8 (16)

Round 7 :

8dec (8)

Info :

Fasten off, leaving a long tail about 15cm for sew the FLO of each remaining stitches and pull it tight to close. Weave in end. Crochet the remaining legs similar to the 1st leg. (photo 14, 15, 16)

β€” Stomach :

Round 1 :

Attach yarn to the 1st stitch next the front leg. (photo 17) 7sc, 1ch, turn (7)

Round 2 :

7sc, 1ch, turn (7)

Round 3 :

7sc, 7ch, rotation (photo 19) (7)

Round 4 :

Start in the 2nd loop from hook: 13sc, 7ch, rotation (13)

Round 5 :

Start in the 2nd loop from hook: 19sc, 1ch, turn (19)

Round 6 :

19sc, 1ch, turn (19)

Round 7 :

13sc, 1ch, turn (13)

Round 8-10 :

7sc, 1ch, turn (7)

Info :

Fasten off, leaving a long tail about 50cm for sewing. Stuff while sewing.

β€” Ears :

Round 1 :

4sc into magic ring (4)

Round 2 :

4inc (8)

Round 3 :

(sc, inc)*4 (12)

Round 4 :

2sc, inc, 2sc, inc, (2sc, inc)*2 (16)

Round 5 :

3sc, inc, 2sc, sc, inc, (3sc, inc)*2 (20)

Round 6 :

4sc, inc, 2sc, 2sc, inc, (4sc, inc)*2 (24)

Round 7 :

5sc, inc, 2sc, 3sc, inc, (5sc, inc)*2 (28)

Round 8 :

9sc, 5sc, 14sc (28)

Info :

Stuff the ears. Fasten off, leave a long tail for sewing.

β€” Tail :

Round 1 :

5sc into magic ring (5)

Round 2 :

5inc (10)

Round 3 :

(sc, inc)*5 (15)

Round 4-16 :

15sc (15)

Info :

Fasten off, leave a long tail for sewing. Stuff the tail.
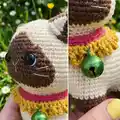
β€” Collar :

Round 1 :

Make a chain of 42ch, start from the 7th chain from hook: (hdc, hdc inc)*18, turn (54)

Round 2 :

Change to honey yarn ch, 54sc, turn (54)

Round 3 :

(ch6, sk2, slst)*18 (126)

Info :

Fasten off, weave in the yarn end. Sew the button and the bell to the collar. Wear collar for the cat.

β€” Sewing :

Info :

Sew ears to the head between round 4-11.

Info :

Sew tail to the body between round 1-5.

Assembly Instructions

  • Insert and secure the safety eyes between rounds 18-19 of the head, spacing them 7 stitches apart before stuffing and closing the head.
  • Sew ears to the head between rounds 4-11, matching the curve of the head and spacing them symmetrically; stuff ears lightly before final stitching.
  • Sew the tail to the back of the body between rounds 1-5, using the long tail left from fastening off and securing firmly with hidden stitches.
  • Position legs in the four leg holes on the underside of the body and sew them in place through the FLO (front loop only) to create a neat base.
  • Attach the collar around the neck, sew on the wooden button and thread the bell to the collar center to finish the decorative detail.

Important Notes

  • πŸ’‘Make invisible decrease stitches for a better, smoother shaping as noted in the pattern.
  • πŸ’‘Insert safety eyes between rounds 18-19 with 7 stitches apart before stuffing the head to ensure correct placement.
  • πŸ’‘Do not cut the body yarn after round 17; continue and work the legs from the opening as instructed for a seamless join.
  • πŸ’‘Leave long tails when fastening off legs and stomach (about 15cm and 50cm respectively) to make sewing and closing easier.

This little Siamese Toby is a delightful, pocket-sized companion that brightens any shelf or gift box. Handcrafted details like the color-blocked face, tiny paws, and ruffled collar give Toby a lot of personality in a small package. Perfect for gifting or collecting, each Toby is a tiny celebration of handmade charm. 🐱🧢

You ask,

we answer.

FAQs

What size will the finished piece be?

The finished amigurumi measures approximately 4.3 inches tall when using Yarnart Jeans (160m/50g) and a 2.0mm hook.

Can I use different yarn weights for this pattern?

Yes, you can use different yarn weights, but this will affect the final size; choose a suitable hook for your yarn and be aware that proportions may change.

Do I need prior crochet experience for this pattern?

This pattern is rated intermediate, so basic knowledge of single crochet, increases, decreases, and working in continuous spirals is recommended.

How long does this project typically take to complete?

Most crocheters complete this project in 5-7 hours, though time may vary depending on experience level and the speed at which you work.