🧢 Beautiful ✨ Detailed πŸ’ Adorable

Forest Deer Amigurumi Pattern

Forest Deer Amigurumi Pattern
4.5β˜… Rating
12-15 Hours Time Needed
2.6K Made This
βœ‚οΈ

Intermediate Level

Ideal for those with basic crochet experience, featuring slightly more advanced stitches and techniques to expand your skills.

⏱️

Multi-Day Project

A rewarding 12+ hour journeyβ€”perfect for dedicated crafters who love detailed work.

πŸ₯

Charming Critter

Delightful animal designs with sweet details that capture the essence of your favorite woodland and farmyard friends.

About This Forest Deer Amigurumi Pattern

This pattern creates a textured forest deer amigurumi approximately 42 cm tall (54 cm with horns) using velvet-style yarns. You will work each limb separately, join the legs to form the body, and continue to shape the neck and head seamlessly. Full-round instructions and photos guide the assembly and finishing touches.

Forest Deer Amigurumi Pattern crochet pattern - detailed view of completed project

The pattern uses US terminology and includes stitch-by-stitch rounds for legs, body, head, eyes and muzzle. Detailed notes on yarns, tools, and assembly make it straightforward to reproduce the original toy.

Why You'll Love This Forest Deer Amigurumi Pattern

I absolutely love this pattern because it combines plush velvet texture with classic amigurumi shaping to create a lifelike deer with personality. I enjoy the structural challenge of joining four legs into a single body β€” it makes the finished toy very sturdy and child-safe. I also love how the use of different yarns (velvet and regular cotton) creates contrast for the muzzle and hooves. This pattern gives you detailed round-by-round instructions so you feel confident at every step.

Forest Deer Amigurumi Pattern step 1 - construction progress Forest Deer Amigurumi Pattern step 2 - assembly progress Forest Deer Amigurumi Pattern step 3 - details and accessories Forest Deer Amigurumi Pattern step 4 - final assembly and finishing

Switch Things Up

I love how easily you can customize this deer by changing yarn colors; I often swap the honey color for soft greys to create winter-themed friends.

I sometimes make a mini version by using a thinner yarn and smaller hook β€” it creates a cute keychain-size deer perfect for gifts.

I also experiment with eye styles: you can use embroidered eyes for a softer look or larger safety eyes for a cartoony expression.

I recommend adding small accessories like a crocheted scarf or bell to change the personality β€” a bright red scarf makes a festive reindeer effect.

If you want posable horns, I use slightly thicker wire wrapped with tape before inserting it into the crocheted horn to keep shape and prevent poking.

I occasionally replace felt eyelashes with embroidered lashes for a subtle, durable finish that withstands washing better.

Try different stuffing levels: a firmer stuffing gives a sturdy display piece while a softer fill makes a cuddlier toy for kids.

For texture variation, I sometimes add a contrasting yarn trim around the hooves or muzzle to make those features stand out more in photos.

I also experiment with placement of the eyes and muzzle β€” shifting them slightly changes the deer’s expression, so test placement before final sewing.

If you want to speed up the project, work with chunkier velvet-style yarn and a larger hook; the shape will be similar but the deer will be bigger and quicker to make.

Common Mistakes & How to Fix Them

βœ— Ignoring the working thread placement during leg joins causes misaligned legs; place the working thread exactly as shown and use markers to align legs before sewing. βœ— Overstuffing the limbs leads to bulky, distorted shapes; stuff gradually as you crochet, adding small amounts to keep smooth contours. βœ— Skipping stitch counts after increases or decreases results in incorrect shaping later; count stitches at the end of each round and mark your place. βœ— Not using stitch markers for the leg joining can make the body opening uneven; position 8 markers as instructed to divide stitches evenly and sew accurately. βœ— Tightening safety eyes too much can warp the head area; position eyes between rounds 52-59 and avoid over-tightening, melting the plastic only slightly if necessary.

Forest Deer Amigurumi Pattern

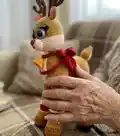
Create a charming Forest Deer amigurumi using plush velvet yarns and clear step-by-step instructions. This pattern walks you through each round, legs joining, body shaping, and head finishing so you can build a sturdy, poseable toy. Ideal for crafters who enjoy detailed assembly and beautiful textured yarn.

Intermediate 12-15 Hours

Materials Needed for Forest Deer Amigurumi Pattern

β€” Main Fabric

  • 01
    LaVita Velurex velvet yarn, Color 1038 (honey color) - main color, approximately 2.5 skeins (100 g, 140 m each; 10% lurex, 90% polyester)
  • 02
    Dolphin Fine Himalaya velvet yarn, Color 33 (color powder) - small amount for muzzle and breast (100 g, 175 m, 100% polyester)
  • 03
    Dolphin Fine Himalaya velvet yarn, Color 37 (brown color) - approx 1/3 skein for hooves (100 g, 175 m)
  • 04
    Dolphin Fine Himalaya velvet yarn, Color 38 (burgundy color) - a little for the nose
  • 05
    Dolphin Baby Himalaya velvet yarn, Color 80332 (coral color) - small amount for ears (100 g, 120 m, 100% polyester)
  • 06
    YarnArt Jeans yarn (50 g, 160 m, 55% cotton, 45% acrylic) Color 62 (white) - small amount for eye whites
  • 07
    YarnArt Jeans yarn Color 70 (brown color) - 1 skein for horns (as listed)
  • 08
    YarnArt Jeans yarn Color 90 (red color) - 1 skein for horn decorations (as listed)
  • 09
    YarnArt Jeans yarn Color 53 (black color) - a little for detailing the eyes
  • 10
    Gazzal Baby Cotton yarn (50 g, 165 m, 40% cotton, 60% acrylic) - used where specified
  • 11
    Kamtex mercerized cotton for sewing parts (50 g, 200 m) - color powder/brown for sewing pieces
  • 12
    YarnArt Mink (50 g, 75 m, 100% polyamide) Color 330 (milky) - small amount as listed

β€” Tools Required

  • 01
    Crochet hook size 2.5 mm (US C)
  • 02
    Crochet hook size 1.75 mm (HS 4)
  • 03
    Thin needle for regular sewing threads (for sewing eyes)
  • 04
    Thicker needle for sewing ears
  • 05
    Long needle for needle sculpting
  • 06
    Sewing threads in black and white
  • 07
    Brown Camtex thread (for sewing legs)
  • 08
    8 stitch markers
  • 09
    Scissors
  • 10
    Yarn needle for sewing and weaving in ends
  • 11
    Polyester stuffing (holofiber)
  • 12
    Black felt (for eyelashes/details)
  • 13
    Eyes 20 mm (2 pcs, blue)
  • 14
    Wire 1 mm (approx 320 cm) and tape to build horn frame
  • 15
    Velcro + glue (8 pieces + glue)
  • 16
    Pins for assembly (optional)

Progress Tracker

0% Complete

β€” Forelegs :

Info :

Take Dolphin Fine Himalaya yarn, color 37 (brown color), crochet hook β„–2.5 (US C).

Round 1 :

make foundation ch8, work 2 sc into the second ch from the hook, 5 sc, work 4 sc into one stitch, turn, along other side of foundation chain crochet 5 sc, 2 sc into one stitch (18)

Round 2 :

2 inc, 5 sc, 4 inc, 5 sc, 2 inc (26)

Round 3 :

(1 sc, 1 inc)*2, 5 sc, (1 sc, 1 inc)*4, 5 sc, (1 sc, 1 inc)*2 (34)

Round 4 :

34 sl sts (34)

Round 5 :

34 sc - crochet in back loops only (34)

Round 6 :

16 sc, 1 dec, 15 sc, 1 inc (34)

Round 7 :

15 sc, 1 dec, 16 sc, 1 inc (34)

Round 8 :

14 sc, 1 dec, 17 sc, 1 inc (34)

Info :

Next, we crochet yarn LaVita yarn Velurex, color 1038.

Round 9 :

(15 sc, 1 dec)*2 (32) - crochet in back loops only

Round 10 :

32 sc (32)

Round 11 :

(14 sc, 1 dec)*2 (30)

Round 12 :

(13 sc, 1 dec)*2 (28)

Round 13 :

(12 sc, 1 dec)*2 (26)

Round 14 :

(11 sc, 1 dec)*2 (24)

Info :

*** Return to the round 4th . Crochet reverse sc along this round. Fasten off, cut off and weave in. ***

Round 15-23 :

24 sc (24) - repeat 9 times. Stuff the toy as you go. Ensure that the working thread is positioned towards the back and center by crocheting additional loops if needed.

Round 24 :

9 sc, 7 inc, 8 sc (31) - it is recommended to position inc towards the center and at the front.

Round 25 :

31 sc (31)

Round 26 :

9 sc, 7 dec, 8 sc (24) - decs should be located towards the center and at the front.

Round 27-35 :

24 sc (24) - repeat 9 times

Round 36 :

(11 sc, 1 inc)*2 (26)

Round 37 :

(12 sc, 1 inc)*2 (28)

Round 38 :

(13 sc, 1 inc)*2 (30)

Info :

Fasten off, cut off. Stuff it. The first front leg has been completed, and the second front leg is crocheted in a similar manner.

β€” Hind legs :

Info :

1-23 round: we crochet similarly to the forelegs. Ensure that the working thread is positioned towards the back and center by crocheting additional loops if needed.

Round 24 :

10 sc, 3 inc, 11 sc (27)

Round 25 :

10 sc, (1 sc, 1 inc)*3, 9 sc, 1 dec (29)

Round 26 :

1 dec, 8 sc, (2 sc, 1 inc)*3, 8 sc, 1 dec (30)

Round 27 :

1 dec, 26 sc, 1 dec (28)

Round 28 :

1 dec, 26 sc (27)

Round 29-33 :

27 sc (27) - repeat 5 times

Round 34 :

1 inc, 26 sc (28)

Round 35 :

1 sc, 1 inc, 26 sc (29)

Round 36 :

2 sc, 1 inc, 26 sc (30)

Round 37-38 :

30 sc (30) - repeat 2 times

Info :

Fasten off, cut off. The initial hind leg is completed, and the second one is crocheted in a similar fashion.

β€” Connecting part for legs :

Info :

Take yarn LaVita yarn Velurex, color 1038, crochet hook β„–2.5 (US C).

Round 1 :

make foundation ch8, work 2 sc into the second ch from the hook, 5 sc , work 4 sc into one stitch, turn, crochet along other side of the foundation chain 5 sc, work 2 sc into one stitch (18)

Round 2 :

2 inc, 5 sc, 4 inc, 5 sc, 2 inc (26)

Round 3 :

(1 sc, 1 inc)*2, 5 sc, (1 sc, 1 inc)*4, 5 sc, (1 sc, 1 inc)*2 (34)

Round 4 :

(2 sc, 1 inc)*2, 5 sc, (2 sc, 1 inc)*4, 5 sc, (2 sc, 1 inc)*2 (42)

Round 5 :

(3 sc, 1 inc)*2, 5 sc, (3 sc, 1 inc)*4, 5 sc, (3 sc, 1 inc)*2 (50)

β€” Legs joining (the stitches division) :

Info :

To sew the legs, we will utilize brown Camtex thread (or any other thread that matches the toy's color) and 8 markers. Prior to commencing the sewing process, place the legs uniformly close to the joining piece and position markers at the designated points where the legs will be joined. The photo illustrates the stitch division, and we will link 6 stitches on each leg.

Round 6 :

it is worth noting that 6 stitches from each leg, 24 stitches from the body (6 multiplied by 4), will now be situated inside the toy's body. So we crochet as follows: on the back - 4 sc, on the hind left leg - 24 sc, on the left side - 7 sc, on the left foreleg - 24 sc, on the chest - 6 sc, on the right foreleg - 24 sc, on the right side - 7 sc, on the hind right leg - 24 sc, on the back - 2 sc (122)

Round 7 :

(59 sc, 1 dec)*2 (120)

Round 8 :

(18 sc, 1 dec)*6 (114)

Round 9-20 :

114 sc (114) - repeat 12 times

Round 21 :

37 sc, ch20 and join with the stitch on the opposite side with a slip stitch, 23 sc (80)

Info :

This way we have our body Β«dividedΒ» into 2 sections (the 1st one - where the head will be and the 2nd one - where the back part/bottom will be). In the next 22th round we continue crocheting the back/bottom - where we have the circle with 80 stitches.

Round 22 :

(8 sc, 1 dec)*8 (72)

Round 23 :

(7 sc, 1 dec)*8 (64)

Round 24 :

(6 sc, 1 dec)*8 (56)

Round 25 :

(5 sc, 1 dec)*8 (48)

Round 26 :

(4 sc, 1 dec)*8 (40)

Round 27 :

(3 sc, 1 dec)*8 (32)

Round 28 :

(2 sc, 1 dec)*8 (24)

Round 29 :

(1 sc, 1 dec)*8 (16)

Round 30 :

8 dec (8) Draw the thread tightly, cut off, and weave in the tail end.

Info :

Draw the thread tightly, cut off, and weave in the tail end. The body back/bottom section is closed.

β€” Neck and Body (return to round 21) :

Info :

Return to the round 21. We are going to crochet the neck and the head along the opening which was formed (It is 74 stitches). So, start the round 22. Stuff the toy as you go.

Round 22 :

(35 sc, 1 dec)*2 (72)

Round 23 :

(16 sc, 1 dec)*4 (68)

Round 24 :

(15 sc, 1 dec)*4 (64)

Round 25 :

(14 sc, 1 dec)*4 (60)

Round 26 :

(13 sc, 1 dec)*4 (56)

Round 27 :

(12 sc, 1 dec)*4 (52)

Round 28 :

(11 sc, 1 dec)*4 (48)

Round 29 :

(10 sc, 1 dec)*4 (44)

Round 30 :

(9 sc, 1 dec)*4 (40)

Round 31 :

(8 sc, 1 dec)*4 (36)

Round 32-38 :

36 sc (36) - repeat 7 times

β€” We continue to crochet the head :

Info :

Take Dolphin Fine Himalaya yarn, color 33, crochet hook β„–2.5 (US C). Make sure that the working thread is at the middle of the back.

Round 39 :

(8 sc, 1 inc)*4 (40)

Round 40 :

(4 sc, 1 inc)*8 (48)

Round 41 :

(5 sc, 1 inc)*8 (56)

Round 42 :

(6 sc, 1 inc)*8 (64)

Round 43 :

(7 sc, 1 inc)*8 (72)

Round 44 :

(8 sc, 1 inc)*8 (80)

Round 45-49 :

80 sc (80) - repeat 5 times

Round 50 :

22 sc, (1 sc, 1 dec)*12, 22 sc (68)

Round 51-61 :

take yarn LaVita yarn Velurex, color 1038, 68 sc (68) - repeat 11 times

β€” Eyes :

Info :

At this point, we proceed with making the eyes. We set the toy aside temporarily and begin crocheting the eyes. Take YarnArt Jeans yarn, color 62 (white), crochet hook β„–1.75 (HS 4).

Round 1 :

8 sc in MR (8)

Round 2 :

8 inc (16)

Round 3 :

(1 sc, 1 inc)*8 (24)

Round 4 :

(2 sc, 1 inc)*8 (32)

Round 5 :

yarn YarnArt Jeans of black color crochet into front loops of the stitches 32 sl sts (32) Fasten off, cut off.

Info :

We cut out felt pieces for the eyes to create eyelashes. When stitching the eyes, it is necessary to position them under the eye and sew through them. I sewed them between the 52nd and 59th rounds, with a distance of 3 sc between them. To attach the eyes to the head, position them at least one division apart, then melted the plastic slightly using a lighter.

β€” We continue to crochet the head :

Info :

Stuff the toy as you go.

Round 62 :

(15 sc, 1 dec)*4 (64)

Round 63 :

(6 sc, 1 dec)*8 (56)

Round 64 :

(5 sc, 1 dec)*8 (48)

Round 65 :

(4 sc, 1 dec)*8 (40)

Round 66 :

(3 sc, 1 dec)*8 (32)

Round 67 :

(2 sc, 1 dec)*8 (24)

Round 68 :

(1 sc, 1 dec)*8 (16)

Round 69 :

8 dec (8) Draw the thread tightly, cut off, and weave in the tail end.

β€” Muzzle :

Info :

Take Dolphin Fine Himalaya yarn, color 33, crochet hook β„–2.5 (US C).

Round 1 :

make foundation chain ch8, work 2 sc into the second ch from the hook , work 5 sc, work 4 sc into one stitch, turn, crochet along the other side of the foundation chain 5 sc, 2 sc into one stitch (18)

Assembly Instructions

  • Sew the legs to the joining piece using brown Camtex thread and 8 markers; place the legs evenly around the joining piece and mark the points where 6 stitches of each leg will be linked.
  • When joining legs to form the body, follow the stitch division: on the back 4 sc, hind left leg 24 sc, left side 7 sc, left foreleg 24 sc, chest 6 sc, right foreleg 24 sc, right side 7 sc, hind right leg 24 sc, back 2 sc; then continue rounds as written.
  • Attach eyes between rounds 52 and 59 with approximately 3 single crochet stitches between them; position felt eyelashes under the eyes and sew through them, taking care not to fasten eyes too tightly.
  • Stuff the toy gradually while shaping neck and head; stuff the limbs as you work and ensure even filling to avoid lumps.
  • Sew the muzzle and ears in place, using reference photos for alignment; use a long needle for needle sculpting to refine the muzzle and cheek shape.
  • Use wire framed inside the horns (1 mm wire, about 320 cm total) and tape to secure; assemble horns and attach to the head securely.

Important Notes

  • πŸ’‘Use stitch markers to keep track of your rounds and to divide the stitches when joining legs to ensure symmetrical construction.
  • πŸ’‘Stuff firmly but gradually; add small amounts of filling as you crochet to keep shapes smooth and avoid overstuffing that can distort sections.
  • πŸ’‘Weave in ends and fasten off securely at each section to avoid unraveling, especially around high-stress joins like leg attachments.
  • πŸ’‘Pay attention to the working thread location when joining legs and sewing pieces; reposition by crocheting additional loops if necessary to keep it centered.
  • πŸ’‘When attaching eyes and small plastic pieces, avoid excessive tightening; melt the plastic slightly if needed to secure placement without deforming the crochet fabric.

This joyful Forest Deer pattern will guide you from individual legs to a beautifully joined body and a sculpted head β€” a true handmade treasure.🦌 The plush velvet texture and careful assembly create a soft, durable toy perfect for gifting or display.🧢 Enjoy the step-by-step photos and detailed rounds as you bring this charming critter to life!✨

You ask,

we answer.

FAQs

What size will the finished piece be?

The finished amigurumi measures approximately 42 cm tall (16.54 inches) without horns and about 54 cm (21.26 inches) with horns when using the recommended yarns and hook sizes.

Can I use different yarn weights for this pattern?

Yes, you can use different yarn weights, but this will affect the final size and stitch counts. Adjust your hook size appropriately and be prepared to modify stitch counts if you change yarn thickness.

Do I need prior crochet experience for this pattern?

This pattern is rated intermediate, so basic knowledge of crochet stitches, increases, decreases and joining techniques is recommended for best results.

How long does this project typically take to complete?

Most crafters will spend around 12-15 hours completing this pattern, depending on experience, speed, and how long you spend on assembly and finishing details.