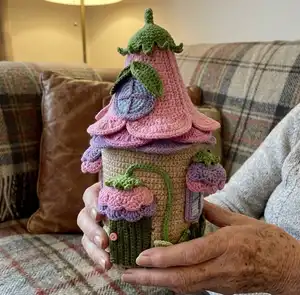
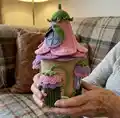
Create a charming Floral Fairy House amigurumi with detailed step-by-step crochet and assembly instructions. This pattern walks you through building a sturdy crocheted house using plastic canvas, a reinforced fishing-line roof, and layered flower-petal roofing. Youll enjoy assembling the textured walls, cute door and windows, and decorative petals to make a magical miniature home.
Progress Tracker
0% Complete
— House Bottom :
Info :
Start crocheting from house bottom with beige yarn. Use a marking thread of contrast color to mark the beginning and the end of the rounds.
Round 2 :
inc*6=12 sc (12)
Round 3 :
(1 sc, inc)*6=18 sc (18)
Round 4 :
1 sc, inc, (2 sc, inc)*5, 1 sc =24 sc (24)
Round 5 :
(3 sc, inc)*6=30 sc (30)
Round 6 :
2 sc, inc, (4 sc, inc)*5, 2 sc =36 sc (36)
Round 7 :
(5 sc, inc)*6=42 sc (42)
Round 8 :
3 sc, inc, (6 sc, inc)*5, 3 sc =48 sc (48)
Round 9 :
(7 sc, inc)*6=54 sc (54)
Round 10 :
4 sc, inc, (8 sc, inc)*5, 4 sc =60 sc (60)
Round 11 :
(9 sc, inc)*6=66 sc (66)
Round 12 :
5 sc, inc, (10 sc, inc)*5, 5 sc =72 sc (72)
Round 13 :
(11 sc, inc)*6=78 sc (78)
Round 14 :
6 sc, inc, (12 sc, inc)*5, 6 sc =84 sc (84)
Round 15 :
(13 sc, inc)*6=90 sc (90)
Info :
To make the completion of the circle more accurate, after the last increase, crochet another 1 sc and then 1 sl st. Leave a long end of the thread.
— Canvas Circles (Base) :
Info :
Cut a circle from the canvas with a diameter slightly smaller than crocheted. Sew the canvas to the circle with small stitches.
Info :
Crochet the second circle in the same way. Put 3 layers together and sew over the edge. Stitch several times through the center.
— Walls & Canvas Cylinder :
Info :
Cut a strip along the entire length (33 cm) 15 cm wide from a sheet of canvas. Roll it into a cylinder - my diameter clearly coincided with the diameter of the bottom. If the cylinder diameter is not much larger, cut off the excess. If the overlap is about 3 cm - leave it like that. If the cylinder diameter is not enough - leave it as it is, we will cover it with an additional strip during assembly.
Info :
Crochet the walls of the house with beige yarn. Chain 91 and crochet back and forth rows 90 sc in a row.
Info :
Crochet half the height of the canvas, I got 21 rows.
Info :
Next crochet only from one side in a height of 38 sc to the end of the canvas. Cut the thread.
Info :
Skip 14 loops in the middle of the canvas and crochet from the other side also 38 sc to the end of the canvas.
Info :
This will be the inside of the house. And since the inner diameter is always smaller, the crocheted canvas will bubble. Therefore, the finished part must be attached to the canvas and stitched with small stitches vertical lines at a distance of 1.5-2 cm from each other. At the same time, on the short side of the canvas, you need to retreat 3 cm on both sides.
Info :
Carefully cut out the door opening. Do not discard the cut piece.
Info :
Crochet the second piece for the outer side in the same way.
Info :
Fold the wall with the plastic canvas outward and sew the edges of the crocheted canvas end-to-end. Then join the edges of the canvas end-to-end and sew them through the crocheted fabric.
Info :
Cut a strip about 4 cm wide from the canvas and overlap the seam with it. If this is not done, then the joint of the canvas will stick out as an angle. Sew the strip on both sides through the crocheted fabric.
Info :
Sew the second piece outside. Better start from the door opening, sew over the edge. Then sew vertical seam on the back side of the house. Sew the top and the bottom sides over the edge.
Info :
Sew the bottom to the wall. When stitching, it is not necessary to grab the canvas, it is enough to grab only the edge of the crocheted fabric with a needle.
— Roof Base (Fishing Line Reinforced Cone) :
Info :
Crochet the base of the roof with fishing line. The color of the base can be any, not contradicting the main color of the house. For example, you can use green if there is a lot of it. Before starting work, burn the end of the fishing line with a lighter so that a ball forms at the end. It will not let the fishing line slip out of crocheting.
Round 2 :
inc*6=12 sc (12)
Round 4 :
(1 sc, inc)*6=18 sc (18)
Round 6 :
(2 sc, inc)*6=24 sc (24)
Round 8 :
(3 sc, inc)*6=30 sc (30)
Round 10 :
(4 sc, inc)*6=36 sc (36)
Round 12 :
(5 sc, inc)*6=42 sc (42)
Round 14 :
(6 sc, inc)*6=48 sc (48)
Round 16 :
(7 sc, inc)*6=54 sc (54)
Round 18 :
(8 sc, inc)*6=60 sc (60)
Round 20 :
(9 sc, inc)*6=66 sc (66)
Round 22 :
(10 sc, inc)*6=72 sc (72)
Round 24 :
(11 sc, inc)*6=78 sc (78)
Round 26 :
(12 sc, inc)*6=84 sc (84)
Round 28 :
(13 sc, inc)*6=90 sc (90)
Round 29 :
90 sc. Cut the fishing line leaving a short end. (90)
Info :
Gently melt the end of the fishing line, protruding it from crocheting, and quickly press it to crocheting. The melted fishing line will stick to the yarn. Crochet a few more sc to close the line, finish with a sl st and cut the thread.
— Roof Petals (Lilac) :
Info :
Crochet roof petals with a lilac yarn. 1. 3 sc in AR. Adjust the ring and then crochet back and forth rows with turning ch.
Round 4 :
1 sc, inc, 1 sc =4 sc (4)
Round 7 :
2 sc, inc, 1 sc =5 sc (5)
Round 10 :
2 sc, inc, 2 sc =6 sc (6)
Round 13 :
2 sc, inc, 3 sc =7 sc (7)
Round 16 :
2 sc, inc, 4 sc =8 sc (8)
Round 19 :
2 sc, inc, 5 sc =9 sc (9)
Round 22 :
2 sc, inc, 6 sc =10 sc (10)
Round 25 :
1 sc, 2 htr, (2 dc in every st)*4, 2 htr, 1 sc
Info :
Sc along the straight sides. Make 3 inc at the narrow end. Along the wide end: 2 ch, 2 dc in every st, (1 dc, 2 ch, sl st) in the last st. Cut the yarn.
Info :
Join yarn to the narrow end and sc around without inc adding a fishing line. Make 5 petals. Crochet 5 more pieces of two other shades.
— Petal Assembly :
Info :
Fasten the petals to the base of the roof. To do this, apply glue with a thin line in the center of the petals and glue one at a time. About the 25th row of petals should fall on the edge of the base. Now gently lift the edges of each petal and glue completely. Glue the second layer of petals in the same way. Place them a little higher and with an offset relative to the first row. Glue the third row. Thanks to the fishing line and glue, the roof is very hard and durable.
— Sepal (Roof Top) :
Info :
Crochet a sepal with green yarn for the top of the roof.
Rounds 1-4 :
6 sc in AR, 3 rounds of 6 sc (6)
Round 5 :
inc*6=12 sc (12)
Round 6 :
(1 sc, inc)*6=18 sc (18)
Round 7 :
(2 sc, inc)*6=24 sc (24)
Round 8 :
(3 sc, inc)*6=30 sc (30)
Rounds 9-10 :
2 rounds of 30 sc (30)
Info :
Crochet an angle: 7 ch, 2 sl st, 1 sc, 1 htr, 2 dc, skip 2 st of the base, 1 sl st. Repeat around. Repeat around.
Info :
Put the sepal on the top of the roof and sew or glue. The roof is not attached to the house in any way, it is simply put on top.
— Alternate Sepal & Finishing (small sepal & angles) :
Info :
Crochet sepal with green yarn: 1. 3 sc in AR. Then crochet back and forth rows with a turning ch. 2. inc*3=6 sc 3. (1 sc, inc)*3=9 sc. Crochet angles: 4 ch, 1 sl st, 2 sc down the chain, sl st in the next st. Make total 5 angles. Glue the sepal to the visor.
— Door, Visor and Door Assembly :
Info :
Put off the roof, take the door. Cut the door leaf so that it is 5 mm smaller than the opening in height and width. With dark green yarn crochet a rectangle of such a size as to cover the door from 2 sides. The number of sc and rows will depend on your crocheting density.
Info :
Sew the door along 3 sides over the edge. Sew the door to the opening making a several stitches through the canvas in 2 points. Sew a small button or a bead. I used 2 mini-buttons put together.
Info :
Crochet a visor over the door with lilac yarn.
Round 2 :
inc*6=12 sc (12)
Round 3 :
(1 sc, inc)*6=18 sc (18)
Round 4 :
(2 sc, inc)*6=24 sc (24)
Round 5 :
(3 sc, inc)*6=30 sc (30)
Round 6 :
(4 sc, inc)*6=36 sc (36)
Round 7 :
(5 sc, inc)*6=42 sc (42)
Rounds 8-9 :
2 rounds of 42 sc (42)
Info :
Crochet shells along the edge: skip 1 st, 6 dc in 1 st, skip 1 st, 1 sc. Make 10 such shells. Since there are 42 sc in the circle, 2 st will be excess. Therefore, in 2 places you need to skip 2 st instead of one. Leave a long end of the thread. Fold the part in half, aligning the shells, and glue inside, giving the shape of a dome. Sew over the edge with the end of the thread.
Info :
Crochet the second layer of the visor with pink yarn. 1. 3 sc in AR. Then crochet back and forth rows with a turning ch, not spiral rounds.
Round 3 :
(1 sc, inc)*3=9 sc (9)
Round 4 :
(2 sc, inc)*3=12 sc (12)
Round 5 :
(3 sc, inc)*3=15 sc (15)
Round 6 :
(4 sc, inc)*3=18 sc (18)
Round 7 :
(5 sc, inc)*3=21 sc (21)
Info :
Crochet 5 shells of 5 dc. Skip 2 st before the first shell instead of 1, because 1 st will be excess. Fold and glue the visor layers as instructed; apply glue to the fold and glue it over the door. Do not fasten too low so that the visor does not interfere with the opening of the door. Additionally sew the visor to the wall with the end of the thread. Glue the pink layer over the lilac one.
— Windows :
Info :
Crochet windows with light blue yarn. Crochet a rectangle 10 sc wide and 12 rows high.
— Final Assembly & Decorative Details :
Info :
Sew the door and windows into the canvas openings as described. Attach small petals and leaves around windows and door using glue or stitches. Sew a small button or bead for the doorknob. Place roof onto the house; the roof is not attached to the house in any way, it simply sits on top. Add any additional leaves, vines, or details as desired by gluing or sewing to the outside of the walls.
This Floral Fairy House pattern brings a tiny enchanted home to life with layered petals, a reinforced cone roof, and a sturdy canvas-backed interior. Its combination of crochet, plastic canvas, and fishing-line reinforcement makes it both whimsical and durable. Perfect as a display piece or a thoughtful handmade gift—happy crafting! 🧶✨