🧢 Beautiful ✨ Detailed πŸ’ Adorable

Elwen Granny Square Pattern

Elwen Granny Square Pattern
4.5β˜… Rating
2-3 Hours Time Needed
2.0K Made This
βœ‚οΈ

Intermediate Level

Ideal for those with basic crochet experience, featuring slightly more advanced stitches and techniques to expand your skills.

⏱️

Bite-Sized Project

Finishes in 2-4 hoursβ€”perfect for an afternoon of creative relaxation.

🏑

Cozy Accent

A warm touch for your space that transforms ordinary corners into inviting nooks filled with handmade charm.

About This Elwen Granny Square Pattern

This pattern creates a charming heart-centered granny square using 3 colors of cotton DK yarn. The tutorial is photo-rich and includes video links for standing stitches and invisible joins to help you master tricky parts. It is perfect for making decorative squares for blankets, cushions, or small projects.

Elwen Granny Square Pattern crochet pattern - detailed view of completed project

The pattern includes full round-by-round instructions, stitch counts, and finishing instructions like weaving in ends and blocking. Use the square as a single accent or make multiples to join into larger projects.

Why You'll Love This Elwen Granny Square Pattern

I absolutely love this pattern because it combines a sweet heart motif with a classic granny-square finish that feels both modern and timeless. I enjoy how the three graduated colors create soft depth and make the heart pop beautifully. The step-by-step photos make the shaping and stitch placement really approachable, and the included video links are great for learning the standing stitches and invisible join. Making this square always brightens my day and works up quickly, perfect for gifting or practicing new techniques.

Elwen Granny Square Pattern step 1 - construction progress Elwen Granny Square Pattern step 2 - assembly progress Elwen Granny Square Pattern step 3 - details and accessories Elwen Granny Square Pattern step 4 - final assembly and finishing

Switch Things Up

I love how versatile this square is for customization; you can easily change the colours to create very different moods.

Try pastel shades for a softer, baby-friendly look or high-contrast brights for a modern pop of colour.

Want a larger square? Use a heavier yarn and a larger hook to scale the finished size up significantly.

For a tiny motif, use a lighter yarn and a smaller hook to make mini squares for keychains or garlands.

I often swap the order of the three colours to make the heart stand out more or to create a framed effect with a darker outer colour.

You can replace the standing stitches with regular joins if you prefer a simpler method, though the standing stitches give a cleaner start.

Experiment with textured yarn or a boucle for the outer rounds to add tactile interest to the square.

I sometimes embroider a contrasting outline around the heart for more definition and a handcrafted look.

Consider making several squares in a single palette and joining them into a cushion cover or lapghan for a coordinated set.

For an extra special touch, add small appliques or beads to the centre after blocking, but sew them on securely for durability.

Common Mistakes & How to Fix Them

βœ— Skipping the stitch marker placement for the marked stitch can make locating the corner difficult later; place a stitch marker in the indicated stitch (for example the 4th last stitch) to keep your corners accurate. βœ— Missing the BLO/BLO instructions when changing rounds can distort your edge texture; always check and work into BLO or FLO as stated, especially when joining a new color to the back loop only. βœ— Not reading the notes about CH counts will change your stitch totals; remember CH 1 and CH 2 do not count as a stitch unless the pattern explicitly states they should. βœ— Forgetting to use the invisible join leaves a visible seam at the heart edge; follow the provided video tutorial or use a slst join as described to create a clean finish. βœ— Over- or under-tension while working the heart rounds will change the shape of the heart; maintain consistent tension and check the photo references frequently to match shape and stitch height.

Elwen Granny Square Pattern

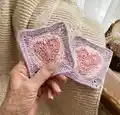
Create a delicate heart-centered granny square with this friendly, photo-based crochet tutorial. You will work in three soft shades to build a pretty heart motif and finish with a classic granny square border. The pattern includes step-by-step photos, video links for tricky stitches, and helpful notes to guide you through each round.

Intermediate 2-3 Hours

Materials Needed for Elwen Granny Square Pattern

β€” Main Fabric

  • 01
    Paintbox Yarns Cotton DK in three colours, total of 10 grams (Blush Pink - C1, Candyfloss Pink - C2, Dusty Rose - C3) or any similar DK cotton yarn

β€” Tools Required

  • 01
    3.75 mm (F) crochet hook (I used Furls White + Rose Gold Odyssey)
  • 02
    Yarn needle for weaving in ends
  • 03
    Scissors
  • 04
    Stitch markers
  • 05
    Blocking tools (blocking mat and pins) - blocking is essential to even out stitches

Progress Tracker

0% Complete

β€” Instructions :

Info :

To start: with C1 (Blush Pink) MR

Round 1 :

CH 1, 12 DC into the ring, then tighten it, join with a SLST to first DC (12 DC)

Round 2 :

CH 2 (doesn't count as a ST), 1 DC in same ST (Pic 1), 1 FPDC around the same ST you just put a DC into (Pic 2), [1 DC in next ST (note: the FPDC might hide the next ST you have to work into) (Pic 3), 1 FPDC around same ST (Pic 4)] 11 times, join with a SLST to first DC (Pic 5) (12 FPDC, 12 DC)

Round 3 :

CH 1, 1 SC in same ST (Pic 1), SK 2 STS, 9 TR in next ST (FPDC) (Pic 2), SK 2 STS, 1 SC in next ST (Pic 3), SK 2 STS, 9 TR in next ST (FPDC) (Pic 4), SK 2 STS, 1 SC in next 6 STS (Pic 5), {2 HDC, 1 DC, 2 HDC} in next ST (Pic 6), 1 SC in next 5 STS (Pic 7), join with an invisible join to first SC (video help of how to do the invisible join: https://youtu.be/k6TOSvEpo-s) or alternatively you can join with a SLST to first SC (Pic 8) Fasten off. (13 SC, 4 HDC, 1 DC, 18 TR)

Round 4 :

Join C2 (Candyfloss Pink) with a standing DC (video help of how to make a standing double crochet: https://youtu.be/mE51DQl8TpY) to the BLO of last TR on the right (Pic 1) (note: if you are left handed, start in the BLO of last TR on the left), 1 DCBLO in same ST (Pic 2), 1 ExtDC into the DC ST from Round 2 (It has a SC in it already, you just have to work over it) (Pic 3), 2 DCBLO in next ST (Pic 4), 1 HDCBLO in next ST (Pic 5), 2 SCBLO in next ST (Pic 6), {1 SCBLO in next ST, 2 SCBLO in next ST} twice (Pic 7), 1 HDCBLO in next ST (Pic 8), 2 DCBLO in next ST (Pic 9), {1 DCBLO in next ST, 2 DCBLO in next ST} twice (Pic 10), 1 HDCBLO in next ST (Pic 11), 2 HDCBLO in next ST (Pic 12), 1 SCBLO in next ST (Pic 13), {2 SCBLO in next ST, 1 SCBLO in next ST} twice (Pic 14), 2 HDCBLO in next ST, 1 HDCBLO in next ST (Pic 15), 2 DCBLO in next ST (Pic 16), {1 DCBLO in next ST, 2 DCBLO in next ST} twice (Pic 17), 1 HDCBLO in next ST (Pic 18), 2 SCBLO in next ST (Pic 19), {1 SCBLO in next ST, 2 SCBLO in next ST} twice (Pic 20), 1 HDCBLO in next ST (Pic 21), join with a SLST to first DC (Pic 21) (23 SCBLO, 10 HDCBLO, 1 ExtDC, 20 DCBLO)

Round 5 :

CH 1, 1 SC in same ST, 1 SC in next ST (Pic 1), 2 SC in next ST (Pic 2), 1 SC in next 26 STS (Pic 3), 2 SC in next ST (Pic 4), 1 SC in next 24 STS, join with a SLST to first SC (Pic 5) Note: Put a SM in the 4th last ST (Pic 6) Fasten off. (56 SC)

Round 6 :

Join C3 (Dusty Rose) with a standing TR (video help of how to make a standing treble crochet: https://youtu.be/TrI1JMxcv94) to the ST marked with a SM, CH 2, 2 TR in same ST (corner) (Pic 1), 1 DC in next 2 STS (Pic 2), 1 HDC in next ST (Pic 3), 1 SC in next 7 STS (Pic 4), 1 HDC in next ST, 1 DC in next 2 STS (Pic 5), {[2 TR, CH 2, 2 TR] in next ST (corner) (Pic 6), 1 DC in next 2 STS, 1 HDC in next ST, 1 SC in next 7 STS, 1 HDC in next ST, 1 DC in next 2 STS} 3 times, 1 TR in first corner (Pic 7), join with a SLST to first TR (Pic 8) (28 SC, 8 HDC, 16 DC, 16 TR, 4 x CH 2 SP)

Round 7 :

SLST to CH 2 corner SP, CH 1, {1 DC, CH 2, 2 DC} in CH 2 corner SP (corner)(Pic 1), 1 DC in each ST on side (Pic 2), [{2 DC, CH 2, 2 DC} in CH 2 corner SP (corner)(Pic 3), 1 DC in each ST on side] 3 times, 1 DC in first corner (Pic 4), join with a SLST to first DC (Pic 5) Fasten off, weave in all ends, block the finished square. (84 DC, 4 x CH 2 SP)

Assembly Instructions

  • When completing Round 3 you can join with an invisible join to the first SC (video help provided) or alternatively join with a SLST to the first SC; choose the invisible join for a neater heart edge.
  • Place a stitch marker in the 4th last stitch as noted in Round 5 to help mark the corner reference for the following round.
  • Join C2 and C3 with standing stitches as instructed: join C2 with a standing DC to the BLO, and join C3 with a standing TR to the stitch marked with the stitch marker; follow the provided video links if you need help.
  • Fasten off each color as instructed, weave in all ends securely, and block the finished square to even out stitches and straighten the edges.

Important Notes

  • πŸ’‘Slip stitches do not count as stitches.
  • πŸ’‘CH 1 and CH 2 do not count as a stitch, unless stated otherwise.
  • πŸ’‘US terms are used throughout this pattern.
  • πŸ’‘At the end of every round there is a note with the stitch count to help you keep track of your work.

This pretty Elwen Granny Square is perfect for adding a handmade accent to pillows, blankets, or gift projects. The heart center and soft color transitions make it an ideal piece for baby items or romantic-themed decor. Share your finished squares and enjoy mixing colors and layouts for unique handmade creations. 🧢✨

You ask,

we answer.

FAQs

What size will the finished piece be?

The finished square measures approximately 4.75" x 4.75" / 12 x 12 cm using the recommended yarn and hook size.

Can I use different yarn weights for this pattern?

Yes, you can use different yarn weights, but this will affect the final size; choose an appropriate hook for the yarn you select and adjust expectations for gauge.

Do I need prior crochet experience for this pattern?

This pattern is rated intermediate and uses stitches like FPDC, back-loop only work, and standing stitches, so basic crochet skills and familiarity with stitch abbreviations are recommended.

How long does this project typically take to complete?

Most crocheters finish one square in about 2-3 hours, though time will vary with experience and yarn choice.

Are there video resources to help with specific stitches?

Yes, the pattern includes links to video tutorials for the standing double crochet, standing treble crochet, and the invisible join to help with those techniques.