🧢 Beautiful ✨ Detailed πŸ’ Adorable

Plush snuggler BUNNY Amigurumi Pattern

Plush snuggler BUNNY Amigurumi Pattern
3.9β˜… Rating
5-7 Hours Time Needed
2.9K Made This
βœ‚οΈ

Intermediate Level

Ideal for those with basic crochet experience, featuring slightly more advanced stitches and techniques to expand your skills.

⏱️

Weekend Treat

Takes 5-7 hours, making it an enjoyable project to finish over a couple of days.

🧸

Cute Companion

An adorable friend to cherish, handcrafted with love to bring comfort and joy for years to come.

About This Plush snuggler BUNNY Amigurumi Pattern

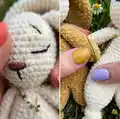
This pattern creates a plush snuggler bunny approximately 41 cm / 16" tall when made with recommended plush yarn and a 4 mm hook. Youll work all pieces in continuous spiral rounds and assemble them to create a soft, floppy bunny with a sweet face. The pattern includes guidance for using safety eyes or embroidering the eyes, nose and brows for a child-friendly option.

Plush snuggler BUNNY Amigurumi Pattern crochet pattern - detailed view of completed project

The toy uses chenille-style plush yarn (100g/120m) and is made from simple single crochet rounds with shaping through increases and decreases. Clear round-by-round instructions and helpful finishing steps are provided to make assembly and facial detailing easy.

Why You'll Love This Plush snuggler BUNNY Amigurumi Pattern

I absolutely love this pattern because it turns simple stitches into an irresistibly soft and huggable bunny. I enjoyed designing the cuddly proportions so the finished toy feels both floppy and well-shaped for little hands. The pattern lets you choose between safety eyes or embroidered features, so you can make a child-safe version or add expressive details. I love how the plush yarn gives an extra cozy texture that makes this bunny feel like a cherished companion. Making a set of different colors is so satisfying and always yields heartwarming gifts.

Plush snuggler BUNNY Amigurumi Pattern step 1 - construction progress Plush snuggler BUNNY Amigurumi Pattern step 2 - assembly progress Plush snuggler BUNNY Amigurumi Pattern step 3 - details and accessories Plush snuggler BUNNY Amigurumi Pattern step 4 - final assembly and finishing

Switch Things Up

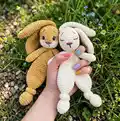
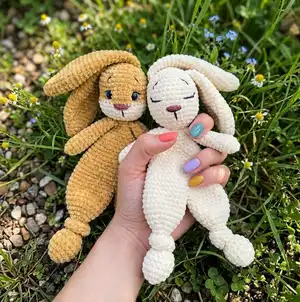
I love changing yarn colors to create different personalities for this bunny β€” try pastels for a nursery or deep jewel tones for a modern look.

You can scale the size by switching yarn weight and hook size: use bulky yarn with a larger hook for an extra cuddly bunny, or thin yarn and smaller hook for a tiny keychain-size version.

I often add little accessories like crocheted scarves, tiny hats or a miniature blanket to make each bunny feel unique.

Try embroidering different expressions by varying eyebrow shape, eyelash length, and mouth placement to change the mood of your bunny.

If you want posable limbs, weave thin wire into the arms or legs before final stuffing for gentle movement and poseability.

For baby-friendly toys, skip safety eyes and embroider all facial features using a dense satin stitch for durability and safety.

I sometimes use two-tone ears or a contrasting muzzle color to add visual interest and highlight facial features.

Want a gift set? Crochet several bunnies in coordinating colors and sizes to create a charming collection for a baby shower or nursery display.

I recommend trying surface embroidery for tiny heart or star details on the belly to personalize gifts with initials or small motifs.

Experiment with different stitch textures for the body by substituting stitch patterns (like half double crochet rows) to see how texture changes the look and feel.

Consider stuffing with a mix of soft filling and fabric scraps to create a firmer base while keeping the limbs cuddly and lightweight.

When adding embellishments, I always pin in place and photograph positions before sewing so I can reproduce the exact look if making multiples.

Common Mistakes & How to Fix Them

βœ— Skipping stitch markers while working in spiral rounds makes it easy to lose your place and lose the start point; place a marker at the first stitch of each round to stay on track. βœ— Not stuffing gradually causes lumps and uneven shaping in the head or limbs; add small amounts of filler as you go and shape evenly for smooth results. βœ— Using the wrong yarn weight will change the finished size and drape of the toy; match the recommended plush yarn weight (100g / 120m) or adjust hook size accordingly. βœ— Pulling your stitches too tight on plush yarn can hide stitch definition and make assembly difficult; maintain a relaxed, even tension so pieces sit together neatly. βœ— Forgetting to count stitches after increases or decreases will lead to mismatched rounds and poor shaping; count stitches after each round, especially after increases and decreases.

Plush snuggler BUNNY Amigurumi Pattern

Make a soft, cuddly plush snuggler bunny perfect for gifting or snuggling. This pattern walks you through each piece step-by-step so you can crochet the legs, body, arms, head, ears and tail with confidence. Youll use plush chenille-style yarn for a velvety finish and optional safety eyes or embroidered features. Ideal for a cozy handmade toy that measures approximately 41 cm when finished.

Intermediate 5-7 Hours

Materials Needed for Plush snuggler BUNNY Amigurumi Pattern

β€” Main Fabric

  • 01
    Wolans Yarns BUNNY BABY plush yarn 100g / 120m (131yds) main color shade 100-18 - 2 skeins if using two colors (2 skeins main color)
  • 02
    Wolans Yarns BUNNY BABY plush yarn 100g / 120m (131yds) secondary color shade 100-02 - some for the head when making two-color version
  • 03
    If making the toy in one color, use 2 skeins of the same Wolans BUNNY BABY plush yarn (100g / 120m)
  • 04
    Yarn Art DOLCE (100g / 120m) - alternative plush yarn (100g skein)
  • 05
    Premier Yarns PARFAIT CHUNKY (100g / 120m) - alternative plush yarn
  • 06
    Katia BAMBI (100g / 120m) - alternative plush yarn
  • 07
    King Cole YUMMY (100g / 120m) - alternative plush yarn
  • 08
    Universal Yarn BELLA CHENILLE (100g / 120m) - alternative plush yarn
  • 09
    Cygnet JELLY CHUNKY CHENILLE (100g / 120m) - alternative plush yarn

β€” Tools Required

  • 01
    Crochet hook 4 mm (G6)
  • 02
    Toy filling or scraps of fabric or yarn for stuffing
  • 03
    Stitch markers
  • 04
    Tapestry needle
  • 05
    Scissors
  • 06
    Thread for sewing details
  • 07
    Rose thread or pink yarn for embroidery nose
  • 08
    16 mm toy safety eyes OR dark thread for embroidery eyes
  • 09
    Pins for assembly (optional)

Progress Tracker

0% Complete

β€” Notes :

Infos :

FINISHED SIZE 41 cm / 16” (approx.) PLUSH YARN: If you make the toy with two colors of yarn, you need 2 skeins of main color yarn (I used Wolans Yarns BUNNY BABY 100g / 120m (131yds) shade 100-18) and some secondary color for a head: I used Wolans Yarns BUNNY BABY 100g / 120m (131yds) shade 100-02. If you make the toy with one color yarn, you need 2 skeins.

Infos :

YARN ANALOGUES: - Yarn Art DOLCE (100g / 120m) - Premier Yarns PARFAIT CHUNKY (100g / 120m) - Katia BAMBI (100g / 120m) - King Cole YUMMY (100g / 120m) - Universal Yarn BELLA CHENILLE (100g / 120m) - Cygnet JELLY CHUNKY CHENILLE (100g / 120m). You can use any other plush yarn with the same weight. If you use a different weight yarn, the size of the finished toy may change. You may also need a hook of a different size (larger or smaller).

Infos :

CHOCHET HOOK: 4 mm (G6). EXTRAS: - toy filling or scraps fabric or yarn for stuffing - stitch markers - tapestry needle - scissors - thread for sewing details - rose thread for embroidery nose - 16 mm toy safety eyes OR dark thread for embroidery eyes

Infos :

ABBREVIATIONS: sc = single crochet inc = increase dec = decrease sl st = slip stitch MR = magic ring

Info :

SPIRAL WAY All details of the toy crocheted in a spiral way. Crocheting in the spiral is the technique of working in the round in a continuous manner, without joining the separate rounds with a slip stitch.

β€” Legs :

Round 1 :

6sc inside MR (6)

Round 2 :

6inc (12)

Round 3 :

(1sc, inc) x6 (18)

Rounds 4-6 :

18sc (18)

Round 7 :

(4sc, dec) x3 (15)

Round 8 :

(3sc, dec) x3 (12)

Info :

Add some filler.

Round 9 :

(2sc, dec) x3 (9)

Round 10 :

(1sc, dec) x3 (6)

Rounds 11-25 :

6sc (6)

Round 26 :

(1sc, inc) x3 (9)

Round 27 :

(2sc, inc) x3 (12)

Round 28 :

(3sc, inc) x3 (15)

Round 29 :

(4sc, inc) x3 (18)

Round 30 :

(5sc, inc) x3 (21)

Round 31 :

(6sc, inc) x3 (24)

Rounds 32-36 :

24sc (24)

Info :

Cut the yarn. Make the second leg in the same way, but don’t cut the thread at the end.

β€” Body :

Assembling round 1 :

join the 2nd leg with 1st leg (insert hook and make sc in the point where stitch 24 of the last round ended), 23sc of 1st leg, join with the leg 2 (insert hook and make sc in the point where stitch 24 of last round ended), 23sc of 2nd leg (48)

Rounds 2-5 :

48sc (48)

Round 6 :

(6sc, dec) x6 (42)

Rounds 7-8 :

42sc (42)

Round 9 :

(5sc, dec) x6 (36)

Rounds 10-11 :

36sc (36)

Round 12 :

(4sc, dec) x6 (30)

Rounds 13-14 :

30sc (30)

Round 15 :

(3sc, dec) x6 (24)

Rounds 16-17 :

24sc (24)

Round 18 :

(2sc, dec) x6 (18)

Rounds 19-20 :

18sc (18)

Round 21 :

(1sc, dec) x6 (12), sl st.

Info :

Cut the yarn. Make knots on the legs.

β€” Arms :

Round 1 :

6sc inside MR (6)

Round 2 :

(1sc, inc) x3 (9)

Round 3 :

(2sc, inc) x3 (12)

Rounds 4-6 :

12sc (12)

Round 7 :

10sc, dec (11)

Round 8 :

9sc, dec (10)

Rounds 9-16 :

10sc (10)

Info :

Fold and crochet the edges together 5sc. Cut the yarn.

Info :

Make the second arm in the same way in rounds 1-6. Round 7: dec, 10sc (11). Round 8: dec, 9sc (10).

β€” Head :

Info :

Start with secondary color yarn. Magic ring.

Round 1 :

6sc inside MR (6)

Round 2 :

6inc (12)

Round 3 :

(1sc, inc) x6 (18)

Round 4 :

(2sc, inc) x6 (24)

Round 5 :

(3sc, inc) x6 (30)

Round 6 :

(4sc, inc) x6 (36)

Rounds 7-8 :

36sc (36)

Info :

Change yarn to the main color.

Rounds 9-15 :

36sc (36)

Info :

If you use the safety eyes, attach them between rounds 10 and 11 (leave 8 stitches between the eyes).

Round 16 :

(4sc, dec) x6 (30)

Round 17 :

(3sc, dec) x6 (24)

Info :

Fill the head with filler.

Round 18 :

(2sc, dec) x6 (18)

Round 19 :

(1sc, dec) x6 (12)

Info :

Add more filler to the head.

Round 20 :

6dec (6)

Info :

Cut the yarn, pull the hole. Hide the end of the thread inside the head.

β€” Ears :

Info :

Use the main color yarn. Magic ring.

Round 1 :

6sc inside MR (6)

Round 2 :

(1sc, inc) x3 (9)

Round 3 :

(2sc, inc) x3 (12)

Round 4 :

(3sc, inc) x3 (15)

Round 5 :

(4sc, inc) x3 (18)

Round 6 :

(5sc, inc) x3 (21)

Round 7 :

(6sc, inc) x3 (24)

Rounds 8-14 :

24sc (24)

Round 15 :

(6sc, dec) x3 (21)

Rounds 16-17 :

21sc (21)

Round 18 :

(5sc, dec) x3 (18)

Rounds 19-20 :

18sc (18)

Round 21 :

(4sc, dec) x3 (15)

Rounds 22-23 :

15sc (15)

Round 24 :

(3sc, dec) x3 (12)

Rounds 25-26 :

12sc (12)

Info :

Fold and crochet the edges together 6sc. Cut the yarn.

β€” Tail :

Info :

Use the main color yarn. Magic ring.

Round 1 :

6sc inside MR (6)

Round 2 :

6inc (12)

Round 3 :

12sc (12)

Round 4 :

(2sc, dec) x3 (9)

Info :

Cut the yarn.

β€” Finishing the toy :

Step 1 :

Sew the head to the body. Sew the arms to the body, leave 4 stitches between the arms. Sew the tail to the back.

Step 2 :

Sew the ears to the head between rounds 17 and 18.

Step 3 :

Embroider the nose with pink thread between rounds 8 and 9. I got a nose 5 stitches wide. You can use any yarn you have (plush or cotton or acrylic). Hide the end of the thread inside the head.

Step 4 :

Embroider the nose, the eyelashes and the brows with dark thread.

Info :

If you don’t use the safety eyes, embroidery the eyes, the nose and the brows with dark thread.

Step 5 :

Tighten the muzzle with the thread of the main color. 1 -> 2 -> 3 -> 4 -> 5 -> 6 -> 7 -> 8

Assembly Instructions

  • Sew the head to the body and secure firmly using a yarn needle so the head sits centered above the body.
  • Sew the arms to the body leaving 4 stitches between the arms for proper spacing and symmetry, using whipstitch or ladder stitch for a neat finish.
  • Sew the tail to the back of the body at the center of the rear, securing the base firmly through several stitches.
  • Sew the ears to the head between rounds 17 and 18, spacing them evenly on either side of the top of the head.
  • Embroider the nose with pink thread between rounds 8 and 9 (about 5 stitches wide), then embroider the eyelashes and brows with dark thread for facial expression.

Important Notes

  • πŸ’‘Use stitch markers to keep track of the start of each spiral round, especially when shaping increases or decreases.
  • πŸ’‘Stuff the head and limbs gradually to achieve an even shape; overstuffing can distort the silhouette.
  • πŸ’‘Pin parts in place and check symmetry before sewing to ensure even placement and a professional finish.
  • πŸ’‘When attaching safety eyes, place them between rounds 10 and 11 with 8 stitches between eyes or choose to embroider eyes for a child-safe option.
  • πŸ’‘Weave in ends and hide thread tails inside the head or body for a tidy finish and to prevent pulling out.

This plush snuggler bunny is a cozy, handmade friend thats perfect for baby snuggles or decorative charm. Make it in soft pastel shades or warm neutrals to match any nursery. Enjoy the velvety feel of plush yarn and the satisfaction of a handmade gift that will be treasured. 🧢🐰

You ask,

we answer.

FAQs

What size will the finished piece be?

The finished amigurumi measures approximately 41 cm / 16 inches tall when made with the recommended plush yarn and 4 mm hook.

Can I use different yarn weights for this pattern?

Yes, but the finished size and texture will change; if you change yarn weight, adjust the hook size and expect a different final size and drape.

Do I need prior crochet experience for this pattern?

This pattern is rated intermediate, so familiarity with single crochet, increases, decreases, and working in continuous spiral rounds is recommended.

How long does this project typically take to complete?

Most crocheters complete this project in 5-7 hours, though time may vary with experience level and any additional embroidery or assembly details.