About This Doll - organizer Amigurumi Pattern
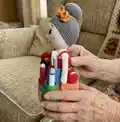
This pattern makes a decorative and functional doll organizer featuring a stuffed doll body with a sewn-in base and an apron with pockets. It combines amigurumi shaping techniques with simple flat crochet for pockets and ribbons. You will change colors for the dress and sew on small details like hair and a needle ball.

Includes full round-by-round instructions for head, torso, base, arms, hair and pockets. Photos and practical tips help you assemble the organizer and secure the cardboard base and glass beads for stability.
Why You'll Love This Doll - organizer Amigurumi Pattern
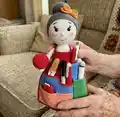
I absolutely love this pattern because it blends a playful amigurumi doll with a very practical organizer function that every crafter will enjoy. I love the way the apron and small pockets allow you to customize storage for needles, scissors and small supplies. The construction encourages creativity — you can change colors and add trims to make each doll unique. Making the base with a cardboard insert and glass beads gives the doll great stability, which I find very satisfying when the piece stands upright.
Switch Things Up
I love how many ways you can customize this doll organizer; swap the dress and apron colors to match your craft room or give it as a themed gift.
Want a smaller or larger organizer? Change your yarn weight and hook size — bulkier yarn will create a chunkier, larger doll and fine yarn will make a mini version.
I often add embroidered motifs or appliques to the apron pocket to personalize the organizer with initials or small motifs like flowers or hearts.
If you prefer a softer base, skip the glass balls and use a heavier cardboard base or add washers instead for a quieter weight option.
Try different eye types for varied expressions — safety eyes, embroidered eyes, or tiny buttons each give a different look.
I sometimes add felt lining inside the large pocket for fragile items, which gives a neat interior finish and extra protection.
Consider making sets: a matching pin cushion, scissor fob, and a small case that tuck into the pocket for a coordinated gift set.
To change the hairstyle, substitute the hair section with longer chained strands for flowing hair or create a bun by sewing a small circle of yarn into place.
For a whimsical look, crochet little accessories (tiny book, spool, or miniature tools) to tuck into the small pockets so the apron looks lived-in and useful.
I recommend experimenting with decorative stitches or surface crochet on the apron to create texture — this pattern is an excellent base for creative embellishments.
Common Mistakes & How to Fix Them
✗ Skipping placement of the eyes will misposition facial features; place safety eyes between rounds 12 and 13 with 8 stitches between them for correct positioning.
✗ Not stuffing during shaping causes lumps and collapse; stuff gradually while crocheting and add filler as instructed to keep an even shape.
✗ Cutting the thread too early on the base or apron pieces can make assembly difficult; follow the instruction to break yarn only where indicated and do not cut threads when told to keep them for joining.
✗ Forgetting to place the cardboard/plastic circle and glass beads in the base will make the doll unstable; insert a cardboard circle and 5-10 glass balls inside the base while crocheting to ensure the doll stands well.