🧢 Beautiful ✨ Detailed πŸ’ Adorable

Dave The Duck Amigurumi Pattern

Dave The Duck Amigurumi Pattern
4.5β˜… Rating
2-3 Hours Time Needed
2.7K Made This
βœ‚οΈ

Beginner Friendly Level

Perfect for those just starting their crochet journey, with clear instructions and simple techniques

⏱️

Bite-Sized Project

Finishes in 2-4 hoursβ€”perfect for an afternoon of creative relaxation.

🧸

Cute Companion

An adorable friend to cherish, handcrafted with love to bring comfort and joy for years to come.

About This Dave The Duck Amigurumi Pattern

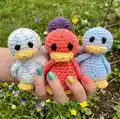
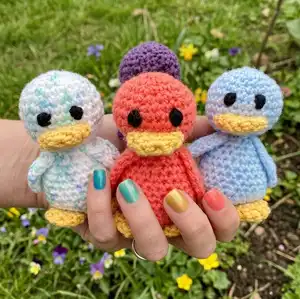
This pattern creates a small, adorable duck amigurumi approximately 10cm tall using DK yarn. It includes full instructions for the head, body, wings, beak and feet using continuous spiral rounds. The design is written in UK terms with a helpful UK-to-US stitch conversion included. Perfect for using up scrap yarn and making quick handmade gifts.

Dave The Duck Amigurumi Pattern crochet pattern - detailed view of completed project

The pattern is compact and easy to follow, with clear round-by-round shaping. Ideal for beginners who want a satisfying small project with a professional finish.

Why You'll Love This Dave The Duck Amigurumi Pattern

I absolutely love this pattern because it turns a few simple rounds into a delightful little character with personality. I enjoy how quickly one duck can be completed β€” it makes for a perfect quick gift or stash-busting project. The shaping is straightforward but effective, teaching important amigurumi skills like increasing and decreasing in the round. I also love how easy it is to customize colors, making each Dave unique. Sewing the small parts together is rewarding, and the finished toy always brings a smile.

Dave The Duck Amigurumi Pattern step 1 - construction progress Dave The Duck Amigurumi Pattern step 2 - assembly progress Dave The Duck Amigurumi Pattern step 3 - details and accessories Dave The Duck Amigurumi Pattern step 4 - final assembly and finishing

Switch Things Up

I love customizing this duck by changing colour schemes; you can easily make a pastel Dave, a neon Dave, or a speckled yarn version for variety.

If you want a bigger or smaller duck, change your yarn weight and corresponding hook size β€” bulky yarn and a larger hook will create a chunky toy, while lighter yarn and a smaller hook make a tiny keychain-friendly version.

I often add embroidered eyebrows or a tiny loop on the head to turn the duck into an ornament or keychain accessory.

Try using safety eyes instead of embroidering for a glossy look, but ensure they are securely fastened if the toy will be given to a child.

To create waddling feet, you can crochet a slightly longer foot piece or add a small felt sole for contrast and extra stability.

I sometimes stitch a small scarf or tiny hat to change the personality β€” these accessories can be crocheted quickly and sewn on for seasonal Daves.

Experiment with different beak shapes by adjusting the number of rounds or using a slightly smaller hook for the beak to make it firmer and more pronounced.

For a textured body, use a variegated DK yarn or switch to a stitch pattern like the moss stitch to add a subtle surface interest.

I also like to stuff the body a little less for a floppy, cuddly feel, and a bit more for a firm, display-friendly toy; balance is everything depending on your end use.

Finally, mix yarn types like cotton for a firmer, less fuzzy finish or acrylic for a soft, plush look β€” each choice gives Dave a different character and feel.

Common Mistakes & How to Fix Them

βœ— Skipping the magic ring set-up can leave a hole at the top of the head; start with a tight magic ring and pull it closed before working the first round. βœ— Joining rounds with a slip stitch when the pattern uses continuous spirals will create visible seams; work in a continuous spiral as instructed to keep the fabric seamless. βœ— Not stuffing gradually causes lumps and uneven shaping; add stuffing little by little while you shape the head and body for a smooth finish. βœ— Forgetting to leave long tails when fastening off makes sewing parts difficult; always leave a long tail for sewing the beak, feet and wings securely. βœ— Misplacing the wings or feet without pinning leads to asymmetry; pin or baste parts in position before sewing to check placement and level.

Dave The Duck Amigurumi Pattern

Make a charming little Dave the Duck with simple DK yarn and a 3.5mm hook. This petite amigurumi is quick to crochet and perfect for giftmaking or practice. The pattern uses continuous spirals and clear shaping for head, body, wings, feet and beak. Youll enjoy a satisfying, small project with cute results.

Beginner Friendly 2-3 Hours

Materials Needed for Dave The Duck Amigurumi Pattern

β€” Main Fabric

  • 01
    DK wool of any colour (1 ball) - I like to use Robin DK (my personal preference)
  • 02
    Small amount of orange or yellow for the beak and feet
  • 03
    Small amount of black wool for embroidering the eyes
  • 04
    Non-toxic toy stuffing - enough to fill head and body firmly

β€” Tools Required

  • 01
    Sewing needle
  • 02
    3.5mm crochet hook

Progress Tracker

0% Complete

β€” Head :

Info :

Make a magic ring, 6dc into the ring and pull the ring closed.

Round 1 :

2dc in each stitch

Round 2 :

(dc, 2dc in next stitch) to end

Round 3 :

(2dc, 2dc in next stitch) to end

Round 4 :

(3dc, 2dc in next stitch) to end

Round 5 to 8 :

dc in each stitch

Round 9 :

(3dc, dc2together) to end

Round 10 :

(2dc, dc2together) to end

Round 11 :

(dc, dc2together) to end

Info :

Stuff the head

Round 12 :

dc2together to end

Info :

Fasten off and sew up the gap.

β€” Beak :

Info :

In orange make a magic ring, 6dc into the ring and pull the ring closed.

Round 1 :

2dc in each stitch

Round 2 to 3 :

dc in each stitch

Info :

Fasten off. Leaving a long tail for sewing to head.

β€” Body :

Info :

Make a magic ring, 6dc into the ring and pull the ring closed.

Round 1 :

2dc in each stitch

Round 2 :

(dc, 2dc in next stitch) to end

Round 3 :

(2dc, 2dc in next stitch) to end

Round 4 :

(3dc, 2dc in next stitch) to end

Round 5 to 6 :

dc in each stitch

Round 7 :

(3dc, dc2together) to end

Round 8 to 11 :

dc in each stitch

Round 12 :

(2dc, dc2together) to end

Round 13 to 14 :

dc in each stitch

Round 15 :

(dc, dc2together) to end

Info :

Stuff body

Round 16 :

dc2together to end

Info :

Fasten off leaving a long tail to sew.

β€” Wings :

Info :

Wings (make 2): Make a magic ring, 5dc into the ring and pull the ring closed.

Row 1 :

turn, chain 1, 2dc in next st, 2htr in next st, 2tr in next st, 2htr in next st, 2dc in next st.

Row 2 :

turn, chain 1, dc, 2dc in next st, htr, 2htr in next st, tr, 2tr in next st, htr, 2htr in next st, dc, 2dc in next st.

Row 3 :

turn, chain 1, 2dc, 2dc in next st, 2htr, 2htr in next st, 2tr, 2tr in next st, 2htr, 2htr in next st, 2dc, 2dc in next st.

Info :

Fasten off. Leaving a long tail for sewing to the body.

β€” Feet :

Info :

Feet (make 2): In orange make a magic ring, 6dc into the ring and pull the ring closed.

Round 1 :

2dc in each stitch

Round 2 to 3 :

dc in each stitch

Info :

Fasten off. Leaving a long tail for sewing to the body.

β€” To make up :

Info :

Sew the head so that it sits level on the top of the body (the fastened off part of the head joining with the fastened off part of the body.)

Info :

Sew the two wings to either side of the body making sure they sit to the sides and are level in height. (The point of the wings should be facing downwards.)

Info :

Sew the orange beak to the front of the head making sure it is central and level. The beak should sit in the middle but lower part of the head.

Info :

Sew the two orange feet to the bottom of the body so that the feet stick out slightly at the front.

Info :

With black wool embroider the eyes so that they sit central above the beak. Leaving an approx. finger width space between the two eyes.

Assembly Instructions

  • Sew the head so that it sits level on the top of the body, aligning the fastened off edge of the head with the fastened off edge of the body and sew securely.
  • Position and sew the two wings to either side of the body so they are level in height and the points face downwards, pinning before sewing to check placement.
  • Sew the orange beak to the front lower centre of the head, ensuring it is central and level and sits slightly lower on the head.
  • Attach the two orange feet to the bottom front of the body so that they stick out slightly and provide a stable base for the toy.
  • Embroider the eyes with black wool so they sit central above the beak, leaving approximately a finger-width space between them for correct proportion.

Important Notes

  • πŸ’‘This design is made using continuous spirals; do not join rounds with a slip stitch unless specified in the pattern.
  • πŸ’‘The pattern is written in UK terms; check the UK-to-US conversion before starting if you use US terminology.
  • πŸ’‘Stuff the head and body gradually before closing to maintain smooth shaping and avoid lumps.
  • πŸ’‘Leave long tails when fastening off small parts so you have enough yarn to sew pieces securely in place.

This little Dave the Duck is a quick and delightful amigurumi project that makes a charming handmade gift. Make one in bright colours or soft pastels to suit any mood and watch them bring smiles. Perfect for crafting afternoons and using up DK yarn scraps. πŸ§ΆπŸ¦†

You ask,

we answer.

FAQs

What size will the finished piece be?

The finished amigurumi is approximately 10cm in height when using DK yarn and a 3.5mm crochet hook.

Can I use different yarn weights for this pattern?

Yes, you can use different yarn weights but the final size will change; adjust your hook size accordingly to match desired proportions.

Do I need prior crochet experience for this pattern?

This pattern is beginner friendly and uses basic stitches, but familiarity with magic ring, increasing and decreasing in the round is helpful.

How long does this project typically take to complete?

Most crocheters can finish this small duck in about 2-3 hours, though time varies with experience and detail work.

Are the pattern terms UK or US?

The pattern is written in UK terms; a conversion chart is included (UK Dc = US Sc, Htr = hdc, Tr = dc).