🧢 Beautiful ✨ Detailed πŸ’ Adorable

Bulbasaur Amigurumi Pattern

Bulbasaur Amigurumi Pattern
4.5β˜… Rating
2-3 Hours Time Needed
3.8K Made This
βœ‚οΈ

Beginner Friendly Level

Perfect for those just starting their crochet journey, with clear instructions and simple techniques

⏱️

Bite-Sized Project

Finishes in 2-4 hoursβ€”perfect for an afternoon of creative relaxation.

🧸

Cute Companion

An adorable friend to cherish, handcrafted with love to bring comfort and joy for years to come.

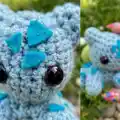
About This Bulbasaur Amigurumi Pattern

This pattern teaches you how to crochet a small Bulbasaur amigurumi using worsted weight yarn and basic single crochet techniques. Youll make a separate head, body, ears, legs and a tiny pod, then sew them together and add felt markings for the final touch. The instructions are photographed and written clearly so you can follow along step by step.

Bulbasaur Amigurumi Pattern crochet pattern - detailed view of completed project

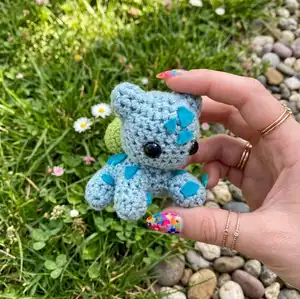
Ideal for a quick handmade gift or a first amigurumi project, the finished Bulbasaur is compact and full of personality. No advanced stitches are required β€” just consistent single crochet with increases and decreases.

Why You'll Love This Bulbasaur Amigurumi Pattern

I absolutely love this pattern because it turns simple stitches into a charming little character that always makes me smile. I enjoy how quick it is to crochet β€” you can see progress rapidly as each piece comes together. The design is forgiving for beginners but satisfying enough for more experienced makers to finish in one sitting. I also love adding felt markings and little personal touches to make each Bulbasaur unique.

Bulbasaur Amigurumi Pattern step 1 - construction progress Bulbasaur Amigurumi Pattern step 2 - assembly progress Bulbasaur Amigurumi Pattern step 3 - details and accessories Bulbasaur Amigurumi Pattern step 4 - final assembly and finishing

Switch Things Up

I love customizing this pattern by changing colors to create alternate characters or a pastel Bulbasaur; swapping the teal for soft pastels makes a totally different vibe.

I sometimes use a thinner yarn and smaller hook to make a miniature keychain version that fits on a bag or zipper pull.

If I want a chunkier plush, I choose a bulky yarn and a larger hook to make a squishier, larger Buddy that is great for cuddling.

I often add wire armatures inside the legs for posability when I want a display piece that can stand or pose.

For different eyes, I try embroidered eyes or smaller safety eyes for a cuter baby look, or felt circles glued on for a fully kid-safe toy.

I like to stitch small smiles or blush details with embroidery thread to change the expression and add personality.

To create a set, I make multiple colors and line them up as a family of tiny creatures β€” you can mix yarn colors for stripes or patches.

I also experiment with varying the pod size or adding a small crocheted flower to the pod as a cute accessory.

For gifting, I attach a loop and keyring to the top and make a durable keychain version that holds up to use.

Lastly, I recommend trying felt shapes of different sizes and layering them for a textured, dimensional marking instead of flat triangles.

Common Mistakes & How to Fix Them

βœ— Placing safety eyes too close together will change the expression and look awkward; measure and place eyes 5 stitches apart before securing to keep the correct facial proportions. βœ— Forgetting to stuff as you go can make closing difficult and uneven; stuff the head and body gradually, filling firmly but not overstuffing to maintain shape. βœ— Skipping stitch counts on increase/decrease rounds causes mis-shaped pieces quickly; count your stitches after each round and mark the start of round with a stitch marker. βœ— Pulling your yarn too tightly on small pieces leads to stiff, rounded shapes; keep moderate, consistent tension for even, flexible fabric and proper shaping.

Bulbasaur Amigurumi Pattern

Create a tiny, adorable Bulbasaur amigurumi with this friendly crochet pattern. Youll work simple single crochet rounds, increases and decreases to shape the head, body, ears, legs and pod. The pattern includes clear step-by-step instructions, materials list, and helpful placement notes so you can sew and finish with confidence. Perfect as a handmade gift or a charming desk companion.

Beginner Friendly 2-3 Hours

Materials Needed for Bulbasaur Amigurumi Pattern

β€” Main Fabric

  • 01
    Worsted weight yarn (medium/#4) - Light Teal/Aqua - small amount for main body and head
  • 02
    Worsted weight yarn (medium/#4) - Green - small amount for the pod
  • 03
    Polyfil or another soft stuffing - small amount to stuff head, body, legs and pod
  • 04
    Dark teal felt - small scraps for markings/triangles

β€” Tools Required

  • 01
    Crochet hook size 3.5mm
  • 02
    Scissors
  • 03
    Tapestry needle
  • 04
    Glue gun or fabric glue
  • 05
    1 pair 10mm safety eyes
  • 06
    Polyfil or other soft stuffing

Progress Tracker

0% Complete

β€” Head :

Round 1 :

Row 1: CH 2, SC 8 in first stitch. (8 stitches)

Info :

Alternatively, SC 8 into a magic circle

Round 2 :

Row 2: INC x 8 (16 stitches)

Round 3 :

Row 3: *SC, INC* x 8 (24 stitches)

Round 4-6 :

Row 4-6: SC x 24 (24 stitches)

Round 7 :

Row 7: *SC x 9*, INC, *SC x 4*, INC, *SC x 9* (26 stitches)

Info :

Place eyes 5 stitches apart (in between each of the increases)

Round 8 :

Row 8: SC x 26 (26 stitches)

Round 9 :

Row 9: *SC x 2*, DEC x 11*, *SC x 2* (15 stitches)

Info :

Stuff as much of the head as you can

Round 10 :

Row 10: *SC x 4*, *DEC x 3*, *SC x 5*

Info :

Finish stuffing head, FO with SlSt.

β€” Body :

Round 1 :

Row 1: CH 2, SC 6 in first stitch. (6 stitches)

Info :

Alternatively, SC 6 into a magic circle

Round 2 :

Row 2: INC x 6 (12 stitches)

Round 3 :

Row 3: *SC, INC* x 6 (18 stitches)

Round 4-6 :

Row 4-6: SC x 18 (18 stitches)

Round 7 :

Row 7: *SC x 5*, INC, *SC x 6*, INC, *SC x 5* (20 stitches)

Round 8-10 :

Row 8-10: SC x 20 (20 stitches)

Round 11 :

Row 11: DEC to close, stuffing the body as you go. FO with a SlSt.

Info :

Sew head onto body (row 1 is the front of the body, and the increases done face the upwards.)

Info :

Ignore the pod/ears (that's coming later), but this is the placement for the head to be sewn onto the body

β€” Ears :

Round 1 :

Row 1: CH 2, SC 6 in first stitch. (6 stitches)

Info :

Alternatively, SC 6 into a magic circle

Round 2 :

Row 2: *SC, INC* x 3

Round 3 :

Row 3: *SC 2, INC* x 3

Info :

FO with SlSt

Info :

Sew ears onto head (I've provided a picture to use as a placement guide.)

β€” Pod :

Round 1 :

Row 1: CH 12, join the ends into a loop with a SlSt. (You're just making a crochet ring with 12 stitches around.) (12 stitches)

Round 2 :

Row 2: INC x 12 (24 stitches)

Round 3-4 :

Row 3-4: SC x 24 (24 stitches)

Round 5 :

Row 5: *SC 4, DEC* x 4 (20 stitches)

Round 6 :

Row 6: DEC x 10 (10 stitches)

Round 7 :

Row 7: DEC x 5 (5 stitches)

Round 8 :

Row 8: SC 4, SlSt, FO.

Info :

Stuff pod (from the bottom)

Info :

Sew pod to the back of your Bulbasaur

β€” Arms and Legs :

Round 1 :

Row 1: CH 2, SC 10 in first stitch. (10 stitches)

Info :

Alternatively, SC 10 into a magic circle

Round 2-5 :

Row 2-5: SC x 10 (10 stitches)

Info :

FO with SlSt.

Info :

Stuff legs lightly, and sew them onto body. (see pictures to the right and below for placement.)

Info :

Next comes the markings! This part is super simple, just cut out a bunch of triangles /other angled shapes of varying sizes and using the fabric glue/your hot glue gun, fasten them to your Bulbasaur.

Info :

And you're done!

Assembly Instructions

  • Sew head to body aligning row 1 of the body as the front, with the increases facing upwards; sew securely with a whipstitch or invisible stitch.
  • Position and sew ears onto the top sides of the head using the provided photo as a placement guide and secure tightly with yarn and needle.
  • Stuff the pod from the bottom, then sew the pod to the back/top of the body so it sits centered and stable.
  • Sew legs onto the bottom sides of the body, spacing them evenly; stuff legs lightly before attaching to maintain shape and stability.
  • Glue felt triangles or markings onto the body using fabric glue or a hot glue gun, arranging shapes in varying sizes for a natural look.

Important Notes

  • πŸ’‘Place safety eyes before closing the head and ensure they are positioned 5 stitches apart for correct facial expression.
  • πŸ’‘Use stitch markers to mark the beginning of each round to avoid losing count during increases and decreases.
  • πŸ’‘Stuff gradually and evenly to achieve smooth shaping; overstuffing can distort small amigurumi pieces.

This Bulbasaur amigurumi pattern makes a tiny, lovable pocket buddy you can finish in an afternoon. 🧢 It combines simple single crochet shaping with a few assembly steps and felt details for personality. ✨ Perfect for gifting or keeping on your desk as a cheerful, handmade companion. 🐾

You ask,

we answer.

FAQs

What size will the finished piece be?

The finished amigurumi measures approximately 8-12 cm tall when using worsted weight yarn and a 3.5mm hook, depending on your tension.

Can I use different yarn weights for this pattern?

Yes, you can use different yarn weights, but this will affect the final size; choose an appropriate hook size for your yarn and expect a larger or smaller result.

Do I need prior crochet experience for this pattern?

This pattern is beginner friendly, but you should be comfortable with single crochet, chain, increases and decreases for best results.

How long does this project typically take to complete?

Most crocheters complete this project in 2-3 hours, though time may vary based on experience level and how much detailing you add.