🧢 Beautiful ✨ Detailed πŸ’ Adorable

Cute Bunny Comforter Amigurumi Pattern

Cute Bunny Comforter Amigurumi Pattern
4.5β˜… Rating
2-3 Hours Time Needed
2.2K Made This
βœ‚οΈ

Beginner Friendly Level

Perfect for those just starting their crochet journey, with clear instructions and simple techniques

⏱️

Bite-Sized Project

Finishes in 2-4 hoursβ€”perfect for an afternoon of creative relaxation.

🧸

Cute Companion

An adorable friend to cherish, handcrafted with love to bring comfort and joy for years to come.

About This Cute Bunny Comforter Amigurumi Pattern

This pattern creates a cozy bunny comforter combining a small amigurumi-style bunny head with a granny square blanket body. It uses simple single crochet shaping for the head, easy rows for the ears, and a classic granny square for the blanket. The result is a safe, yarn-sewn face comforter perfect for little ones.

Cute Bunny Comforter Amigurumi Pattern crochet pattern - detailed view of completed project

Clear step-by-step rounds and row instructions guide you through head, ears, arms and blanket construction. Minimal materials and a single hook make this a very accessible quick project.

Why You'll Love This Cute Bunny Comforter Amigurumi Pattern

I absolutely love this pattern because it combines the timeless charm of a granny square blanket with a cuddly amigurumi head that little ones will adore. I enjoy how quickly the blanket grows using simple 3-dc clusters and how satisfying the neat, tight single crochet head is to shape. The ears and arms are straightforward but add so much personality to the finished piece. I also appreciate that the face is sewn with yarn, making it safe for babies and toddlers to snuggle and play with.

Cute Bunny Comforter Amigurumi Pattern step 1 - construction progress Cute Bunny Comforter Amigurumi Pattern step 2 - assembly progress Cute Bunny Comforter Amigurumi Pattern step 3 - details and accessories Cute Bunny Comforter Amigurumi Pattern step 4 - final assembly and finishing

Switch Things Up

I love customizing this comforter by changing colors for a unique look; try pastel shades for a baby girl or bright contrasting colors for a playful feel.

I often make the blanket larger by repeating more granny square rounds, which creates a bigger security blanket for toddlers.

I sometimes switch yarn weight and hook size to create a chunky, cuddly version; a bulky yarn with a larger hook gives a very plush result.

I like to add a simple scallop or picot edging around the granny square for a decorative finish that frames the bunny nicely.

I sometimes embroider eyelashes or a tiny nose in a contrasting yarn color to give the bunny a different expression and personality.

I have experimented with adding a tiny crocheted bow or ribbon at the base of one ear to create a dressed-up look for gifting.

I recommend making a mini keyring-sized version by using finer yarn and a smaller hook if you want a portable keepsake.

I occasionally add a thin wire inside the ears to allow gentle shaping for poses or to make the ears stand slightly at the top.

I enjoy combining yarn textures, such as a fluffy boucle for the blanket and smooth worsted for the head, to create tactile interest for babies.

I also suggest using different stitch patterns for the blanket center, like shells or clusters, to vary the drape and look of the finished comforter.

Common Mistakes & How to Fix Them

βœ— Skipping stitch markers when working rounds can lead to losing track of the start of round; place and move a stitch marker at the start of each round to maintain accurate stitch counts. βœ— Working with loose tension on the head will let stuffing show through; keep your stitches tight and even while making the head to maintain a neat surface. βœ— Forgetting to leave a long tail when fastening off will make assembly difficult; always leave a long tail to sew head and ears securely to the blanket. βœ— Overstuffing the head will distort the shaping and make sewing difficult; stuff firmly but gradually, adding small amounts until you reach the desired shape and feel. βœ— Not folding and sewing the ears lengthwise accurately can produce lopsided ears; fold each ear exactly in half and align row 21 edges before sewing for symmetry. βœ— Skipping the edging around the ear may make the seam look unfinished; work the specified sc edging around the ear and join with a slip stitch to neaten the edges before fastening off.

Cute Bunny Comforter Amigurumi Pattern

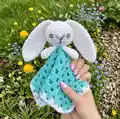
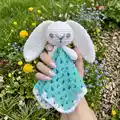
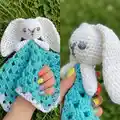
Make a sweet, snuggly bunny comforter with an amigurumi head and a granny square blanket body. This pattern is quick to work up and perfect for gifting to babies or toddlers. You will enjoy simple shaping, easy ears and small arms combined with a classic granny square. Suitable for those who want a charming handmade comforter to cherish.

Beginner Friendly 2-3 Hours

Materials Needed for Cute Bunny Comforter Amigurumi Pattern

β€” Main Fabric

  • 01
    3/Light/Worsted/8ply yarn - 15g of one color for bunny head, arms and ears, 15g of another color for blanket (body/dress) plus a small amount of yarn for the face

β€” Tools Required

  • 01
    Crochet hook H (5mm)
  • 02
    Stitch marker
  • 03
    Darning needle
  • 04
    Scissors
  • 05
    Polyester stuffing (small amount for head)
  • 06
    Pins for assembly (optional)

Progress Tracker

0% Complete

β€” Granny Square Blanket :

Info :

Useful Granny Square Tutorial link from The Crochet Crowd: http://www.youtube.com/watch?v=BFnyfJEWCd8

Info :

Ch4 and sl st to the beginning ch to form ring.

Round 1 :

Ch3 (counts as a dc from now on), work 2dc into the ring, *ch2, 3dc into the ring*, rep from * twice more, ch2 and sl st to the top of the ch3 that started the round.

Round 2 :

Ch3, work 2dc into the same sp, *ch1, work 3dc, ch2, 3dc into next ch2 corner sp. Repeat from * all the way around. Your final sts should be 3dc, ch2 and then sl st to the top of the ch3 that started the round.

Round 3 :

Ch3, work 2dc into the same sp, ch1 * work 3dc, ch1, into each ch sp across to corner sp. In corner sp, work 3dc, ch2, 3dc, ch1. Repeat from * all the way around. Your final corner should have 3dc, ch2 and then sl st to the top of the ch3 that started the round.

Info :

Repeat round 3 nine times. Each round will cause the square to increase in size.

β€” Head :

Info :

Rounds are worked in continuous spirals; do not join. Do not turn work at the end of each round but use stitch markers as indicated.

Round 1 :

Ch2, work 6sc in furthest ch from hook. Place stitch marker in first st for beg of next Round; move marker up at start of each Round.

Round 2 :

Work 2 sc in each sc around (12sc).

Round 3 :

*2sc in next sc, sc in next sc; repeat from * around (18sc).

Round 4 :

*2sc in next sc, sc in each of next 2sc; repeat from * around (24sc).

Round 5 :

*2 sc in next sc, sc in each of next 3sc; repeat from * around (30sc).

Round 6-10 :

Sc in each st around.

Round 11 :

*Sc2tog, sc in each of next 3sc; repeat from * around (24sc)

Round 12 :

*Sc2tog, sc in each of next 2sc; repeat from * around (18sc).

Round 13 :

*Sc2tog, sc in next sc; repeat from * around (12sc)

Info :

Stuff firmly.

Round 14 :

Sc2tog around (6sc).

Info :

Fasten off, leaving a long tail to use to sew head to centre of blanket.

β€” Bunny Ears (make 2) :

Info :

Note: Turning ch1 does not count as a st.

Row 1 :

Starting at bottom of ear, ch 2, 3 sc in 2nd ch from hook, ch 1, turn (3sc)

Row 2 :

Sc in each st across, ch 1, turn (3sc)

Row 3 :

2sc in first sc, sc in next sc, 2sc in last sc, ch 1, turn (5sc)

Row 4 & 5 :

Sc in each st across, ch1, turn (5sc)

Row 6 :

2sc in first st, sc in each st to last st, 2sc in last st, ch1, turn (7sc)

Rows 7 - 18 :

Sc in each sc across, ch1, turn.

Row 19 :

Sc2tog, sc in each st to last 2 sts, sc2tog, ch1, turn (5sc)

Row 20 :

Sc in each sc across, ch1, turn.

Row 21 :

Sc2tog, sc in next st, sc2tog, ch1, DO NOT TURN (3sc)

Edging :

Work 21 sc down side of ear, work 3 sc across opposite side of starting ch, work 21 sc up side of ear, ch1, join with a sl st to first sc of row 21. Leaving a length of yarn for sewing, fasten off.

Info :

Fold ear in half lengthwise and sew the top of row 21 together. Sew ears to top of head.

β€” Arms (make 2) :

Info :

Notes Rounds are worked in continuous spirals; do not join. Do not turn work at the end of each round but use stitch markers as indicated.

Round 1 :

Ch2, work 5sc in furthest ch from hook. Place stitch marker in first st for beg of next round; move marker up at start of each Round (6sc)

Round 2 :

Work 2sc in each sc around (12sc).

Rounds 3 - 4 :

Work 1sc in each st around (12sc)

Round 5 :

Sc2tog, sc in next two sts around (9sc)

Rounds 6 - 9 :

Work 1sc in each st around (9sc)

Info :

Do not stuff arms, sew open end shut and tie off leaving a long tail. Using tail sew arms just beneath the head onto the blanket body.

Info :

Finish by sewing a simple face onto the bunny using a darning needle - using yarn makes this comforter very safe for little ones.

Info :

I hope you like this pattern! If you have any problems with it please don't hesitate to let me know and I'll see if I can help!

Assembly Instructions

  • Sew the head to the centre of the granny square blanket using the long tail left when fastening off the head, positioning the head so it sits centered and secure with neat whipstitches.
  • Fold each ear in half lengthwise and sew the top of row 21 together, then sew the completed ears to the top of the head so they are symmetrically placed.
  • Sew the arms to the blanket body just beneath the head using the long tails left from fastening off; place them evenly and secure with several stitches so they stay firmly attached.
  • Work the edging on each ear as instructed, leaving a length of yarn for sewing, and fasten off before final assembly to neaten edges and hide ends.
  • Embroider a simple face with yarn using a darning needle; use yarn instead of safety eyes to keep the comforter safe for little children.

Important Notes

  • πŸ’‘Use stitch markers to mark the first stitch of each round and move the marker up at the start of each round to avoid losing your place.
  • πŸ’‘Stuff the head firmly but not overly tight so the shape is maintained without bulging stitches or lumps.
  • πŸ’‘Do not stuff the arms; sew the open end shut and use a long tail to attach them securely to the blanket body.

This Cute Bunny Comforter is a delightful combination of a granny square blanket and a cuddly amigurumi bunny head, perfect for gifting or keeping close. Handmade with simple stitches and minimal yarn, it is a sweet, quick project you can finish in an afternoon. Give it as a treasured comforter for babies and toddlers and enjoy making something special. 🧢🐰

You ask,

we answer.

FAQs

What size will the finished piece be?

The finished comforter size depends on how many granny square rounds you make; using the recommended yarn and hook the head is small and the blanket makes a lovey-sized comforter suitable for babies.

Can I use different yarn weights for this pattern?

Yes, you can use different yarn weights but this will affect the final size; choose an appropriate hook for your yarn and be aware that thicker yarn will yield a chunkier comforter.

Do I need prior crochet experience for this pattern?

This pattern is beginner friendly and uses basic stitches (sc, dc, ch) and simple shaping, so a crocheter with basic skills will be comfortable following it.

How long does this project typically take to complete?

Most crocheters complete this project in 2-3 hours, though time may vary based on experience level and how many granny square rounds you choose to make.

Are safety eyes used for the face?

No, the pattern recommends finishing the face by sewing with yarn using a darning needle to make the comforter safer for little ones.