🧢 Beautiful ✨ Detailed πŸ’ Adorable

Crochet Short Sleeved Top Pattern

Crochet Short Sleeved Top Pattern
3.9β˜… Rating
5-7 Hours Time Needed
2.5K Made This
βœ‚οΈ

Beginner Friendly Level

Perfect for those just starting their crochet journey, with clear instructions and simple techniques

⏱️

Weekend Treat

Takes 5-7 hours, making it an enjoyable project to finish over a couple of days.

πŸ‘•

Casual Chic

Relaxed style with a modern twist, perfect for everyday wear while maintaining that handcrafted uniqueness.

About This Crochet Short Sleeved Top Pattern

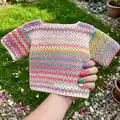
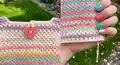
This pattern creates a short sleeved, boxy crochet top worked in a Granny Stripe pattern using two contrast colors. It features square armholes and a simple single crochet neck edging for a neat finish. The design is written for multiple sizes with color-coded numbers for easy following.

Crochet Short Sleeved Top Pattern crochet pattern - detailed view of completed project

Worked flat and seamed with easy shaping for shoulders and armholes, this top is ideal for showcasing self-striping or gradient yarn. Full materials, gauge and finishing instructions are included to help you achieve a professional result.

Why You'll Love This Crochet Short Sleeved Top Pattern

I absolutely love this pattern because it makes the most of vibrant yarn without complicated stitches. I enjoy how the Granny Stripe pattern creates lively texture with simple double crochet groups, making it relaxing to work. I love that it is sized from XS/S up to 4/5XL, so I can make tops for friends and family easily. I also appreciate the straightforward assembly and the square armhole construction that gives a modern silhouette.

Crochet Short Sleeved Top Pattern step 1 - construction progress Crochet Short Sleeved Top Pattern step 2 - assembly progress Crochet Short Sleeved Top Pattern step 3 - details and accessories Crochet Short Sleeved Top Pattern step 4 - final assembly and finishing

Switch Things Up

I love experimenting with color order in this Granny Stripe top; try changing the sequence of the two contrast colors to create different visual effects and stripes that suit your wardrobe.

You can make the top wider or narrower by adding or subtracting multiples of the stitch repeat in the starting chain, adjusting the ch count accordingly to keep the pattern consistent.

To make a longer tunic version, simply continue the Granny Stripe pattern for additional rows before shaping the armholes, checking your gauge as you go to reach your desired length.

If you prefer a fitted silhouette, decrease the width at the side seams before finishing by working a few rows tapering slightly and then seaming for a more shaped garment.

Swap the single crochet neck edging for a delicate picot or reverse single crochet (crab stitch) edge to add a subtle decorative finish to the neckline.

I sometimes substitute a solid contrast color for 1 or 2 rows between stripes to create a break in the pattern and a crisp stripe detail that highlights the color changes.

Want short flutter sleeves instead? Work fewer rows for the sleeve length and shape the sleeve edge with a scallop or shell border for a feminine touch.

For a summer-friendly version, use a cotton or cotton-blend yarn with similar yardage and adjust the hook to achieve the stated gauge, producing a cooler, breathable fabric.

Try adding small surface embroidery or embroidered flowers on a few stripes for a personalized embellishment that really pops against the Granny Stripe background.

I also like to experiment with blocking the finished pieces; gentle wet-blocking helps set the stitch pattern and relax the fabric, making assembly and seaming cleaner and easier.

Common Mistakes & How to Fix Them

βœ— Skipping the chain foundation count for the starting chain can create a too-narrow or too-wide piece; recount your starting chains and check the stitch count before proceeding. βœ— Failing to change colors correctly will leave loose floats and messy edges; work to the last two loops on the last dc and yarn over with the new color to join cleanly. βœ— Not carrying unused yarn loosely up the side can tug and distort the edge of your work; carry the unused color loosely along the side rather than pulling it tight through the stitches. βœ— Ignoring gauge will result in incorrect finished measurements and fit; make a gauge swatch (15 sc and 16 rows = 4" [10 cm]) and adjust hook size as needed before starting the project.

Crochet Short Sleeved Top Pattern

Make a colorful Granny Stripe short sleeved top using Caron Skinny Cakes yarn. This easy pattern guides you through a simple double crochet group (granny stripe) stitch to create a relaxed, boxy top with square armholes and a neat neck edging. Great for using vibrant gradient yarn and practicing color changes while building a wearable wardrobe piece.

Beginner Friendly 5-7 Hours

Materials Needed for Crochet Short Sleeved Top Pattern

β€” Main Fabric

  • 01
    Caron Skinny Cakes (8.8 oz/250 g; 795 yds/727 m) main yarn
  • 02
    Contrast A: Fruit Punch - 1 ball for sizes XS/S, M, L; 2 balls for sizes XL, 2/3XL, 4/5XL
  • 03
    Contrast B: Cupcake - 1 ball for sizes XS/S, M, L; 2 balls for sizes XL, 2/3XL, 4/5XL

β€” Tools Required

  • 01
    Crochet hook size U.S. H/8 (5 mm) Susan Bates Silvalume crochet hook or size needed to obtain gauge
  • 02
    Susan Bates tapestry needle
  • 03
    Scissors
  • 04
    Stitch markers (recommended for seams/armholes)
  • 05
    Measuring tape
  • 06
    Pins for assembly (optional)
  • 07
    Polyester stuffing (not required for garment but optional for blocking support)

Progress Tracker

0% Complete

β€” Materials :

Info :

Caron Skinny Cakes (8.8 oz/250 g; 795 yds/727 m). Contrast A: Fruit Punch. Contrast B: Cupcake. Size U.S. H/8 (5 mm) Susan Bates Silvalume crochet hook or size needed to obtain gauge. Susan Bates tapestry needle. Gauge: 15 sc and 16 rows = 4" [10 cm]. 5 dc-groups and 9 rows = 4" [10 cm] in pattern.

β€” Abbreviations :

Info :

Approx = Approximately. Beg = Beginning. Ch = Chain(s). Cont = Continue. Dc = Double crochet. Pat = Pattern. Rem = Remain(ing). Rep = Repeat. Rnd = Round. RS = Right side. Sc = Single crochet. Sl st = Slip stitch. St(s) = Stitch(es).

β€” Sizes & Gauge :

Info :

To fit chest measurement: XS/S 28-34" [71-86.5 cm], M 36-38" [91.5-96.5 cm], L 40-42" [101.5-106.5 cm], XL 44-46" [112-117 cm], 2/3XL 48-54" [122-137 cm], 4/5XL 56-62" [142-157.5 cm]. Finished chest XS/S 37" [94 cm], M 44" [112 cm], L 46" [118 cm], XL 52" [132 cm], 2/3XL 55" [139.5 cm], 4/5XL 64Β½" [164 cm]. Gauge: 15 sc and 16 rows = 4" [10 cm]; 5 dc-groups and 9 rows = 4" [10 cm] in patt.

β€” Front & Back :

Info :

Make alike. See diagram on page 3.

Row 1 :

With A, ch 71 (83-89-98-104-122). 1st row: (RS). 1 sc in 2nd ch from hook, 1 sc in each ch to end of chain. Turn. 70 (82-88-97-103-121) sc.

Row 2 :

Ch 3 (counts as dc here and throughout). 1 dc in first sc. *Skip next 2 sc. 3 dc in next sc. Rep from* to last 3 sc. Skip next 2 sc. 2 dc in last sc. Drop A. Join B. Turn. 22 (26-28-31-33-39) groups of 3 dc, with 2 dc at either side edge.

Row 3 :

With B, ch 3. Skip next dc. 3 dc in sp between last skipped dc and next dc-group. *3 dc in sp between next 2 dc-groups. Rep from * to last 2 dc. Skip next dc. 1 dc in last dc. Turn.

Row 4 :

Ch 3. 1 dc in first dc. *3 dc in sp between next 2 dc-groups. Rep from * to last dc. 2 dc in top of last dc. Turn. Drop B. Join A.

Row 5 and 6 :

With A, as 3rd and 4th rows.

Info :

Rep 3rd to 6th rows for Granny Stripe Pat, working 2 rows each in A and B, until piece measures approx 12 (12-13-13-14-14)" [30.5 (30.5-33-33-35.5-35.5) cm], ending on either 4th or 6th row of pat. Fasten off.

β€” Shape armholes :

Row 1 :

(RS). Skip first 3 (3-3-6-6-6) dc. Join appropriate color with sl st to next dc. Ch 3. Skip next dc. 3 dc in sp between last skipped dc and next dc-group. *3 dc in sp between next 2 dc-groups. Rep from * to last 5 (5-5-8-8-8) dc. Skip next dc. 1 dc in next dc. Turn. Leave rem sts unworked. 20 (24-26-27-29-35) groups of 3 dc, with 2 dc at either side edge.

Info :

Cont even in Granny Stripe Pat until Armhole measures approx 7 (7-7-8-8-8)" [18 (18-18-20.5-20.5-20.5) cm], ending on 4th or 6th row of pattern.

β€” Shape Left Shoulder :

Row 1 :

Ch 3. Skip next dc. 3 dc in sp between last skipped dc and next dc-group. (3 dc in sp between next 2 dc-groups) 4 (6-6-6-7-10) times. Skip next dc. 1 dc in next dc. Turn. Leave rem sts unworked.

Row 2 :

Next row: Pat across row. Fasten off.

β€” Shape Right Shoulder :

Row 1 :

With RS facing, skip next 32 (32-38-41-41-41) dc. Join appropriate color to next dc. Ch 3. Skip next dc. 3 dc in sp between last skipped dc and next dc-group. (3 dc in sp between next 2 dc-groups) 4 (6-6-7-10) times. Skip next dc. 1 dc in last dc. Turn.

Row 2 :

Next row: Pat across row. Fasten off.

β€” Sleeves :

Info :

With A, ch 59 (59-59-68-68-68).

Row 1 :

(RS). 1 sc in 2nd ch from hook. 1 sc in each ch to end of chain. Turn. 58 (58-58-67-67-67) sc.

Row 2 :

Ch 3 (counts as dc here and throughout). 1 dc in first sc. *Skip next 2 sc. 3 dc in next sc. Rep from* to last 3 sc. Skip next 2 sc. 2 dc in last sc. Drop A. Join B. Turn. 18 (18-18-21-21-21) groups of 3 dc, with 2 dc at either side edge.

Info :

Cont in Granny Stripe Pat as given for Front & Back until work from beg measures 8 (9-9-10-10-11)" [20.5 (23-23-25.5-25.5-28) cm]. Fasten off.

β€” Finishing :

Info :

Sew shoulder seams. Sew in Sleeves to form square armholes. Sew side and sleeve seams.

β€” Neck edging :

Info :

With RS facing, join A with sl st to right shoulder seam. Ch 1. Work 1 rnd of sc evenly around neck edge. Join with sl st to first sc. Fasten off.

β€” Notes :

Info :

The instructions are written for XS/S. If changes are necessary for larger size(s) the instructions will be written XS/S (M-L-XL-2/3XL-4/5XL). Numbers for each size are shown in the same color throughout the pattern. When only one number is given in black, it applies to all sizes. Note: Do not break yarn when changing colors. Carry yarn not in use loosely up side of work. To change colors, work to last 2 loops on hook of last dc, yo with new color and proceed.

β€” Diagram & Stitch Key :

Info :

See reduced sample of pattern diagram on page 3. Stitch key: circle = chain (ch). T symbol = double crochet (dc).

Assembly Instructions

  • Sew shoulder seams aligning shoulder edges and matching stripe pattern, using mattress stitch or whipstitch for a neat join.
  • Sew in sleeves to form square armholes, matching center of sleeve to shoulder seam and easing sleeve edges into armhole opening.
  • Sew side and sleeve seams from hem to cuff in one continuous seam to create a clean side line and secure sleeve edges.
  • Attach neck edging by joining A at right shoulder seam and working 1 rnd of sc evenly around neck edge, then join and fasten off.

Important Notes

  • πŸ’‘Do not break yarn when changing colors; carry unused yarn loosely up the side of the work to maintain tension and neat edges.
  • πŸ’‘Work gauge before starting: 15 sc and 16 rows = 4" [10 cm] and 5 dc-groups and 9 rows = 4" [10 cm] in pattern to ensure correct sizing.
  • πŸ’‘Fasten off and weave in ends after finishing each piece; pin parts in place before sewing to ensure accurate alignment.

This cheerful Granny Stripe short sleeved top is perfect for showing off colorful gradient yarn and quick crochet techniques. Whether you make one for yourself or as a handmade gift, it brings playful color to any wardrobe. Happy crocheting and enjoy the vibrant stitches! 🧢✨

You ask,

we answer.

FAQs

What size will the finished piece be?

Finished chest measurements are provided: XS/S 37" [94 cm], M 44" [112 cm], L 46" [118 cm], XL 52" [132 cm], 2/3XL 55" [139.5 cm], 4/5XL 64Β½" [164 cm].

Can I use different yarn weights for this pattern?

You can use different yarn weights but this will change the finished size; always make a gauge swatch and adjust hook size to match the stated gauge for best results.

Do I need prior crochet experience for this pattern?

This pattern is rated Beginner Friendly and uses basic stitches (sc and dc groups) and simple shaping, so it is suitable for new crocheters familiar with single and double crochet.

How long does this project typically take to complete?

Most crocheters complete this project in 5-7 hours, depending on size and experience, as noted under the Weekend Treat time estimate.