🧢 Beautiful ✨ Detailed πŸ’ Adorable

The Bowling Llama Amigurumi Pattern

The Bowling Llama Amigurumi Pattern
4.1β˜… Rating
2-4 Hours Time Needed
3.8K Made This
βœ‚οΈ

Intermediate Level

Ideal for those with basic crochet experience, featuring slightly more advanced stitches and techniques to expand your skills.

⏱️

Bite-Sized Project

Finishes in 2-4 hoursβ€”perfect for an afternoon of creative relaxation.

🧸

Cute Companion

An adorable friend to cherish, handcrafted with love to bring comfort and joy for years to come.

About This The Bowling Llama Amigurumi Pattern

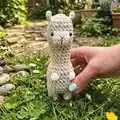
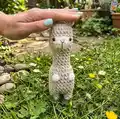
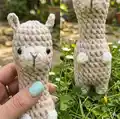
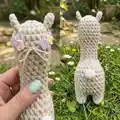
This pattern creates a sweet Bowling Llama amigurumi with an integrated head and body and an included bowling ball. It features bobble stitch accents for the legs and decorative spots, plus color-change tips and finishing guidance. You will find step-by-step rounds and helpful video links for key techniques.

The Bowling Llama Amigurumi Pattern crochet pattern - detailed view of completed project

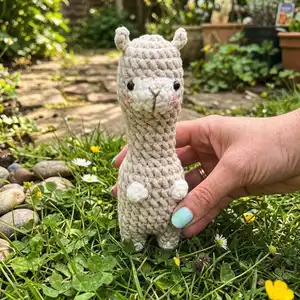
The llama is crocheted as a no-sew project so ears, snout and legs are worked into the main piece. The pattern also includes a full bowling ball pattern to complete the set.

Why You'll Love This The Bowling Llama Amigurumi Pattern

I absolutely love this pattern because it turns simple stitches into a delightful character with personality. I enjoy how the bobble stitch creates playful texture for the legs and spots, making each llama look handmade and charming. The no-sew construction means less finishing work and a neater result, which I find very satisfying. I also appreciate the included bowling ball pattern β€” it makes this set extra special and gift-ready.

The Bowling Llama Amigurumi Pattern step 1 - construction progress The Bowling Llama Amigurumi Pattern step 2 - assembly progress The Bowling Llama Amigurumi Pattern step 3 - details and accessories The Bowling Llama Amigurumi Pattern step 4 - final assembly and finishing

Switch Things Up

I love customizing this pattern by changing yarn colors; try pastel tones for a nursery-friendly look or bold shades for a playful set.

If you want a bigger llama, use a bulkier yarn and a larger hook to scale up the project while keeping the same stitch counts.

To make a tiny keychain version, use thin yarn and a smaller hook and reduce the stuffing for a lightweight result.

I often replace safety eyes with embroidered eyes for a fully baby-safe toy; this also gives a softer, handmade expression.

Swap the bobble stitch spots for small felt circles sewn on after finishing if you prefer less texture or want crisper shapes.

Add wire inside the neck or limbs if you want a poseable llama that can lean or tilt its head for character.

Try embroidering unique facial expressions by adjusting nose placement and mouth shape to create personalities like sleepy, surprised or smiling llamas.

Create matching accessories like a tiny crochet scarf or blanket to give each llama extra charm and personalization.

Make a full bowling set by crocheting multiple llamas in several colors and one ball per set; this is perfect for gifting or a playful craft market item.

I also like to mix yarn textures β€” using a velvet yarn body with a fuzzy accent color β€” for luxurious tactile contrast that kids love to touch.

Common Mistakes & How to Fix Them

βœ— Skipping stitch markers during rounds with increases and decreases leads to lost stitch counts; place a marker at the start of each round and move it after completing the round. βœ— Not stuffing gradually results in lumps and hard-to-shape areas; add fiberfill in small amounts while shaping to get an even, smooth form. βœ— Leaving gaps when using bulky yarn can allow stuffing to show through; keep your stitches close together and use front loop finishing to close openings neatly. βœ— Forgetting to insert safety eyes before closing sections will require reopening the work; insert the 6mm safety eyes between rounds 6 and 7 before closing to avoid extra work. βœ— Pulling decreases too tightly can distort shaping and make sewing tails difficult to weave; use even tension and weave the tail through front loops as instructed to close cleanly.

The Bowling Llama Amigurumi Pattern

Create a charming Bowling Llama amigurumi complete with a matching bowling ball. This pattern guides you step-by-step through crocheting the integrated head and body, bobble stitch details, and finishing touches. Perfect for gifting or a cute nursery decoration, you will enjoy the fun color accents and simple assembly. Follow the clear instructions and video links to master the most important techniques.

Intermediate 2-4 Hours

Materials Needed for The Bowling Llama Amigurumi Pattern

β€” Main Fabric

  • 01
    Chunky yarn size 4-5mm (example: Himalaya Velvet, Himalaya Dolphin Baby) - approx 50g main color (cream) for one llama
  • 02
    Contrast white yarn - approx 20g for snout and spots
  • 03
    Gray chunky yarn - approx 20-30g for bowling ball base
  • 04
    Yellow chunky yarn - approx 15-25g for bowling ball accent
  • 05
    Additional colors (brown, beige) - approx 20-30g for variation and multiple llamas

β€” Tools Required

  • 01
    Crochet hook size 4mm
  • 02
    6mm toy safety eyes (2 pieces)
  • 03
    Needle for sewing / yarn needle
  • 04
    Toy stuffing (polyester fiberfill)
  • 05
    Stitch marker
  • 06
    Scissors
  • 07
    Optional pad (2cm radius) made from plastic or recycled milk bottle to flatten bottom
  • 08
    Brown embroidery thread for nose
  • 09
    Powder blush for cheeks (optional)

Progress Tracker

0% Complete

β€” Head & Body :

Info :

As this Llama is crocheted as a no-sew project, the legs, nose, and ears are integrated into the body and head, without separate parts. The ears are in round 2, the snout in rounds 6-8, and the legs in rounds 12 and 23.

Info :

Start in cream yarn. (Note: Use cream yarn in black word, white yarn in pink word)

Round 1 :

8sc in MR [8]

Round 2 :

2inc, (ch 4, skip 2 ch from the hook, slst in next 2 ch), inc in next st of the base, 3inc, (ch 4, skip 2 ch from the hook, slst in next 2 ch), inc in next st of the base, inc [16]

Round 3 :

(3sc, inc) x 4 [20]

Round 4 :

20sc [20]

Round 5 :

20sc [20]

Round 6 :

8sc, 4inc, 8sc [24]

Round 7 :

8sc, 8sc, 8sc [24]

Round 8 :

8sc, 4dec, 8sc [20]

Round 9 :

20sc [20]

Round 10 :

sc, dec, (2sc, dec) x 4, sc [15]

Round 11 :

15sc [15]

Round 12 :

15sc [15]

Round 13 :

15sc [15]

Round 14 :

15sc [15]

Info :

Stuff the head firmly with fiberfill.

Round 15 :

(2sc, inc) x 5 [20]

Round 16 :

(4sc, inc) x 4 [24]

Round 17 :

24sc [24]

Round 18 :

11sc, bo4, 4sc, bo4, 7sc [24]

Round 19 :

24sc [24]

Round 20 :

24sc [24]

Round 21 :

24sc [24]

Round 22 :

24sc [24]

Round 23 :

11sc, bo4, 5sc, bo4, 6sc [24]

Round 24 :

24sc [24]

Round 25 :

(sc, dec) x 8 [16]

Info :

Stuff the body firmly with fiberfill.

Info :

Optional: You can insert a pad, 2cm in radius, made from plastic or a milk bottle, inside the llama to flatten its bottom. This will enable your llama to stand upright on its own.

Round 26 :

8dec [8]

Info :

Fasten off, leaving the yarn tail. Using the yarn needle, weave the yarn tail through the front loop of each remaining stitch and pull it tight to close.

Info :

Insert the 6mm safety eyes between rounds 6 and 7, 8 stitches apart. Embroider the nose with brown threads. Use powder blush for the nose and the cheeks.

Info :

Video tutorials: ~ How to crochet the Llama's head (from rnd 1 to 3): https://youtu.be/l8HahbG62SI ~ How to embroidr the Llama's face: https://youtu.be/cqKbExxDB-8

β€” Bowling Ball :

Info :

Start in gray yarn. (Note: Use yellow yarn in orange word, gray yarn in black word)

Round 1 :

8sc in MR [8]

Round 2 :

8inc [16]

Round 3 :

(sc, inc) x 2, (sc, inc) x 6 [24]

Round 4 :

(2sc, inc) x 3, (2sc, inc) x 3, (2sc, inc) x 2 [32]

Round 5 :

32sc [32]

Round 6 :

(3sc, inc) x 8 [40]

Round 7 :

40sc [40]

Round 8 :

40sc [40]

Round 9 :

40sc [40]

Round 10 :

40sc [40]

Round 11 :

40sc [40]

Round 12 :

40sc [40]

Round 13 :

(3sc, dec) x 8 [32]

Round 14 :

32sc [32]

Round 15 :

(2sc, dec) x 2 + (2sc, dec) x 3 + (2sc, dec) x 3 [24]

Round 16 :

(sc, dec) x 6 + (sc, dec) x 2 [16]

Info :

Stuff the ball firmly with fiberfill.

Round 17 :

8dec [8]

Info :

Fasten off, leaving the yarn tail. Using the yarn needle, weave the yarn tail through the front loop of each remaining stitch and pull it tight to close.

Info :

How to weave in the yarn end on a stuffed piece: https://youtu.be/amYifc37uSs

Assembly Instructions

  • Insert the 6mm safety eyes between rounds 6 and 7 of the head, placing them 8 stitches apart and secure the washers tightly.
  • Embroider the nose with brown thread centered between the eyes and below round 7; add a little powder blush to the nose and cheeks for a soft finish.
  • Stuff the head and body firmly with fiberfill as instructed (stuff head before rounds 11-14 and body before closing at round 25) to create smooth shaping.
  • Optional: Insert a 2cm radius pad made from plastic or a milk bottle inside the bottom of the body before final stuffing to flatten the bottom and help the llama stand upright.
  • Fasten off leaving a yarn tail and weave the tail through the front loop of each remaining stitch; pull tight to close openings and weave in ends securely.

Important Notes

  • πŸ’‘Make the invisible decrease stitches to have a better results and a smoother finish on shaping areas.
  • πŸ’‘Add toy stuffing according to instruction of each part and stuff gradually to avoid lumps or overfilling.
  • πŸ’‘Stitches should be close together so that when the finished toy is stuffed, the stuffing doesn't come out through gaps in the stitches.
  • πŸ’‘The pattern includes color change techniques, bobble stitch technique and the X stitch technique for single crochet stitch; master these techniques to ensure the finished product resembles the pattern.
  • πŸ’‘Finished size: the finished toy is approximately 15cm (~5.9 inch) high when made with the recommended chunky yarn and 4mm hook.

Congratulations β€” you did it! This adorable Bowling Llama set is ready to charm and play with children or sit sweetly on a shelf. Make a whole flock in different colors or pair it with the bowling ball for a playful gift. πŸ§ΆπŸŽ‰

You ask,

we answer.

FAQs

What size will the finished piece be?

The finished amigurumi measures approximately 15 cm tall when using the recommended chunky yarn (4-5mm) and a 4mm hook.

Can I use different yarn weights for this pattern?

Yes, you can use different yarn weights, but this will affect the final size and texture; adjust hook size accordingly and expect changes in finished dimensions.

Do I need prior crochet experience for this pattern?

This pattern is rated intermediate and uses bobble stitches, increases, decreases and color changes, so basic crochet experience is recommended for best results.

How long does this project typically take to complete?

Most crocheters complete a single llama and ball in about 2-4 hours, though time may vary based on experience and attention to detail.