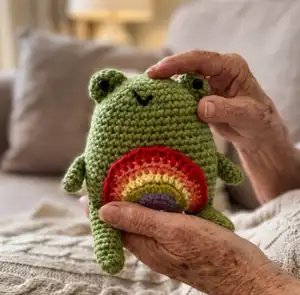
Create a cuddly Pride Frog with vibrant rainbow and pride-flag belly patches in this cheerful crochet pattern. You will follow clear, photographed steps to make the body, arms, legs, eyes and three interchangeable patches. Perfect for gifting or keeping, this pattern highlights creativity with simple color changes and charming finishing details that make each frog unique.
Progress Tracker
0% Complete
— Measurements :
Info :
7 inches long and 6 inches wide (arm to arm)
— Materials :
Infos :
Worsted Weight yarn: Green for Frog. Rainbow Flag: Red, Orange, Yellow, Green, Blue and Purple. Trans Flag: Light Blue, Pink and White. Non-Binary Flag: Yellow, White, Purple and Black. 1- pair size 9.00 mm black safety eyes with washers. Scrap of Black yarn or thread (for nose embroidery). Poly-fill stuffing. Size G crochet hook. Yarn Needle. Stitch Marker.
— Abbreviations :
Infos :
sc = Single Crochet. hdc = Half-Double Crochet. 2sctog = single crochet 2 stitches together (decrease). 2scinc = single crochet twice in the same single crochet stitch (increase). 2hdcinc = Half-Double crochet twice in the same stitch (increase).
— About this pattern :
Info :
This pattern is worked in a spiral, so please mark the last stitch of each round to keep place, with a stitch marker or safety pin. When starting a piece, the pattern calls for a "ring" use what ever ring you would like: a slip knot, double ring, an adjustable loop, Chain 2- then start spiral in first chain, etc... The tail from the ring should be tightened and sewn into the piece and cut.
— Frog Body :
Round 1 :
Make a ring, sc 6 times into ring (6) (Remember to mark last stitch of each round)
Round 2 :
(starting in 1 st sc on the ring) 2scinc in each stitch around (12)
Round 3 :
*2scinc, sc the next stitch * repeat between in *'s across (18)
Round 4 :
*2scinc, sc in each of the next 2 stitches once each * repeat between in *'s across (24)
Round 5 :
*2scinc, sc in each of the next 3 stitches once each * repeat between in *'s across (30)
Round 6 :
*2scinc, sc in each of the next 4 stitches once each * repeat between in *'s across (36)
Round 7 :
*2scinc, sc in each of the next 5 stitches once each * repeat between in *'s across (42)
Round 8-23 :
Sc around (72)
Round 24 :
*2sctog, sc in each of the next 5 stitches once each * repeat between in *'s across (36)
Info :
End- cut yarn leaving a 16 inch yarn tail and pull thru last stitch, you will use this yarn tail to sew the body closed, but first stuff the body firmly. Now, sew the body closed with the yarn tail across the last row as in photos.
— Arms :
Info :
With Green yarn, (make 2)
Round 1 :
Make a ring, sc 8 times into ring (8) (Remember to mark last stitch of each round)
Round 2 :
(starting in 1 st sc on the ring) sc in each stitch around (8)
Round 3 thru Round 6 :
Sc around (8)
Info :
End- slip stitch to next stitch, cut yarn leaving a 10 inch yarn tail and pull thru. You will use this yarn tail to sew arms to body at either side.
— Legs :
Info :
With Green yarn, (make 2)
Round 1 :
Make a ring, sc 8 times into ring (8) (Remember to mark last stitch of each round)
Round 2 :
(starting in 1 st sc on the ring) sc in each stitch around (8)
Round 3 thru Round 12 :
Sc around (8)
Info :
End- slip stitch to next stitch, cut yarn leaving a 10 inch yarn tail and pull thru. You will use this yarn tail to sew legs to the bottom of the body.
— Eyes :
Info :
With Green yarn, (make 2)
Round 1 :
Make a ring, sc 6 times into ring (6) (Remember to mark last stitch of each round)
Round 2 :
(starting in 1 st sc on the ring) 2scinc in each stitch around (12)
Round 3 and Round 4 :
Sc around (12)
Info :
End- slip stitch to next stitch, cut yarn leaving a 10 inch yarn tail and pull thru. You will use this yarn tail to eyes to top body, but first you will need to secure the black safety eyes to the inside of the eye pieces with the washers. Next stuff each eye lightly. Arrange and sew each eye to the top of the body with the yarn tail.
Info :
Now with a scrap of black yarn, or thread, embroider a simple "V" for the frog's mouth at the top of the body just below the eyes.
— Rainbow Patch :
Info :
Start with Purple yarn, chain 2.
Row 1 :
In the 2nd chain from hook make 4 sc stitches (4)
Row 2 :
ch 1, turn: 2scinc in the first stitch, 2hdcinc in each of the next 2 stitches, 2scinc in the last stitch (8)
Info :
Change to Blue Yarn
Row 3 :
ch 1, turn: 2scinc in the first stitch, sc the next stitch, *2hdcinc, hdc the next stitch * twice, 2scinc in the next stitch, sc the last stitch (12)
Info :
Change to Green Yarn
Row 4 :
ch 1, turn: 2scinc in the first stitch, sc in each of the next 2 stitches, *2hdcinc, hdc in each of the next 2 stitches * twice, 2scinc in the next stitch, sc each of the last 2 stitches (16)
Info :
Change to Yellow Yarn
Row 5 :
ch 1, turn: 2scinc in the first stitch, sc in each of the next 3 stitches, *2hdcinc, hdc in each of the next 3 stitches * twice, 2scinc in the next stitch, sc each of the last 3 stitches (20)
Info :
Change to Orange Yarn
Row 6 :
ch 1, turn: 2scinc in the first stitch, sc in each of the next 4 stitches, *2hdcinc, hdc in each of the next 4 stitches * twice, 2scinc in the next stitch, sc each of the last 4 stitches (24)
Row 7 :
ch 1, turn: 2scinc in the first stitch, sc in each of the next 5 stitches, *2hdcinc, hdc in each of the next 5 stitches * twice, 2scinc in the next stitch, sc each of the last 5 stitches (28)
Info :
End- cut yarn leaving a 20 inch yarn tail and pull thru last stitch, you will use this yarn tail to sew the rainbow patch to the Body piece. First arrange the rainbow at the body, so that the flat portion aligns with the sewn edge of the body, with yarn tail sew all along the rainbow to secure.
— Trans Patch :
Info :
Start with Light Blue yarn, chain 2.
Row 1 :
In the 2nd chain from hook make 4 sc stitches (4)
Row 2 :
ch 1, turn: 2scinc in the first stitch, 2hdcinc in each of the next 2 stitches, 2scinc in the last stitch (8)
Info :
Change to Pink Yarn
Row 3 :
ch 1, turn: 2scinc in the first stitch, sc the next stitch, *2hdcinc, hdc the next stitch * twice, 2scinc in the next stitch, sc the last stitch (12)
Info :
Change to White Yarn
Row 4 :
ch 1, turn: 2scinc in the first stitch, sc in each of the next 2 stitches, *2hdcinc, hdc in each of the next 2 stitches * twice, 2scinc in the next stitch, sc each of the last 2 stitches (16)
Info :
Change to Pink Yarn
Row 5 :
ch 1, turn: 2scinc in the first stitch, sc in each of the next 3 stitches, *2hdcinc, hdc in each of the next 3 stitches * twice, 2scinc in the next stitch, sc each of the last 3 stitches (20)
Info :
Change to Light Blue Yarn. End- cut yarn leaving a 20 inch yarn tail and pull thru last stitch, you will use this yarn tail to sew the patch to the Body piece. First arrange the patch at the body, so that the flat portion aligns with the sewn edge of the body, with yarn tail sew all along the patch to secure.
— Non-Binary Patch :
Info :
Start with Black yarn, chain 2.
Row 1 :
In the 2nd chain from hook make 4 sc stitches (4)
Row 2 :
ch 1, turn: 2scinc in the first stitch, 2hdcinc in each of the next 2 stitches, 2scinc in the last stitch (8)
Info :
Change to Purple Yarn
Row 3 :
ch 1, turn: 2scinc in the first stitch, sc the next stitch, *2hdcinc, hdc the next stitch * twice, 2scinc in the next stitch, sc the last stitch (12)
Row 4 :
ch 1, turn: 2scinc in the first stitch, sc in each of the next 2 stitches, *2hdcinc, hdc in each of the next 2 stitches * twice, 2scinc in the next stitch, sc each of the last 2 stitches (16)
Info :
Change to White Yarn
Row 5 :
ch 1, turn: 2scinc in the first stitch, sc in each of the next 3 stitches, *2hdcinc, hdc in each of the next 3 stitches * twice, 2scinc in the next stitch, sc each of the last 3 stitches (20)
Row 6 :
ch 1, turn: 2scinc in the first stitch, sc in each of the next 4 stitches, *2hdcinc, hdc in each of the next 4 stitches * twice, 2scinc in the next stitch, sc each of the last 4 stitches (24)
Info :
Change to Yellow Yarn
Row 7 :
ch 1, turn: 2scinc in the first stitch, sc in each of the next 5 stitches, *2hdcinc, hdc in each of the next 5 stitches * twice, 2scinc in the next stitch, sc each of the last 5 stitches (28)
Row 8 :
ch 1, turn: 2scinc in the first stitch, sc in each of the next 6 stitches, *2hdcinc, hdc in each of the next 6 stitches * twice, 2scinc in the next stitch, sc each of the last 6 stitches (32)
Info :
End- cut yarn leaving a 20 inch yarn tail and pull thru last stitch, you will use this yarn tail to sew the rainbow patch to the Body piece. First arrange the rainbow at the body, so that the flat portion aligns with the sewn edge of the body, with yarn tail sew all along the rainbow to secure.
— Notes & Contact :
Info :
I hope you have enjoyed my pattern! If you have any questions along the way, please feel free to email me at amygaines123@yahoo.com Thank you!
This adorable Pride Frog pattern brings together playful crochet shaping and bright, meaningful colorwork to celebrate pride in a small handmade form. Make a set of frogs with different flag patches to share with friends or keep as cozy companions. Each frog is quick to crochet and full of personality — happy stitching and enjoy the process! 🧶🌈