🧢 Beautiful ✨ Detailed πŸ’ Adorable

Crochet PopTart Amigurumi Pattern

Crochet PopTart Amigurumi Pattern
4.1β˜… Rating
2-3 Hours Time Needed
3.8K Made This
βœ‚οΈ

Beginner Friendly Level

Perfect for those just starting their crochet journey, with clear instructions and simple techniques

⏱️

Bite-Sized Project

Finishes in 2-4 hoursβ€”perfect for an afternoon of creative relaxation.

🧸

Cute Companion

An adorable friend to cherish, handcrafted with love to bring comfort and joy for years to come.

About This Crochet PopTart Amigurumi Pattern

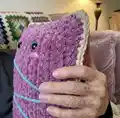
This pattern creates a soft, stuffed PopTart pillow with a tan crust, berry filling, and a robin-blue drizzle. You will crochet two rectangular panels, attach safety eyes, sew the pieces together, stuff, and finish with decorative drizzle and optional blush. It uses super bulky blanket yarn for a plush, cozy finish and quick progress.

Crochet PopTart Amigurumi Pattern crochet pattern - detailed view of completed project

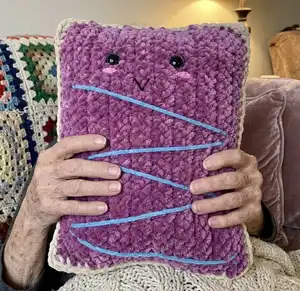
Perfect as a fun gift or a playful accessory for your home, the pattern focuses on easy single crochet rows and straightforward assembly. No advanced stitches are required, making it ideal for new crocheters who know basic single crochet.

Why You'll Love This Crochet PopTart Amigurumi Pattern

I absolutely love this pattern because it turns simple stitches into an irresistibly soft and fun PopTart pillow that brightens any room. I enjoy how quickly the project comes together using super bulky yarn, which makes it ideal for a satisfying afternoon make. The design is playful and customizable β€” I always have fun choosing colors for the filling and drizzle. Sewing the pieces together and adding facial details gives the pillow personality, and I love gifting these because they always get smiles.

Crochet PopTart Amigurumi Pattern step 1 - construction progress Crochet PopTart Amigurumi Pattern step 2 - assembly progress Crochet PopTart Amigurumi Pattern step 3 - details and accessories Crochet PopTart Amigurumi Pattern step 4 - final assembly and finishing

Switch Things Up

I love to change up colors β€” try pastel shades for a soft, nursery-friendly PopTart or bold neons for a modern, playful look.

I often switch yarn weight and hook size to create different sizes: a chunky version with the recommended super bulky yarn and 10 mm hook or a mini keychain version with DK yarn and a smaller hook.

I like to experiment with different drizzle styles β€” embroider a zigzag like the original, or loop a contrasting yarn in a squiggle for texture.

Try swapping safety eyes for embroidered eyes or felt circles if you prefer no plastic pieces for a baby-safe version.

I sometimes add small sewn accessories like a tiny crocheted bow or felt sprinkles to make the PopTart extra special.

For a sturdier pillow, add a panel of lining fabric before stuffing, or use extra polyfill to make it more plush and huggable.

I recommend testing placement of facial features with pins before committing; slight shifts make a big personality difference.

Want a reversible PopTart? Crochet two tops in different colors and make them interchangeable by adding buttons or snaps inside.

Try mixing yarn textures β€” a fluffy main body with a shiny, smooth yarn for drizzle gives a terrific contrast and visual interest.

I also like to make a set of mini PopTarts in coordinating colors to display together or gift as a set; they make cute favors or a playful garland option.

Common Mistakes & How to Fix Them

βœ— Skipping the initial chain count will make your pieces the wrong width; always chain the exact number stated (Chain x30 for base, Chain x28 for top) and recount before continuing. βœ— Not working back into the chain can create uneven edges and an incorrect fabric orientation; be sure to work back in chain for every row from the starting chain onward. βœ— Cutting yarn too short when you tie off will make finishing difficult; leave several inches of yarn tail before cutting so you have enough to weave in and sew pieces together. βœ— Forgetting to line up wrong sides together during assembly can result in the wrong sides facing out; always place wrong sides together so the correct sides face out before stitching. βœ— Stuffing unevenly will make the PopTart lumpy and misshapen; stuff gradually and evenly until you reach the desired firmness for a smooth finish. βœ— Not securing safety eyes or placing them incorrectly may shift or look off-center; attach safety eyes between rows 7-8 right in the center as instructed and secure firmly.

Crochet PopTart Amigurumi Pattern

Make a cuddly PopTart pillow with this simple crochet pattern that turns super bulky yarn into a delightful, plush treat. You will love how quickly two simple panels become a fun, decorative pillow with a whimsical drizzle and friendly face. The pattern is focused, approachable, and perfect for gifting or brightening your home decor.

Beginner Friendly 2-3 Hours

Materials Needed for Crochet PopTart Amigurumi Pattern

β€” Main Fabric

  • 01
    Bernat Blanket yarn, size 6 super bulky (1 skein) - Tan (for crust/base)
  • 02
    Sweet Snuggles Loops and Threads (1 skein) - Berry (for PopTart top/filling)
  • 03
    Sweet Snuggles Loops and Threads Lite (1 skein) - Blue Bird (for drizzle)
  • 04
    Optional: Any pink yarn for blush on cheeks (small amount)
  • 05
    Optional: Any black yarn for smile (small amount)

β€” Tools Required

  • 01
    10 mm crochet hook
  • 02
    Darning needle (metal or plastic)
  • 03
    Safety Eyes 25 mm (or any size you choose)
  • 04
    Polyfill (1 small bag) for stuffing

Progress Tracker

0% Complete

β€” Key :

Infos :

SC - single crochet. R - row.

β€” Notes :

Info :

*This pattern does not teach crochet basics. You will need to know what the terms above in the key mean, and how to do them to be able to move forward in this pattern*

β€” Supplies :

Infos :

-Bernat Blanket yarn, size 6, super bulky (1 skein) - Tan. -Sweet Snuggles Loops and Threads (1 skein) - Berry. -Sweet snuggles Loops and Threads Lite (1 skein) - Blue Bird. *The above can be ordered online or bought in store at Michael's or Joann's*

Infos :

Note: You can use any yarn for this project - however, if you are wanting the exact results pictured; you will need to use the recommended yarn

Infos :

-10 mm crochet hook. -Darning needle (metal or plastic). -Safety Eyes (25 mm) - or any size you choose. -Polyfill (1 small bag)

Infos :

**Optional: -any pink yarn for blush on cheeks. -any black yarn for smile

Infos :

*The above can be bought at any standard craft store or amazon*

β€” PopTart Base (Tan) :

Round R1 :

R1: Chain x30

Info :

Working back in chain for every row from this point on:

Round R2 - R22 :

R2 - R22: SC

Info :

*tie off, leaving several inches of yarn tail before cutting*

β€” PopTart Top (Berry) :

Round R1 :

R1: Chain x28

Info :

Working back in chain for every row from this point on:

Round R2 - R20 :

R2 - R20: SC

Info :

*tie off, leaving several inches of yarn tail before cutting*

Info :

*Attach safety eyes between rows 7-8 right in the center*

β€” Attachment :

Step 1 :

Step 1: Line up both pieces so that the wrong sides are facing together, and correct sides are facing out

Step 2 :

Step 2: Insert crochet hook into top corner, looping into both pieces; place a x3 SC in each corner, and a SC in all other non-corner spaces, working all the way around the PopTart until only several inches of opening is left

Step 3 :

Step 3: Stuff project to your liking

Step 4 :

Step 4: Close remaining space using instructions in step 2

Step 5 :

Step 5: Tie off, hide tail inside project

β€” Drizzle (Robin Blue) :

Item :

-Use darning needle to attach drizzle in a wavy pattern across top of PopTart

Item :

-Tie off, cut, hide tail in body of project

β€” Smile and Blush :

Info :

*optional* -Use darning needle and pink yarn to add blush underneath eyes -Use darning needle to attach smile between both eyes right above beginning of drizzle

β€” Completion :

Info :

You did it!!

Assembly Instructions

  • Line up both panels so the wrong sides are facing together and the right sides are facing out before joining.
  • Insert crochet hook into top corner, looping into both panels; place 3 SC in each corner and 1 SC in each non-corner space all the way around until several inches remain open for stuffing.
  • Stuff the PopTart to your liking using polyfill, distributing stuffing evenly for a smooth, plush shape.
  • Close the remaining opening by continuing to SC through both layers as in step 2, then tie off and hide the tail inside the project.
  • Attach safety eyes between rows 7-8 centered on the panel before stuffing and final closure to ensure correct placement and secure attachment.
  • Use a darning needle to sew the robin-blue drizzle in a wavy pattern across the top, tie off, cut, and hide the tail inside the body.

Important Notes

  • πŸ’‘*This pattern does not teach crochet basics; you should know how to single crochet and read simple instructions before starting.*
  • πŸ’‘Use the recommended super bulky yarn to achieve the pictured size and texture; other yarns will alter the final dimensions.
  • πŸ’‘Leave several inches of yarn tail when tying off each panel to allow for sewing and weaving in ends easily.
  • πŸ’‘Attach safety eyes before stuffing to ensure they are centered correctly and secured.
  • πŸ’‘Pin pieces together and check alignment before sewing to ensure even edges and symmetrical placement.

This cheerful PopTart pillow is a fast, satisfying make that adds a playful pop of color to any space. 🧢 It combines plush super-bulky yarn with simple construction for a delightful finished piece you can gift or keep. 🎁 Have fun customizing the drizzle and facial details to make each PopTart uniquely yours. ✨

You ask,

we answer.

FAQs

What size will the finished piece be?

The finished PopTart pillow will be roughly the size of the two panels you create with Chain x30 (base) and Chain x28 (top) using super bulky yarn and a 10 mm hook; exact size varies with tension.

Can I use different yarn weights for this pattern?

Yes, though changing yarn weight will change the final size and texture; if you use a lighter yarn, choose a smaller hook and expect a smaller, denser pillow.

Do I need prior crochet experience for this pattern?

This pattern is beginner-friendly but assumes you already know basic skills like chaining and single crochet; it does not teach crochet basics.

How do I place the safety eyes correctly?

Attach safety eyes between rows 7-8 centered on the top panel before stuffing and closing the pillow to ensure they are symmetrical and secure.

How much stuffing should I use?

Stuff to your likingβ€”firm enough to hold shape but not so firm that the seams stretch; add polyfill gradually and check the shape as you go.