About This Crochet Owl Amigurumi Pattern
This pattern teaches you how to crochet a tiny owl using simple rounds and basic stitches. You will make the body from the bottom up and create separate little white eyes to attach. The design is compact, colorful, and perfect for making a set of matching owls for gifts or decor.

Clear step-by-step instructions are provided for each round and the eye pieces. No advanced techniques are needed—just basic crochet skills and a little patience.
Why You'll Love This Crochet Owl Amigurumi Pattern
I absolutely love this pattern because it turns simple stitches into an irresistibly cute little owl in no time. I enjoy how quickly you can make several in different color combinations and build a colorful collection. The pattern is forgiving and perfect for practicing consistent tension and shaping. It is also very satisfying to add the small details—folded ears and a tiny beak—that give each owl personality.
Switch Things Up
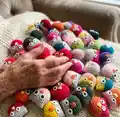
I love to experiment with colors, so I often make a set of owls in a rainbow of shades to create a playful display.
You can change yarn weight and hook size to make miniature keychain owls or larger plush versions depending on your needs.
I sometimes embroider little eyelashes or eyebrows to change the personality of each owl for a more expressive look.
Try replacing safety eyes with French knot embroidery or small buttons for a handmade, softer face.
Use variegated or speckled yarn to get an interesting mottled body without changing colors mid-pattern.
I often add tiny accessories like a crocheted scarf, hat, or a felt heart sewn to the chest for seasonal themes.
For a more sturdy toy, use tighter tension and smaller hook than recommended to reduce gaps between stitches.
To make a magnet or keychain version, insert a small magnet or keyring loop before closing the body and secure thoroughly.
You can sew on different shaped beaks or try felt beaks for a cleaner, crisp look on tiny owls.
I recommend trying contrasting eyelids or tiny felt wings to create unique characters and practice simple assembly techniques.
If gifting, consider sewing a small loop at the top so your owl can hang as an ornament or bag charm.
Common Mistakes & How to Fix Them
✗ Skipping the magic ring and starting with a chain can create a hole at the bottom; always begin rounds with a proper magic ring to close the center neatly.
✗ Forgetting to change colour at the indicated round will alter the look of the owl; mark the round where you need to switch and change yarn neatly after finishing the stitch.
✗ Not stuffing as you go can lead to lumps or an uneven shape; stuff gradually and evenly to maintain a smooth, rounded body.
✗ Placing safety eyes without checking placement may produce a lopsided face; position the eyes and check symmetry before securing the backing tightly.
✗ Pulling stitches too tight when closing the top can distort the ear shapes; close gradually and shape the ears by folding the top sides gently before final sewing.