About This Citrus Slice Coasters Pattern
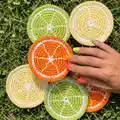
This pattern creates a round citrus slice coaster using Lily Sugar'n Cream cotton yarn and simple single crochet rounds. The design uses two contrasting colors and a final embroidered back stitch to define the citrus segments. Each coaster measures approximately 4½" (11.5 cm) across when made to gauge. It is a quick, satisfying project for beginners and gift makers alike.
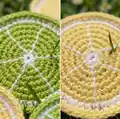
Youll work in the round with easy increases to form a flat circle, changing colors for the rind and center. Finish each coaster by embroidering segment lines with a back stitch for that classic citrus look.
Why You'll Love This Citrus Slice Coasters Pattern
I absolutely love this pattern because it turns basic crochet rounds into a playful, colorful coaster that is practical and beautiful. I enjoy how fast each coaster comes together, making it perfect for last-minute gifts or quick craft sessions. The back stitch detail gives so much personality with very little extra effort, and I always find it relaxing to embroider the segment lines. Using cotton yarn makes the coasters durable and washable, which I appreciate for everyday use.
Switch Things Up
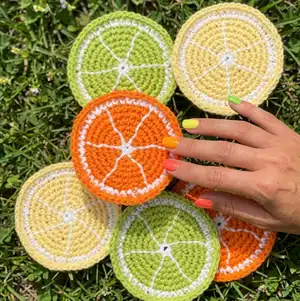
I love to change the color combinations to create different citrus varieties; try lime greens, sunny yellows, or bold oranges.
I sometimes use variegated cotton to give a more organic fruit-look to the center while keeping a solid rind color.
I make mini versions by switching to a lighter weight cotton and a smaller hook for keychains or ornaments.
I also try a chunky cotton yarn and a larger hook when I want oversized, coaster-style trivets that hold hotter dishes.
I often add a decorative edge by working a round of reverse single crochet or picot around the final round for a finished look.
I like to embroider different patterns instead of the citrus segments, such as a floral motif or simple dots to personalize each coaster.
I will sometimes stitch a small hanging loop at the edge to store the coaster on a peg in the kitchen when not in use.
I recommend testing different hook sizes to adjust flatness and diameter; that simple change can create a whole new effect.
I enjoy making matching sets in alternating colors to use as a bright gift set; package them stacked with twine for a handmade present.
I also experiment with adding a second embroidered color for contrast on the segment lines to make the design pop even more.
I always weave in ends carefully and press the finished coaster lightly to keep the shape neat and lasting.
Common Mistakes & How to Fix Them
✗ Not checking gauge before starting can make finished coasters too large or too small; check 16 sc and 17 rows = 4" (10 cm) and adjust hook size to match gauge.
✗ Forgetting to join with the correct color leads to visible color joins; follow the join instructions exactly and swap colors at the specified rounds.
✗ Skipping stitch counts or not counting increases creates a bowl-shaped piece instead of a flat circle; count stitches at the end of each round to ensure accuracy.
✗ Embroidering segment lines too tightly can pucker the coaster surface; use even, gentle tension when doing the back stitch to maintain a flat finished piece.