🧶 Beautiful ✨ Detailed 💝 Adorable

EZ Baby Blanket Pattern

EZ Baby Blanket Pattern
4.1★ Rating
5-7 Hours Time Needed
4.1K Made This
✂️

Beginner Friendly Level

Perfect for those just starting their crochet journey, with clear instructions and simple techniques

⏱️

Weekend Treat

Takes 5-7 hours, making it an enjoyable project to finish over a couple of days.

🤗

Soft Hug

Gentle, plush, and full of warmth, creating a sense of comfort and coziness wherever they find a home.

About This EZ Baby Blanket Pattern

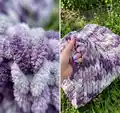
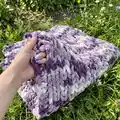
This easy blanket pattern uses Bernat Alize Blanket-EZ yarn to create a plush, textured baby blanket approximately 39" square. The technique pulls loops from the working yarn to form stitches, producing a thick, comfy finish with minimal fuss. Perfect for beginners and a lovely handmade gift for a new baby.

EZ Baby Blanket Pattern crochet pattern - detailed view of completed project

The pattern is written for right-handed direction with clear step-by-step rows and a simple bind-off finish. No complex stitches are required, making it accessible and relaxing to make.

Why You'll Love This EZ Baby Blanket Pattern

I absolutely love this pattern because it transforms that ultra-soft blanket yarn into a delightful, fluffy result with very little effort. I enjoy how quickly the texture builds up and how satisfying each row looks as the blanket grows. The technique is wonderfully approachable, so I can relax and crochet without worrying about complicated stitch counts. Making this blanket feels like a speedy, cozy reward and it always makes a lovely handmade gift that family and friends adore.

EZ Baby Blanket Pattern step 1 - construction progress EZ Baby Blanket Pattern step 2 - assembly progress EZ Baby Blanket Pattern step 3 - details and accessories EZ Baby Blanket Pattern step 4 - final assembly and finishing

Switch Things Up

I love customizing this blanket by changing the color palette to suit the nursery or recipient; switching to soft pastels makes a gentle baby blanket while bold hues create a modern statement piece.

I sometimes adjust the width by increasing or decreasing the number of foundation loops; each additional loop changes the finished width slightly so plan accordingly.

To make a larger throw, I simply continue repeating the 2nd and 3rd rows until the blanket reaches the size I want, checking measurements as I go.

For a smaller lap blanket or stroller cover, I reduce the number of foundation loops and stop when the blanket reaches a convenient size for portability.

I like to add a contrasting border after binding off by picking up loops along the edge and working a simple slip-stitch or single crochet frame to tidy edges and add color.

If I want a more polished finish, I lightly block the blanket after weaving in ends to even out the edges and relax the yarn pile without flattening the texture.

I sometimes embroider a small motif or attach a crocheted applique to one corner for personalization, using a coordinating or contrasting color for visual interest.

Try using a bulkier weight loop yarn or different brand for a chunkier result; remember this will change the finished drape and may require more yarn than listed.

I enjoy making matching accessories like a small pillow or hat using the same loop technique to create a coordinated set for gifting.

Finally, experiment with alternating yarn color balls during work to create subtle stripes and marled effects without changing yarn every few rows.

Common Mistakes & How to Fix Them

✗ Not keeping the right side of the project facing consistently can reverse your stitch direction; always ensure the right side is facing you as stated in the notes. ✗ Starting the yarn end on the wrong side can make following directions confusing; begin with yarn end at the far right or reverse directions if you prefer the opposite side. ✗ Failing to count the 50 foundation loops will alter the blanket width and stitch count; take time to verify you have exactly 50 loops before continuing. ✗ Overpulling loops or pulling them too tight will make the blanket uneven and stiff; pull loops gently and maintain consistent tension for even, soft fabric.

EZ Baby Blanket Pattern

Create a luxuriously soft, cozy baby blanket using Bernat Alize Blanket-EZ yarn. This beginner-friendly pattern uses simple loop techniques to make a plush 39" square blanket you will love to snuggle. The design is fast to work up and perfect for gifting or adding a handmade touch to any nursery.

Beginner Friendly 5-7 Hours

Materials Needed for EZ Baby Blanket Pattern

— Main Fabric

  • 01
    Bernat® Alize® Blanket-EZ™ (6.4 oz/180 g; 18 yds/16 m) Thistle (37021) - 3 balls

— Tools Required

  • 01
    No crochet hook required - Blanket-EZ loop method (work is created by pulling loops from the yarn)
  • 02
    Scissors
  • 03
    Tapestry/yarn needle for weaving in ends
  • 04
    Measuring tape to check blanket dimensions

Progress Tracker

0% Complete

— Materials :

Info :

Bernat® Alize® Blanket-EZ™ (6.4 oz/180 g; 18 yds/16 m) Thistle (37021) 3 balls

— Notes :

Info :

Right side of project is facing at all times. 'Working yarn' is held behind stitches throughout work. Loops from working yarn are always pulled through stitches from back to front of work.

Info :

Note: When beginning project, yarn end can start at far right or far left. Instructions are written with yarn end starting on the far right. Please reverse direction throughout the pattern if the opposite is more comfortable.

— Foundation Row :

Info :

Count 50 loops for foundation row (noting yarn end is at far right and all loops are facing upwards).

— Row 1 :

Round 1 :

1st row: Working from left to right, pull the 51st loop (from 'working yarn') up through 50th loop (last loop of foundation row) from behind to create a knit stitch. Pull next loop from working yarn up through next loop of foundation row. Continue in this manner to end of row. Do not turn work. 50 stitches in row.

— Row 2 :

Round 2 :

2nd row: Working from right to left, pull next loop from working yarn up from behind through last stitch worked on previous row. *Pull next loop from working yarn up from behind through next stitch. Repeat from * across to end of row. Do not turn.

— Row 3 :

Round 3 :

3rd row: Working from left to right, pull next loop from working yarn up from behind through last stitch worked on previous row. *Pull next loop from working yarn up from behind through next stitch. Repeat from * across to end of row. Do not turn.

— Repeat Instructions :

Info :

Repeat 2nd and 3rd rows until Blanket measures approximately 39" [99 cm], ending on a 3rd row.

— Bind off :

Item Name (Bind off row) :

Bind off row: Working in same direction as last row, pull 2nd stitch through first stitch. Pull 3rd stitch through 2nd stitch. Pull 4th stitch through 3rd stitch. Continue in this manner to end of row. Cut last loop to create a yarn 'tail'. Tie to secure and weave in ends.

Assembly Instructions

  • Tie off the final loop to create a yarn tail, then tie securely and weave in the tail using a yarn needle to hide the end.
  • Ensure the blanket measures approximately 39" [99 cm] square before binding off; if necessary, work additional rows following the 2nd and 3rd row pattern.
  • When beginning the project, place the yarn end at the far right (as written) or far left if you prefer; reverse the direction of working if you start on the opposite side.
  • Keep the right side of the blanket facing you at all times while working to maintain correct stitch direction and texture.
  • After weaving in ends, inspect the edges and trim any excess yarn; block lightly if desired to even out the edges and shape the blanket.

Important Notes

  • 💡Right side of project should face you at all times to maintain correct stitch direction and texture.
  • 💡'Working yarn' should be held behind the stitches throughout the work to ensure loops form correctly.
  • 💡Count exactly 50 loops for the foundation row before proceeding to the first row to ensure correct blanket width.
  • 💡Do not turn your work between rows; follow the left-to-right and right-to-left directions specified in the pattern.
  • 💡When finishing, cut the last loop to create a yarn tail, tie to secure the bind-off, and weave in ends neatly.

This cozy EZ Baby Blanket is a comforting project that works up into a plush, snuggly 39" square with minimal effort. Perfect for gifting or to keep by the sofa, it showcases the beautiful texture of Blanket-EZ yarn. Grab your yarn and enjoy making something soft and warm for someone special. 🧶🤍

You ask,

we answer.

FAQs

What size will the finished piece be?

The finished blanket measures approximately 39" [99 cm] square when made using the recommended yarn and following the pattern instructions.

Do I need a crochet hook for this pattern?

This pattern is written for the Blanket-EZ loop technique and does not require a traditional crochet hook; loops are pulled from the working yarn as instructed.

How many balls of yarn are required?

You will need 3 balls of Bernat Alize Blanket-EZ yarn (Thistle 37021) as specified in the materials list.

Can I change the blanket size?

Yes, you can alter width by changing the number of foundation loops and extend the length by repeating the 2nd and 3rd rows until you reach the desired measurement.