🧢 Beautiful ✨ Detailed πŸ’ Adorable

Chunky chain Pattern

Chunky chain Pattern
3.9β˜… Rating
2-3 Hours Time Needed
3.4K Made This
βœ‚οΈ

Beginner Friendly Level

Perfect for those just starting their crochet journey, with clear instructions and simple techniques

⏱️

Bite-Sized Project

Finishes in 2-4 hoursβ€”perfect for an afternoon of creative relaxation.

✨

Stylish Touch

An elegant detail to elevate any look, combining traditional techniques with contemporary design sensibilities.

About This Chunky chain Pattern

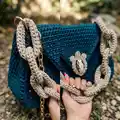
This pattern shows you how to crochet a chunky chain using 2mm cord to create links suitable for bag handles or necklaces. It uses simple single crochet and slip stitch techniques for a neat, consistent result. The instructions include finishing steps like hiding ends and creating multiple links for a handle.

Chunky chain Pattern crochet pattern - detailed view of completed project

The finished chain measures approximately 22 inches with ten links using the specified materials. Detailed photos and a video link are included to help you follow each step easily.

Why You'll Love This Chunky chain Pattern

I absolutely love this pattern because it transforms simple cord into a striking, functional accessory with minimal tools and stitches. I enjoy how quick it is to make β€” you see progress fast and end up with a versatile piece. The design is forgiving, which makes experimenting with colors and lengths fun and creative. I also love that the finished chain can be used in many ways, as a bag handle, necklace, or decorative strap.

Chunky chain Pattern step 1 - construction progress Chunky chain Pattern step 2 - assembly progress Chunky chain Pattern step 3 - details and accessories Chunky chain Pattern step 4 - final assembly and finishing

Switch Things Up

I love changing the cord color to create bold or subtle looks β€” try contrasting colors for each link to make a statement.

I often switch the cord thickness and hook size to make tiny keychain links or oversized chunky handles for a different vibe.

I sometimes add small beads between links or incorporate a metal chain for mixed-material texture and extra durability.

I recommend experimenting with metallic snap hooks or colored hardware to coordinate with the bag or outfit you plan to pair with the chain.

I add embroidered or crocheted charms to a few links for a personalized touch and to create themed sets as gifts.

I occasionally join the ends with a decorative knot instead of snap hooks to make a seamless necklace version that slips over the head.

I like to alternate stitches on the surface (for example, a round of HDC instead of SC) to create subtle texture differences between links.

I sometimes make shorter chains and use them as bracelet accents or bag tassel toppers β€” they are great for repurposing leftover cord.

I suggest trying color blocking by making half the links one color and half another to visually shorten or lengthen the handle.

I always test one prototype link with a new material before committing to a full-length chain to ensure the look and strength meet my expectations.

Common Mistakes & How to Fix Them

βœ— Not placing a stitch marker can lead to losing the start of the row and miscounting; always place a marker in the first SC of each row and move it as instructed. βœ— Pulling the cord too tightly when joining the circle will create an uneven ring and strain the cord; join gently and adjust tension to keep the circle flat and even. βœ— Forgetting to pull the tail through the first loop and secure it will leave a loose end at the join; pull the end through a few loops of the first row, cut and carefully melt or process the end to secure. βœ— Skipping the instruction to insert the hook in the back loop only for the base trim will remove the defined edge; insert the hook under the back loop only for a neat base trim as directed. βœ— Cutting the cord too short before hiding the end can result in exposed ends; leave enough tail to pull back into the last SlSt and hide before processing with fire.

Chunky chain Pattern

Make a stylish chunky crochet chain perfect for bag handles, necklaces, or decorative accents. This beginner-friendly pattern guides you through looping 2mm cord into sturdy chain links you can personalize. Youll get clear step-by-step instructions, photos, and finishing tips so your chain looks professional. Perfect for quick handmade gifts or adding a custom strap to a bag.

Beginner Friendly 2-3 Hours

Materials Needed for Chunky chain Pattern

β€” Main Fabric

  • 01
    Any cord, 2 mm, 60 yards (50 m) - polyester cord (example: Shikimiki PP Macrame Mini, latte color)

β€” Tools Required

  • 01
    Crochet hook size 3 mm
  • 02
    Marker (stitch marker)
  • 03
    Lighter (for processing cord ends)
  • 04
    Scissors

Progress Tracker

0% Complete

β€” Crochet the chain :

Info :

Crochet chain with 25 CH. Connect in a circle.

Round 1 :

SlSt in the 1st loop of the chain, CH.

Round 2 :

1 row. 25 SC. Place the marker in the 1st SC of this row, last SC make in the SlSt and the 1st loop of the chain.

Info :

SlSt, CH.

Round 3 :

2 row. 25 SC, SlSt, CH, rearrange the marker in the 1st loop of this and the each subsequent row.

Info :

Pull out the end through the 1st loop of the chain.

Info :

Then pull the end through a few loops of the 1st row. Cut, process with fire.

Info :

Crochet the row.

Round 4-5 :

3-4 rows. 25 SC, SlSt, CH.

Round 6 :

5 row. 25 SC, SlSt.

Info :

Fold the work in half lengthwise, right side inward.

Info :

Pull the working loop through the loop of the chain.

β€” Base trim :

Item Name (Base trim) :

Base trim. Crochet 25 SlSt. Insert the hook on the back loop only of the last row and the loop of the chain.

Info :

Cut the thread, pull out the end. Insert the hook under the 1st SlSt. Pull the end.

Info :

Pull back the end in the last SlSt. Strengthen and hide the end. Process with fire.

β€” Assembly :

Info :

Crochet the next chain link through hole of the 1st link.

Info :

Crochet the required number of the links. For example, 9-10 links for a handle.

Info :

Put the crochet chain to the snap hook rings.

Info :

The chain can be used as a necklace.

Assembly Instructions

  • Join each new chain link by inserting the work through the hole of the previous link and continuing the 25 CH construction so the links interlock securely.
  • For a bag handle, crochet approximately 9-10 links for a comfortable handle length and test the fit before finishing the last link.
  • Attach the finished chain to snap hook rings by placing the end link onto the ring and securing the hardware as shown in the photos.
  • Hide and strengthen ends by pulling the tail back into the last SlSt, trimming excess, and processing the cord end with a lighter to melt and secure.
  • Use the chain interchangeably as a necklace by attaching it to snap hook rings or joining ends to form a continuous loop.

Important Notes

  • πŸ’‘Use a stitch marker in the first single crochet of each row and move it each row to keep track of the beginning of rounds.
  • πŸ’‘When joining the initial chain into a circle, avoid pulling the cord too tight to maintain an even base for stitching.
  • πŸ’‘Leave sufficient tail length to pull the end through a few loops and hide it before cutting and processing the cord with a lighter.
  • πŸ’‘Insert the hook into the back loop only when working the base trim to create a neat edge and allow the chain to sit flat.
  • πŸ’‘Fold the work right side inward before pulling the working loop through the chain loop to form a tidy, reinforced link.

This chunky chain pattern gives you a beautiful, handmade accessory to customize for bags, necklaces, or home decor.🧢 Its simple stitches and quick assembly make it a perfect project for gifting or testing new cord colors.✨ Have fun personalizing length, color, and hardware to match your style and needs.😊

You ask,

we answer.

FAQs

What size will the finished piece be?

The finished chain from the specified materials measures approximately 22 inches (55 cm) with 10 chain links; each link is about 3 inches (8 cm) long and 2 inches (5 cm) wide.

Can I use different cord or yarn for this pattern?

Yes, you can use different cords or yarns, but the size and look will change; thicker cord or larger hook produces a chunkier link, while thinner cord makes a smaller, more delicate chain.

Do I need prior crochet experience for this pattern?

This is a beginner-friendly pattern that uses basic stitches like chain, single crochet, and slip stitch, so basic crochet knowledge is sufficient to complete the project.

How long does this project typically take to complete?

Most crafters complete a chain in about 2-3 hours depending on experience and number of links; making a multi-link handle may take longer.