๐Ÿงถ Beautiful โœจ Detailed ๐Ÿ’ Adorable

Christmas Tree Cat Amigurumi Pattern

Christmas Tree Cat Amigurumi Pattern
4.8โ˜… Rating
5-7 Hours Time Needed
1.5K Made This
โœ‚๏ธ

Intermediate Level

Ideal for those with basic crochet experience, featuring slightly more advanced stitches and techniques to expand your skills.

โฑ๏ธ

Weekend Treat

Takes 5-7 hours, making it an enjoyable project to finish over a couple of days.

๐Ÿงธ

Cute Companion

An adorable friend to cherish, handcrafted with love to bring comfort and joy for years to come.

About This Christmas Tree Cat Amigurumi Pattern

This pattern creates a charming cat dressed like a layered Christmas tree, complete with a tiny hat and pompom. Youll work in rounds to shape the head, body, ears, limbs, tail, and decorative outer layers. The design features BLO/FLO techniques to create the ruffled tree look and simple embroidery for facial details.

Christmas Tree Cat Amigurumi Pattern crochet pattern - detailed view of completed project

Perfect for handmade holiday gifts or festive decorations, this amigurumi uses sport/fine yarn and a small 2.5mm hook. Clear round-by-round instructions and assembly steps are included for an enjoyable weekend project.

Why You'll Love This Christmas Tree Cat Amigurumi Pattern

I absolutely love this pattern because it combines an irresistible cat character with fun, textured tree layers that add festive charm. I enjoy how the BLO and FLO rows transform a simple body into a ruffled tree skirt โ€” its a small technique that makes a big impact. I also love that the final embroidery lets you give the face its own expression, making each cat unique. This pattern is a joyful mix of shaping and decorative detail that keeps the project engaging from start to finish.

Christmas Tree Cat Amigurumi Pattern step 1 - construction progress Christmas Tree Cat Amigurumi Pattern step 2 - assembly progress Christmas Tree Cat Amigurumi Pattern step 3 - details and accessories Christmas Tree Cat Amigurumi Pattern step 4 - final assembly and finishing

Switch Things Up

I love personalizing this pattern by changing the color palette โ€” try pastel greens and creams for a softer holiday look.

I sometimes use a thicker sport yarn with a slightly larger hook to make a chunkier, cuddlier version of the cat.

For a tiny keychain version, use fingering yarn and a smaller hook to shrink the pattern down into a pocket-sized charm.

I like adding embroidered blush or stitched eyelashes to give each cat its own expression and personality.

Try using safety eyes in different colors or tiny buttons for a whimsical face alternative.

Make the hat taller or shorter by adding or removing rounds to change the silhouette and proportion of the hat.

Swap the pompom for a tiny bell or bead to create a jingly holiday ornament variation.

Add wire inside the tail to pose it, or skip the wire for a soft, floppy tail depending on how you want it to sit.

I often crochet matching mini trees or little presents to make a holiday scene and turn this cat into a festive display set.

Experiment with embroidery patterns on the body layers โ€” tiny stars or dots can add a decorative accent to each ruffle.

For gifting, attach a little loop to the hat so the cat becomes a hanging ornament on a tree or garland.

Common Mistakes & How to Fix Them

โœ— Skipping stitch markers during rounds causes lost stitch counts; use a marker at the first stitch of each round to keep track. โœ— Forgetting to stuff gradually results in lumps and uneven shaping; stuff small amounts as you go and shape with your fingers for smooth curves. โœ— Not working BLO or FLO in the correct rows will ruin the ruffle effect; mark the specified rows and double-check before crocheting those special loops. โœ— Pulling yarn too tightly when changing colors can pucker the fabric; maintain even, moderate tension and secure color joins neatly. โœ— Attaching eyes without counting stitches can make the face uneven; count and mark the eye placement between R9 and R10, leaving nine stitches between them.

Christmas Tree Cat Amigurumi Pattern

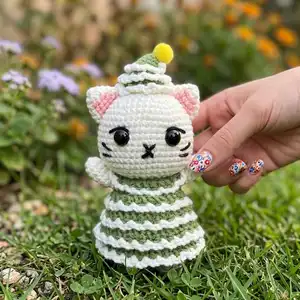
Make a whimsical Christmas Tree Cat amigurumi that doubles as festive decor or a cuddly gift. This pattern guides you through shaping the head, body layers, hat, ears, limbs, and tail with clear step-by-step rounds. Youll enjoy the textured tree-layer technique and simple embroidery details to bring personality to your kitty.

Intermediate 5-7 Hours

Materials Needed for Christmas Tree Cat Amigurumi Pattern

โ€” Main Fabric

  • 01
    Yarn Weight: Sport | Fine (2)
  • 02
    Color: white (main), green (body/hat), pink (ear inner)
  • 03
    Eyes: 12-15mm (2 pieces)
  • 04
    Pompom: 10mm (1 piece)
  • 05
    Fiberfill stuffing (amount as needed for small amigurumi)

โ€” Tools Required

  • 01
    Crochet hook size 2.5mm (C)
  • 02
    Safety eyes 12-15mm (2 pieces)
  • 03
    Pompom 10mm
  • 04
    Stitch marker
  • 05
    Sewing needle
  • 06
    Scissors
  • 07
    Hot glue gun
  • 08
    Polyester stuffing (fiberfill)
  • 09
    Long piece of wire for tail (optional, equal to tail length)

Progress Tracker

0% Complete

โ€” Head :

Round 1 :

8 SC in an MR (8)

Round 2 :

8 INC (16)

Round 3 :

(SC, INC) 8 times (24)

Round 4 :

(2 SC, INC) 8 times (32)

Round 5 :

32 SC (32)

Round 6 :

(7 SC, INC) 4 times (36)

Round 7 :

(5 SC, INC) 6 times (42)

Round 8 :

(6 SC, INC) 6 times (48)

Round 9-17 :

48 SC (48)

Round 18 :

(4 SC, DEC) 8 times (40)

Round 19 :

(3 SC, DEC) 8 times (32)

Round 20 :

(2 SC, DEC) 8 times (24)

Info :

Cut the yarn, leaving a long tail for sewing.

Info :

*Stuffing*

โ€” EARS (MAKE 2) :

Info :

Begin with White Yarn. Change to pink yarn color when changing text color

Round 1 :

6 SC in an MR (6)

Round 2 :

(SC, INC) 3 times (9)

Round 3 :

2 SC, INC, 2 SC, INC (12)

Round 4 :

3 SC, INC, 3 SC, INC, 3 SC, INC (15)

Round 5 :

4 SC, INC, 4 SC, INC, 4 SC, INC (18)

Info :

Cut the yarn, leaving a long tail for sewing.

โ€” Hat :

Info :

Begin with Green yarn

Round 1 :

6 SC in an MR (6)

Round 2 :

(SC, INC) 3 times (9)

Round 3 :

(2 SC, INC) 3 times (12)

Round 4 :

(3 SC, INC) 3 times (15)

Round 5 :

BLO, (4 SC, INC) 3 times (18)

Round 6 :

(5 SC, INC) 3 times (21)

Round 7 :

BLO, (6 SC, INC) 3 times (24)

Round 8 :

(7 SC, INC) 3 times (27)

Info :

Cut the yarn, leaving a long tail for sewing.

Info :

Begin with White yarn: Back to row 4 and crochet FLO: (3 CH, Sk, Slst) 7 times, 3 Ch, Slst.

Info :

Crochet FLO in row 6: (3 CH, Sk, Slst) 10 times, 3 Ch, Slst.

Info :

Crochet FLO in row 8: (3 CH, Sk, Slst) 13 times, 3 Ch, Slst.

Info :

Sew BLO of hat between R3 and R4 of the head. Stuff it before sewing it closed.

Info :

Sew the ears onto the head: from R4 to R10 of the head.

Info :

Attach the eyes between R9 and R10, with a distance of 9 stitches between them.

Info :

Use black yarn to embroider the nose, eyelid, and whiskers.

Info :

Use yellow yarn to sew the eyebags.

โ€” Body :

Round 1 :

8 SC in an MR (8)

Round 2 :

8 INC (16)

Round 3 :

(SC, INC) 8 times (24)

Round 4 :

(2 SC, INC) 8 times (32)

Round 5 :

(3 SC, INC) 8 times (40)

Round 6 :

(4 SC, INC) 8 times (48)

Round 7 :

BLO, 48 SC (48)

Round 8 :

(10 SC, DEC) 4 times (44)

Round 9 :

44 SC (44)

Round 10 :

BLO, (9 SC, DEC) 4 times (40)

Round 11 :

40 SC (40)

Round 12 :

(8 SC, DEC) 4 times (36)

Round 13 :

BLO, 36 SC (36)

Round 14 :

(7 SC, DEC) 4 times (32)

Round 15 :

32 SC (32)

Round 16 :

BLO, (6 SC, DEC) 4 times (28)

Round 17 :

28 SC (28)

Round 18 :

(5 SC, DEC) 4 times (24)

Round 19 :

BLO, 24 SC (24)

Info :

Cut the yarn, leaving a long tail for sewing.

Info :

Begin crocheting the outer layers of the body:

Round Row 18 crochet FLO :

Row 1: 2 Ch, 24 DC, Slst (green). Row 2: (3 Ch, Sk, Slst) 12 times (white).

Round Row 15 crochet FLO :

Row 1: 2 Ch, 32 DC, Slst (green). Row 2: (3 Ch, Sk, Slst) 16 times (white).

Round Row 12 crochet FLO :

Row 1: 2 CH, 36 DC, Slst (green). Row 2: (3 Ch, Sk, Slst) 18 times (white).

Round Row 9 crochet FLO :

Row 1: 2 CH, 44 DC, Slst (green). Row 2: (3 Ch, Sk, Slst) 22 times (white).

Round Row 6 crochet FLO :

Row 1: 2 CH, 48 DC, Slst (green). Row 2: (3 Ch, Sk, Slst) 24 times (white).

Info :

*Stuffing*

โ€” LEGS: (MAKE 2) :

Round 1 :

6 SC in an MR (6)

Round 2 :

6 INC (12)

Round 3 :

(3 SC, INC) 3 times (15)

Round 4-5 :

15 SC (15)

Info :

Cut the yarn, leaving a long tail for sewing.

โ€” HANDS (MAKE 2) :

Round 1 :

6 SC in an MR (6)

Round 2 :

(SC, INC) 3 times (9)

Round 3-8 :

9 SC (15)

Info :

Cut the yarn, leaving a long tail for sewing.

โ€” TAIL :

Round 1 :

6 SC in an MR (6)

Round 2-15 :

6 SC (6)

Info :

Cut the yarn, leaving a long tail for sewing. Use a long piece of wire, equal to the tail length, and thread it through.

โ€” Assembly :

Info :

Sew the body to the head.

Info :

Sew the arms to the body, between R19 & R20.

Info :

Sew the legs and tail to the body.

Info :

Attach a yarn pompom to the hat to complete the product.

Assembly Instructions

  • Sew the body to the head by aligning the neck opening to the top of the body and using a whipstitch to secure it evenly all around.
  • Position and sew the arms to the body between rounds 19 and 20, angling slightly forward for a natural pose and attaching firmly with passing stitches.
  • Attach the legs to the bottom of the body, spacing them evenly for balance and sewing securely so the toy sits upright.
  • Sew the tail onto the back center of the body, inserting the optional wire into the tail before attaching and stitching through the body for stability.
  • Sew the ears onto the head from round 4 to round 10, matching left and right placement for symmetry and tacking them firmly.
  • Attach safety eyes between rounds 9 and 10 with a distance of 9 stitches between them, then embroider the nose, eyelids, and whiskers with black yarn.

Important Notes

  • ๐Ÿ’กUse stitch markers to keep track of the beginning of each round, especially during increases and when working BLO or FLO rows.
  • ๐Ÿ’กStuff gradually and evenly while shaping the head and body to avoid lumps and to achieve a smooth round shape.
  • ๐Ÿ’กPin parts (ears, arms, legs) in place before sewing to ensure correct positioning and symmetry across the finished toy.
  • ๐Ÿ’กWhen working BLO and FLO rows, confirm the correct row numbers before crocheting to achieve the intended ruffled texture.
  • ๐Ÿ’กWeave in ends and secure color changes neatly to prevent unraveling, and use hot glue for the pompom if needed.

This little Christmas Tree Cat brings handmade holiday cheer to shelves, tables, and gift piles. Its ruffled tree dress and tiny pompom hat make it a delightful seasonal companion. Create one for yourself or stitch up a flock of festive kitties to share the joy. ๐ŸŽ„๐Ÿงถ

You ask,

we answer.

FAQs

What size will the finished piece be?

The finished amigurumi measures approximately 12-15 cm tall when using the recommended sport/fine yarn and 2.5mm hook, though size will vary slightly with tension.

Can I use different yarn weights for this pattern?

Yes, you can change yarn weight, but the final size and the look of the tree ruffles will change; adjust hook size accordingly to maintain fabric density.

Do I need prior crochet experience for this pattern?

This pattern is rated intermediate and uses BLO, FLO, DC, and shaping techniques, so basic crochet skills and working in the round are recommended.

How long does this project typically take to complete?

Most crocheters complete this project in 5-7 hours as a weekend project, though time may vary depending on experience and assembly speed.