๐Ÿงถ Beautiful โœจ Detailed ๐Ÿ’ Adorable

Christmas Minion Amigurumi Pattern

Christmas Minion Amigurumi Pattern
4.1โ˜… Rating
5-7 Hours Time Needed
3.4K Made This
โœ‚๏ธ

Intermediate Level

Ideal for those with basic crochet experience, featuring slightly more advanced stitches and techniques to expand your skills.

โฑ๏ธ

Weekend Treat

Takes 5-7 hours, making it an enjoyable project to finish over a couple of days.

๐Ÿงธ

Cute Companion

An adorable friend to cherish, handcrafted with love to bring comfort and joy for years to come.

About This Christmas Minion Amigurumi Pattern

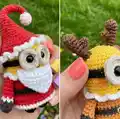
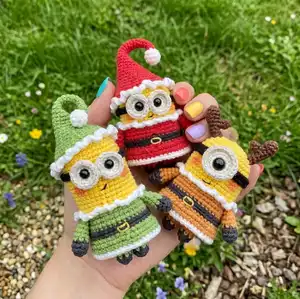
This pattern teaches you how to crochet three tiny Christmas Minions โ€” Bob, Kevin, and Stuart โ€” with festive hats and outfits. You will work in the round to shape bodies, make hats, glasses, horns, arms, and legs, then assemble them for a polished finish. The instructions include color changes, BLO/FLO rounds, and small detail work to create charming holiday characters.

Christmas Minion Amigurumi Pattern crochet pattern - detailed view of completed project

Detailed round-by-round instructions guide you through each piece and every color change, with clear finishing and assembly notes. Ideal for intermediate crocheters who enjoy small amigurumi projects and customizable details.

Why You'll Love This Christmas Minion Amigurumi Pattern

I absolutely love this pattern because it combines tiny-scale amigurumi with cheerful holiday styling that brings out lots of personality in each Minion. I enjoy the small, fiddly details like the glasses, horns, and tiny belts because they let me add my own touch to every piece. The pattern is satisfying to work because rounds are short and progress is visible quickly, which keeps me excited throughout. Making a set is especially rewarding โ€” each Minion has a slightly different build and outfit, so they feel like a little family when finished.

Christmas Minion Amigurumi Pattern step 1 - construction progress Christmas Minion Amigurumi Pattern step 2 - assembly progress Christmas Minion Amigurumi Pattern step 3 - details and accessories Christmas Minion Amigurumi Pattern step 4 - final assembly and finishing

Switch Things Up

I love experimenting with colorways to give each Minion a unique personality; try pastel holiday colors for a soft look or bold jewel tones for a richer aesthetic.

Swap the sport yarn for a thinner thread and smaller hook to create tiny keychain-sized Minions, or use a chunkier yarn and larger hook for a plush, huggable version.

I often add embroidered smiles or freckles to change facial expressions and add charm to each character.

Try replacing the safety eyes with tiny embroidered eyes for a fully handmade, child-safe toy suitable for babies.

Customize outfits by changing stripe patterns, adding tiny crocheted scarves, or creating different hat shapes like beanies and earflap hats.

For seasonal variations, make Easter or Halloween outfits using different color combos and props you crochet, such as pumpkins or eggs.

I sometimes add a loop at the top of the hat to turn the Minion into a tree ornament or a hanging decoration.

Attach wire inside arms for posability if you want the Minion to hold tiny props like candy canes or signs.

Make a whole family by varying sizes and accessories โ€” small, medium, and large versions look delightful together on a mantel or as a centerpiece.

Experiment with different eye numbers and placements to make unique characters โ€” add two eyes, one eye, or tiny goggles to change personality.

Common Mistakes & How to Fix Them

โœ— Forgetting to switch colors exactly on the BLO/FLO rounds can misplace your stripes and trims; mark the round where you need to change color and make the yarn switch in the correct loop to keep rows neat. โœ— Not stuffing as you go can make shaping difficult and stuffing uneven; add fiberfill gradually and shape the body as you progress to maintain an even silhouette. โœ— Skipping stitch counts after increases or decreases causes trouble later in shaping; count your stitches at the end of each round to ensure the correct number and correct mistakes early. โœ— Leaving short yarn tails when cutting off can make sewing parts difficult later; leave long tails for sewing and hide ends only after parts are securely attached.

Christmas Minion Amigurumi Pattern

Make three adorable Christmas Minions with this detailed amigurumi pattern. You will create Bob, Kevin, and Stuart in festive hats and outfits using sport yarn and small hooks. The pattern includes full round-by-round instructions, glasses, hats, horns, and assembly tips to help you finish a lovable handmade gift. Perfect for gifting or decorating your home for the holidays.

Intermediate 5-7 Hours

Materials Needed for Christmas Minion Amigurumi Pattern

โ€” Main Fabric

  • 01
    Sport weight yarn (1.5-2mm) in colors: yellow, red, green, brown, black, white (small amounts of each)
  • 02
    Black safety eyes size 8-10mm (I used 8mm eyes)
  • 03
    Black yarn or black embroidery thread for decorating details
  • 04
    Fiberfill stuffing for bodies and parts

โ€” Tools Required

  • 01
    Crochet hook size 2.0mm - 2.5mm (use size to obtain gauge)
  • 02
    Yarn needle for sewing parts and weaving ends
  • 03
    Scissors
  • 04
    Stitch markers (optional)
  • 05
    Glue (to attach eyes to glasses)

Progress Tracker

0% Complete

โ€” Materials :

Infos :

Yarn: sport yarn size 1.5-2mm. Crochet hook: 2.0mm - 2.5mm sport yarn or any size to obtain gauge. Gauge: 9 single crochet and 9 rows yield a square with 1 inch sides for 2.0mm hook. Black safety eyes size 8-10mm (i used 8mm eyes). Black yarn or black embroidery thread for decorating. Fiberfill. Yarn needle. Stitch markers (if you need).

โ€” Abbreviation :

Infos :

MR: magic ring. Ch: chain. Slst: slip stitch. Sc: single crochet. Inc: increase (2 single crochet in one stitch). Dec: decrease (use invisible decrease). Hdc: half double crochet. Hdc-inc: half double crochet increase (2 half double crochet in one stitch). Dc: double crochet. Dc-dec: double crochet decrease. Dc-inc: double crochet increase. BLO: back loop only. FLO: front loop only. Rnds: rounds. Sts: stitch.

โ€” Bob's Body :

Info :

Start with yellow yarn

Round 1 :

7sc in MR (7)

Round 2 :

7 -inc (14)

Round 3 :

(sc, inc) * 7 (21)

Round 4 :

(inc, 2sc) * 7 (28)

Round 5 :

(3sc, inc) * 7 (35)

Round 6-14 :

(9 rnds) 35sc (35)

Info :

Switch to red yarn

Round 15 :

BLO (4sc, inc) * 7 (42)

Round 16-17 :

(2 rnds) 42sc (42)

Info :

Switch to black yarn

Round 18-19 :

(2 rnds) 42sc (42)

Info :

Switch to red yarn

Round 20 :

BLO 42sc (42)

Round 21 :

42sc (42)

Round 22 :

(4sc, dec) * 7 (35)

Round 23 :

(3sc, dec) * 7 (28)

Info :

Stuff the body tight with fiberfill

Round 24 :

(2sc, dec) * 7 (21)

Round 25 :

(sc, dec) * 7 (14)

Round 26 :

7 -dec (7)

Info :

Cut the yarn. Invisible fasten off. Thread a needle with your yarn tail and close the ramaining gap.

โ€” Kevin's Body :

Info :

Start with yellow yarn

Round 1 :

7sc in MR (7)

Round 2 :

7 -inc (14)

Round 3 :

(sc, inc) * 7 (21)

Round 4 :

(inc, 2sc) * 7 (28)

Round 5 :

(3sc, inc) * 7 (35)

Round 6-21 :

(16 rnds) 35sc (35)

Info :

Switch to green yarn

Round 22 :

BLO (4sc, inc) * 7 (42)

Round 23-24 :

(2 rnds) 42sc (42)

Info :

Switch to black yarn

Round 25-26 :

(2 rnds) 42sc (42)

Info :

Switch to green yarn

Round 27 :

BLO 42sc (42)

Round 28 :

42sc (42)

Round 29 :

(4sc, dec) * 7 (35)

Round 30 :

(3sc, dec) * 7 (28)

Info :

Stuff the body tight with fiberfill

Round 31 :

(2sc, dec) * 7 (21)

Round 32 :

(sc, dec) * 7 (14)

Round 33 :

7 -dec (7)

Info :

Cut the yarn. Invisible fasten off. Thread a needle with your yarn tail and close the ramaining gap.

โ€” Stuart's Body :

Info :

Start with yellow yarn

Round 1 :

7sc in MR (7)

Round 2 :

7 -inc (14)

Round 3 :

(sc, inc) * 7 (21)

Round 4 :

(inc, 2sc) * 7 (28)

Round 5 :

(3sc, inc) * 7 (35)

Round 6-17 :

(12 rnds) 35sc (35)

Info :

Switch to brown yarn

Round 18 :

BLO (4sc, inc) * 7 (42)

Round 19-20 :

(2 rnds) 42sc (42)

Info :

Switch to black yarn

Round 21-22 :

(2 rnds) 42sc (42)

Info :

Switch to brown yarn

Round 23 :

BLO 42sc (42)

Round 24 :

42sc (42)

Round 25 :

(4sc, dec) * 7 (35)

Round 26 :

(3sc, dec) * 7 (28)

Info :

Stuff the body tight with fiberfill

Round 27 :

(2sc, dec) * 7 (21)

Round 28 :

(sc, dec) * 7 (14)

Round 29 :

7 -dec (7)

Info :

Cut the yarn. Invisible fasten off. Thread a needle with your yarn tail and close the ramaining gap.

โ€” Arms :

Info :

With black and minion shirt's yarn (make two)

Round 1 :

start with black 4sc in MR (4)

Round 2 :

4 -inc (8)

Info :

Switch color

Round 3-8 :

(6 rnds) 8sc (8)

Info :

Cut the yarn. Leave a long tail. Thread a needle with your yarn tail and sew to the body at the round you switch to minion shirt's color yarn.

โ€” Legs :

Info :

With black and minion shirt's yarn.

Round 1 :

start with black 7sc in MR (7)

Round 2 :

inc, 6sc (8)

Info :

Switch color

Round 3-4 :

8sc (8)

Info :

Cut the yarn. Leave a long tail. Thread a needle with your yarn tail and sew the legs to bottom of the body.

โ€” Bob's and Kevin's Glasses :

Info :

With white and gray.

Round 1 :

start with white 7sc in MR (7)

Round 2 :

7 -inc (14)

Info :

Switch to gray

Round 3 :

FLO 14sc, slst(14)

Info :

Cut the yarn. Leave a long tail. Thread a needle with your yarn tail and sew the glasses to the body. Place the eyes on glasses and use glue to stick them to the body.

โ€” Stuart's Glasses :

Info :

With white and gray.

Round 1 :

start with white 7sc in MR (7)

Round 2 :

7 -inc (14)

Round 3 :

(sc, inc) * 7 (21)

Info :

Swith to gray

Round 4 :

FLO 21sc, slst (21)

Info :

Black trap for Bob and Kevin glasses: Start with black yarn, ch32, 31 -slst on chain. Cut the yarn. Leave a long tail. Thread a needle with your yarn tail and sew it to the body of minion.

Info :

Black trap for Stuart glasses: Start with black yarn, ch37, 36sc on chain. Cut the yarn. Leave a long tail. Thread a needle with your yarn tail and sew it to the body of minion.

โ€” Piece of shirt :

Info :

With minion shirt's yarn Insert your hook to FLO stitches of the second BLO round on the body,

Round 1 :

ch1, (5sc, inc) * 7, slst (49)

Round 2-3 :

(2 rnds) ch1, 49sc, slst (49)

Info :

Switch to white yarn

Round 4 :

49sc, slst (49)

Info :

Cut the yarn. Invisible fasten off. Hide your yarn tail.

โ€” Collar :

Info :

With white yarn Insert your hook to FLO stitches of the first BLO round on the body, (ch 3, slst to the next stitch) * end round

Info :

Cut the yarn. Invisible fasten off. Hide your yarn tail.

โ€” Bob's and Kevin's hat :

Info :

With minion shirt's yarn

Round 1 :

4sc in MR (4)

Round 2-4 :

(3 rnds) 4sc (4)

Round 5 :

3sc, inc (5)

Round 6-8 :

(3 rnds) 5sc (5)

Round 9 :

4sc, inc (6)

Round 10-12 :

(3 rnds) 6sc (6)

Round 13 :

(sc, inc) * 3 (9)

Round 14 :

9sc (9)

Round 15 :

(2sc, inc) * 3 (12)

Round 16-17 :

(2 rnds) 12sc (12)

Round 18 :

(sc, inc) * 6 (18)

Round 19 :

18sc (18)

Round 20 :

(2sc, inc) * 6 (24)

Round 21 :

24sc (24)

Round 22 :

(3sc, inc) * 6 (30)

Round 23 :

(4sc, inc) * 6 (36)

Round 24 :

2sc, inc, (5sc, inc) * 5, 3sc (42)

Round 25 :

42sc (42)

Info :

Switch to white yarn

Round 26 :

42sc (42)

Round 27 :

(Ch 3, slst to the next stitch) * end round

Info :

Cut the yarn. Invisible fasten off. Hide your yarn tail.

โ€” Stuart's horn :

Info :

With dark brown yarn. Make two.

Item Name (Big piece) :

Rnd 1. 6sc in MR (6). Rnd 2. (2sc, inc) * 2 (8). Rnd 3. 8sc (8). Rnd 4. 2sc, 2 -dec, 2sc (6). Rnd 5. 2sc, dec, 2sc (5). Rnd 6-7. (2 rnds) 5sc (5). Rnd 8. 3sc, dec, slst (4)

Info :

Cut the yarn. Leave a long tail for sewing.

Item Name (Small piece) :

Rnd 1. 4sc in MR (4). Rnd 2-3. (2 rnds) 4sc (4)

Info :

Cut the yarn. Leave a long tail. Thread a needle with your yarn tail. Sew small piece to big piece spanning rounds 5&6.

Info :

Sew the horn to the top of minion spanning rounds 4&5

Assembly Instructions

  • Sew arms to the body at the round where you switch to the minion shirt color yarn, using the long tail left when you cut the yarn; secure with tight whipstitches and weave in ends.
  • Sew legs to the bottom of the body using the long tails left on each leg so they are spaced evenly and support the minion to stand.
  • Attach glasses by sewing them to the body and then glue the safety eyes to the glasses before securing the glasses in position.
  • Sew Stuart's horn by attaching the small piece to the big piece spanning rounds 5 and 6, then sew the assembled horn to the top of the minion spanning rounds 4 and 5.
  • Attach hats and collars by sewing them into place around the BLO rounds indicated; hide and weave in all yarn tails securely after sewing.

Important Notes

  • ๐Ÿ’กWork in continuous rounds unless otherwise stated and use stitch markers to mark the beginning of each round for accurate counting.
  • ๐Ÿ’กStuff the body firmly but evenly with fiberfill during assembly to keep the shape smooth and avoid lumps.
  • ๐Ÿ’กHide and weave in yarn tails or use invisible fasten off techniques after sewing parts to maintain a neat finished look.

Create a trio of festive Minions for holiday joy with this charming amigurumi pattern. These pocket-sized characters make perfect handmade gifts and tree ornaments for friends and family. Follow the step-by-step rounds and assembly notes to bring Bob, Kevin, and Stuart to life this season. ๐ŸŽ„๐Ÿงถ

You ask,

we answer.

FAQs

What size will the finished piece be?

The finished amigurumi measures approximately 7-9 cm tall when using sport yarn and a 2.0-2.5mm hook; exact size will vary with yarn and tension.

Can I use different yarn weights for this pattern?

Yes, you can use different yarn weights, but the final size will change; choose an appropriate hook size and adjust stuffing and details to match.

Do I need prior crochet experience for this pattern?

This pattern is rated intermediate, so basic knowledge of crocheting in the round, increases, decreases, and BLO/FLO techniques is recommended.

How long does this project typically take to complete?

Most crocheters complete one Minion in a few hours; making a set of three usually takes around 5-7 hours total depending on experience and finishing time.