🧢 Beautiful ✨ Detailed πŸ’ Adorable

Christmas Bells Pattern

Christmas Bells Pattern
3.9β˜… Rating
2-3 Hours Time Needed
1.2K Made This
βœ‚οΈ

Intermediate Level

Ideal for those with basic crochet experience, featuring slightly more advanced stitches and techniques to expand your skills.

⏱️

Bite-Sized Project

Finishes in 2-4 hoursβ€”perfect for an afternoon of creative relaxation.

πŸŽ„

Holiday Cheer

Festive fun for the season, bringing handmade magic to celebrations and creating new family traditions.

About This Christmas Bells Pattern

This pattern creates a sweet pair of crocheted Christmas bells complete with leaves, berries, and a hanging loop. It uses YarnArt Jeans DK weight yarn and a small hook to create a neat, detailed finish. The pattern includes step-by-step rounds, a crab (reverse) stitch edge, and clear assembly instructions. Ideal for making festive ornaments or small seasonal gifts.

Christmas Bells Pattern crochet pattern - detailed view of completed project

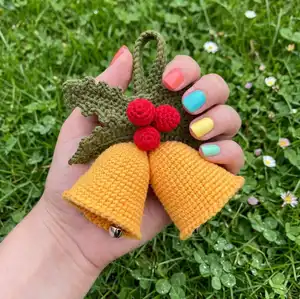
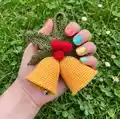
Youll crochet two bells, four leaves, three berries, and a loop, then assemble them into a finished ornament. Photos and concise instructions help you through attaching the jingle bells and hiding tails neatly.

Why You'll Love This Christmas Bells Pattern

I absolutely love this pattern because it turns simple stitches into an elegant holiday ornament thats full of charm. I enjoy the balance of quick, focused rounds for the bells and the delicate shaping used for the leaves and berries. The crab (reverse) stitch edge adds a professional finish that I find very satisfying. Its a delightful project to gift or display, and I always enjoy making a few as seasonal presents.

Christmas Bells Pattern step 1 - construction progress Christmas Bells Pattern step 2 - assembly progress Christmas Bells Pattern step 3 - details and accessories Christmas Bells Pattern step 4 - final assembly and finishing

Switch Things Up

I like to change colors to match my holiday decor; using metallic or sparkly yarn gives the bells a festive sheen.

To create a chunkier ornament, I try a bulkier yarn and a larger hook for a bold, plush version that fills a larger space.

For a tiny keychain charm, I downsize using thinner yarn and a smaller hook to make mini bells that are perfect for gifts.

I sometimes embellish with beads or sequins along the bell rim to add a little extra sparkle and texture to the finished piece.

Make the loop longer or shorter depending on where you want to hang it β€” a short loop looks best on wreaths, while a longer loop is ideal for tree branches.

I enjoy swapping the red berries for small pom-poms or tiny embroidered berries when I want a softer look.

If you want a more rustic feel, try natural or muted tones and add twine instead of a crocheted loop for hanging.

I often change the jingle bells to wooden beads or tiny bells in different finishes for a personalized sound and look.

Try grouping several sets of bells together on a single ribbon to make a charming garland for a doorway or mantle.

For gifting, I stitch a small ribbon bow at the top of the leaf cluster and package a set of two bells in a festive box.

Common Mistakes & How to Fix Them

βœ— Crocheting too loosely can let stuffing show through the stitches; keep tension tight and consistent to prevent gaps and a messy finish. βœ— Forgetting to work in continuous spirals causes visible seams and mismatched stitch alignment; use a stitch marker and crochet without turning chains.
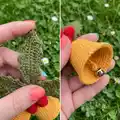
 βœ— Not securing the tambourine or jingle bell tightly may cause it to fall out later; pull the thread firmly through the eye and tie securely with extra knots. βœ— Skipping the crab (reverse) stitch round will remove the neat finished edge; work the specified crab stitch row as directed to maintain the bell rim detail.

Christmas Bells Pattern

Make a charming set of crochet Christmas bells to decorate your home or give as thoughtful handmade gifts. This pattern walks you through crocheting two bells, leaves, and berries, then assembling them into a festive ornament. Youll enjoy clear step-by-step instructions and helpful photos to guide you through every stage. Perfect for holiday crafting and handmade decor projects.

Intermediate 2-3 Hours

Materials Needed for Christmas Bells Pattern

β€” Main Fabric

  • 01
    DK weight yarn - Yarn Art Jeans (55% cotton/45% acrylic; 50 g/160 m)
  • 02
    Yarn Art Jeans No 35 (yellow) - bells (quantity: enough for two small bells, approx 20-40 g)
  • 03
    Yarn Art Jeans No 82 (dark green) - leaves and loop (quantity: small skein or scraps, approx 10-20 g)
  • 04
    Yarn Art Jeans No 90 (red) - berries (quantity: small scraps, approx 5-10 g)

β€” Tools Required

  • 01
    Crochet hook size 2.25 mm
  • 02
    Smaller crochet hook (for threading bell eye; size not specified)
  • 03
    Stuffing material (fiberfill/ polyester)
  • 04
    Tapestry needle
  • 05
    Scissors
  • 06
    Stitch marker (a scrap of contrasting yarn)
  • 07
    Tambourine / jingle bells, 2 pieces

Progress Tracker

0% Complete

β€” Notes :

Infos :

NOTE! Yarn consumption, size, and appearance of the toy depend on crochet density and how you hold the yarn. The presented toy is crocheted with V and X look single crochet: (First, you grab yarn over the hook, and for making the second stitch grab it under the hook). The finished product using the materials specified in this template has a size of ~4.7*5.1 inches with a loop. Make sure you crochet tight enough; otherwise, the stuffing will show through the holes. Crochet the toy in continuous spirals without turning chains.

β€” Bells :

Rnd 1 :

6 into MR

Rnd 2 :

6 inc (12)

Rnd 3 :

(1 sc, inc)*6 (18)

Rnd 4 :

(2 sc, inc)*6 (24)

Rnd 5 :

(3 sc, inc)*6 (30)

Rnd 6-7 :

30 sc (2 rounds)

Rnd 8 :

(4 sc, inc)*6 (36)

Rnd 9-14 :

36 sc (6 rounds)

Rnd 15 :

(5 sc, inc)*6 (42)

Rnd 16-19 :

42 sc (4 rounds)

Info :

* Crochet the next row with Crab (Reverse) stitch

Rnd 20 :

42 sc (Crab stitch), 1 sl st

Info :

Break yarn. Pull tightly. Hide the tail inside.

β€” Bell Language :

Info :

Chain 16 with blue yarn. Using a smaller hook, pull the thread into the eye of the bell to grab and pull the thread.

Info :

Start working in the second chain from hook 15 sc. Break yarn.

Info :

We attach the finished language to the bell. Tie all the threads.

Info :

Tie both bells together.

β€” Leaf :

Info :

Yarn - YarnArt Jeans No. 82 (dark green)

Info :

Chain 15, crochet to the chain foundation. Start working in the second chain from hook - 13 sc, 3 sc in 1 stitch.

Info :

Continue crocheting on the other side of the chain foundation. – 12 sc, 3 sc in 1 stitch.

Rnd 2 :

(3 sc, chain 3, 1 sc in the previous stitch)*4, 3 sc, chain 3, 1 sc in the previous stitch, (3 sc, chain 3, 1 sc in the previous stitch)*4, 2 sc, 2 sl st.

Info :

Break yarn, leaving a long tail for sewing.

Info :

* Iron the part with steam if it is uneven. To do this, put a damp cloth on top of a crochet garment and steam it off for a few seconds.

β€” Berries :

Info :

Yarn - YarnArt Jeans No. 90 (red)

Rnd 1 :

6 into MR

Rnd 2 :

6 inc (12)

Rnd 3-6 :

12 sc (4 rounds)

Info :

Complete stuffing with fiberfill.

Info :

Tighten the hole using a tapestry needle.

β€” Assembly :

Step 1 :

Sew four leaves together.

Step 2 :

Using a needle, remove all the threads from the bell to the back of the sheet and tie them together.

Step 3 :

Sew the berries.

Info :

Attach the finished leaf assembly to the bells, hide and tie all threads neatly at the back.

β€” Loop :

Info :

Yarn - YarnArt Jeans No. 82 (dark green)

Rnd 1 :

Chain 41, turn and continue crocheting on the other side of the chain.

Rnd 2 :

40 sc, 1 cp, turn

Rnd 3 :

40 sc

Info :

Cut off the long end of the thread. Use a needle to connect the ends. With the remaining piece of thread, sew the loop to the back of the leaves, thereby hiding all the protruding threads.

Info :

Congratulations! You did it great! Thank you for purchasing my pattern. I hope that you liked the pattern and enjoyed crocheting.

Assembly Instructions

  • Sew four leaves together at their bases to form the leaf cluster, aligning points symmetrically before tying the center securely.
  • Using a needle, pull all the threads from the bell to the back of the leaf assembly and tie them together to secure the bells in place.
  • Attach the small jingle/tambourine to the interior bottom of each bell by pulling the thread through the eye and tying it tightly.
  • Sew the three berries to the top center of the leaf cluster and secure with several stitches so they sit firmly between the leaves.
  • Sew the finished loop to the back of the leaf assembly, hide all protruding threads, and reinforce the loop with extra stitches for hanging.

Important Notes

  • πŸ’‘Make sure you crochet tight enough; otherwise, the stuffing will show through the holes and affect the neatness of the bells.
  • πŸ’‘Crochet the toy in continuous spirals without turning chains to avoid visible seams and maintain even stitch flow.
  • πŸ’‘When parts are uneven, iron the piece with steam using a damp cloth on top to gently shape leaves or other flat pieces.
  • πŸ’‘Tie and hide all tails securely to prevent parts from loosening, and use a tapestry needle to tighten small openings after stuffing.

This festive Christmas Bells pattern brings handmade joy to your holiday decor with sweet bells, leaves, and berries. πŸŽ„ These ornaments make lovely gifts or charming accents for wreaths, garlands, or tree branches. 🧢 Create a set to brighten your home and share the holiday spirit with friends and family.

You ask,

we answer.

FAQs

What size will the finished piece be?

The finished ornament measures approximately 4.7 x 5.1 inches using the recommended YarnArt Jeans DK yarn and 2.25 mm hook.

Can I use different yarn weights for this pattern?

Yes, but changing yarn weight will affect the final size; use a different hook appropriate for your yarn and expect a larger or smaller finished piece.

Do I need prior crochet experience for this pattern?

This pattern is rated intermediate and assumes you are comfortable with single crochet, increases, decreases, and working in spirals.

How long does this project typically take to complete?

Most crocheters complete this project in 2-3 hours, though time may vary depending on experience and how many pieces you make.