🧢 Beautiful ✨ Detailed πŸ’ Adorable

Carnation Flower Pattern

Carnation Flower Pattern
4.7β˜… Rating
1-2 Hours Time Needed
1.9K Made This
βœ‚οΈ

Beginner Friendly Level

Perfect for those just starting their crochet journey, with clear instructions and simple techniques

⏱️

Quick Make

Complete in under 2 hoursβ€”lightning fast fun for instant gratification and quick gifts.

🏑

Cozy Accent

A warm touch for your space that transforms ordinary corners into inviting nooks filled with handmade charm.

About This Carnation Flower Pattern

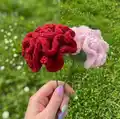
This pattern creates a small, wired carnation flower with a green base and a ruffled colored head. It uses DK (size 3) yarn and a 3.5 mm hook to form neat petals and a sturdy top for inserting a wire stem. The design is compact and quick to make, great for crafting bouquets or single decorative stems.

Carnation Flower Pattern crochet pattern - detailed view of completed project

You will make the green base first, then work the flower head into the back loops to create ruffles. Instructions include finishing and assembly tips for wiring and taping the stem.

Why You'll Love This Carnation Flower Pattern

I absolutely love this pattern because it turns basic stitches into a beautiful, textured flower that looks far more intricate than it feels to make. I enjoy how economical it is β€” you only need tiny amounts of yarn to create several blooms. The method of working into the front and back loops gives such a lovely frilly edge that feels very satisfying to crochet. I also love that you can personalise each bloom with color choices and stem lengths to suit your projects and gifts. Making a handful of these quickly becomes an addictive, relaxing little project I always reach for when I want something pretty and fast.

Carnation Flower Pattern step 1 - construction progress Carnation Flower Pattern step 2 - assembly progress Carnation Flower Pattern step 3 - details and accessories Carnation Flower Pattern step 4 - final assembly and finishing

Switch Things Up

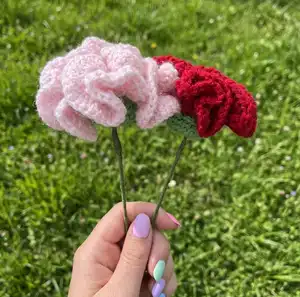
I love how easily this pattern can be customised with different colors for varied looks; try ombre or two-tone petals for extra interest.

Swap yarn weights to change the size: use a bulkier yarn and bigger hook for chunky blooms, or finer yarn and a small hook for delicate miniature flowers.

I often experiment with petal counts by working fewer or more rounds of ruffles to make denser or sparser heads.

Try adding a bead or French knot stitch to the centre for a more detailed stamen effect if you like more realism.

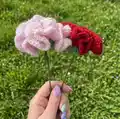
You can attach multiple crocheted heads to one wrapped stem to create a small bouquet β€” stagger heights for a natural look.

I sometimes embroider tiny veins on petal edges with contrasting thread to give each petal more texture and depth.

For a vintage look, use muted or pastel shades and wrap the stem with twine instead of florist tape.

If you want a posable stem, use craft wire thicker than florist wire and test it inside the base before wrapping.

I recommend trying eyelash or novelty yarn for very textured, fluffy flowers β€” they create a totally different effect and are fun to play with.

Make quick accessories by mounting a small carnation onto a hair clip or brooch backing for a wearable florals project.

Common Mistakes & How to Fix Them

βœ— Not marking the start of rounds; this can cause you to lose track of where a round begins and end leading to uneven stitches; solution: place a stitch marker at the first stitch of each round and move it every round. βœ— Crocheting too loose when working the ruffled petals; loose stitches will make the petals floppy and lose definition; solution: maintain a tighter, consistent tension and consider a slightly smaller hook if needed. βœ— Forgetting to work into the back loops for the green base; this will prevent the flower head from sitting correctly and hide the loops needed for attachment; solution: double-check R3 on the base and access the back loops as instructed. βœ— Cutting yarn ends too short after fastening off; short tails make sewing and securing parts difficult; solution: leave a long tail for sewing and weave in the starter tail if you did not crochet over it. βœ— Skipping the slip stitch joins at the end of rounds; skipping these can distort stitch counts and pattern flow; solution: always complete the slst to the top of the referenced stitch as shown to finish rounds neatly.

Carnation Flower Pattern

Make a charming crocheted carnation using simple stitches and a small amount of yarn. This pattern walks you through creating a neat green base and a ruffled flower head you can attach to a wired stem. It is perfect for quick handmade gifts, small bouquets, or decorative accents around the home. Clear step-by-step instructions and helpful photos guide you through every stage.

Beginner Friendly 1-2 Hours

Materials Needed for Carnation Flower Pattern

β€” Main Fabric

  • 01
    DK (size 3) yarn: small amount of green (for base)
  • 02
    DK (size 3) yarn: approximately 10 g of flower shade of your choosing (for flower head)
  • 03
    Note: You can use different type/weight yarn for this project; adjust hook size accordingly.

β€” Tools Required

  • 01
    3.5 mm crochet hook
  • 02
    Yarn needle
  • 03
    Scissors
  • 04
    Flower wire for the stem (for wiring the flower)
  • 05
    Florist tape (optional, for wrapping the stem)
  • 06
    Stitch marker

Progress Tracker

0% Complete

β€” Carnation flower :

Info :

Start with green yarn.

Info :

Start by creating a magic circle. You will be working in a continuous circle.

Info :

Tip: Mark your first stitch with a stitch marker.

R 1 :

6 sc into the mc (6 sts).

R 2 :

inc 6 times (12 sts).

R 3 :

*FLO sc, FLO inc* 6 times (18 sts).

R 4-6 :

(3 rounds): sc around (18 sts).

Info :

Do not turn your work right way round yet, you need to access the back loops created from R 3.

Info :

Fasten off and cut yarn but leave a bit of a tail for later. You can sew in the starter tail if you did not crochet over it.

Info :

Continue with the colour of the flower head.

Info :

You will now be working into the back loops from R 3. Attach your yarn to one of the loops.

R 1 :

ch 1 (does not count as a stitch) BLO sc around, slst to beg ch-1 to finish (12 sts).

R 2 :

ch 2 (does not count as a stitch), dc around, slst to top of first dc to finish (12 sts).

R 3-5 :

(3 rounds): ch 2 (does not count as a stitch), 3 dc into each stitch from the round below, slst to top of first dc to finish (36, 108, 324 sts).

Info :

Fasten off, leave a long tail for sewing. You can sew in the starter tail if you did not crochet over it.

β€” Assembly :

Info :

With your yarn needle, make a few stitches through the middle of the flower head to keep it in place, you can make the flower head tighter or looser depending on your own personal preference, see photo below the difference between pink and red carnation flower.

Info :

Turn the green part of your work the right way around to cover the bottom part of the flower head and form the top of the stem, securing it to place with a few stitches all around.

Info :

Bend the top part of your flower wire and push it through the middle of the flower head to come out at the middle of the green magic circle. Twist the ends of the wires together and add some florist tape all along the stem if you like.

Info :

See photos in the pattern for visual guidance on how the ruffles form and how to place stitches and wire.

Assembly Instructions

  • Make a few stitches through the middle of the flower head with a yarn needle to secure its centre and tighten or loosen according to your preferred fullness.
  • Turn the green base right side out to cover the bottom of the flower head and form the top of the stem; secure all around with a few stitches.
  • Bend the top of the flower wire and push it through the middle of the flower head so the wire comes out at the centre of the green magic circle.
  • Twist the ends of the flower wires together to secure the head, then wrap florist tape along the stem to cover and finish the wire for a neat look.

Important Notes

  • πŸ’‘Gauge/tension is not important for this pattern as long as your stitches are tight and without gaps; if you struggle getting tight enough stitches, try a smaller hook.
  • πŸ’‘You can use a different yarn weight for this project but be sure to adjust your hook size to match the yarn and desired finished size.
  • πŸ’‘Leave a long tail when fastening off to make sewing and attaching the head to the stem easier; sew in the starter tail if you did not crochet over it.

This pretty carnation pattern turns small amounts of yarn into elegant ruffled flowers you can display or gift. 🌸 Make single stems or a whole bouquet to brighten a corner or a gift bundle. 🌿 Quick, satisfying, and endlessly customisable β€” happy crocheting! 🧢

You ask,

we answer.

FAQs

What size will the finished piece be?

The finished carnation measures approximately the size of a small flower head (about 3-5 cm diameter depending on yarn and tension) when using DK yarn and a 3.5 mm hook.

Can I use different yarn weights for this pattern?

Yes, you can use different yarn weights, but this will change the final size and appearance; choose an appropriate hook size for the yarn you select and expect larger or smaller blooms.

Do I need prior crochet experience for this pattern?

This pattern is rated for confident beginners, so basic knowledge of single crochet, double crochet, magic circle, and working into front/back loops is recommended.

How long does this project typically take to complete?

Most crocheters can finish one carnation in under 2 hours, though time may vary with experience and how many petals or flowers you make.