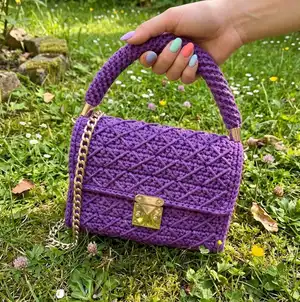
Make a stylish, textured canvas handbag using sturdy 3mm polyester cord and a 4mm hook. This pattern walks you through creating the canvas, adding embroidered diamond detail, sewing side panels, and assembling hardware for a polished finish. Youll end with a structured, lined bag perfect for everyday use or gifting. Clear step-by-step photos and precise counts make the process fun and achievable.
Progress Tracker
0% Complete
— Canvas :
Round 1 :
1 row. 25 SC from the 2nd loop from the hook on the back loop of the chain only, CH. (25)
Info :
When crochet SC, pull the working loop to the level of the hook (17-18 mm). Then the canvas will be without holes.
Info :
Then tighten the loop on the hook back.
Info :
Insert the hook trough the last SC. Over hook the end of the thread and pull out.
Info :
Crochet in the end of the thread in the next row.
Info :
Next crochet with the turning rows.
Round 2 :
2 row. 25 SC, CH. (25)
Round 3 :
3 row. 25 SC, CH. Cut the end of the beginning of the crocheting, process with fire. (25)
Info :
From the 3rd row crochet the 1st SC on the legs of the last SC and skip the 1st loop of the row.
Round 4 :
4 row. 25 SC, CH. (25)
Round 5 :
5 row. 25 SC, CH. (25)
Round 6-66 :
6-66 rows. 25 SC, CH. (25 per row)
Round 67 :
67 row. 25 SC. Don't cut the thread. (25)
— Base trim :
Info :
Crochet 2 SC in the last SC of the 67th row.
Info :
Next crochet 65 SC in the each row. Then 3 SC in 1.
Info :
Next 23 SC. Then 3 SC in 1.
Info :
Next 65 SC in the each row.
Info :
Then 1 SC in the 1st SC of the 67th row. Cut the thread, insert the hook under 1st SC of the row, pull the thread. Tighten back in the last loop.
Info :
Tighten the end through few loops, process with fire.
Info :
Insert the hook in the any SC of the base trim. Pull the loop, insert the hook in the next SC, crochet SlSt.
Info :
Next crochet SlSt in the each SC of the base trim.
Info :
Cut the thread and pull out the end.
Info :
Close the row: insert the hook under 1st SlSt of the row, pull the thread. Tighten back in the last loop. Tighten the ends through few loops, process with fire.
Info :
Now, after the base trim, the canvas consists of 68 rows.
— Embroidery :
Info :
Start embroidery from the top left corner.
Info :
The top is the future valve, where the crocheting of the fabric is finished (67th row).
Info :
Cut the thread about 4.4 yards (4 m) long, so there are fewer knots.
Info :
Insert the needle under the base trim. Count 4 rows and 4 SC and insert the needle between the 4th and 5th SC.
Info :
Insert the needle after 4th row again, then up under the base trim.
Info :
Next embroider from left to right, down and right to left.
Info :
Repeat rapport until the end of the canvas.
Info :
Don't tighten the seams, but should not hang out.
Info :
Tie the knot when the thread runs out. Then join the threads with the lighter.
Info :
Hide the ends. Steam with the iron through a damp cloth.
Info :
Embroidery looks like squares on the wrong side.
— Side part(*2) :
Round 1 :
1 row. 6 SC from the 2nd loop from the hook on the back loop of the chain only, CH. (6)
Info :
Insert the hook trough the last SC. Over hook the end of the thread and pull out.
Info :
Crochet in the end of the thread in the next row.
Info :
Next crochet with the turning rows.
Round 2 :
2 row. 6 SC, CH. (6)
Round 3 :
3 row. 6 SC, CH. From the 3rd row crochet the 1st SC on the legs of the last SC and skip the 1st loop of the row. (6)
Round 4-18 :
4-18 row. 6 SC, CH. (6 per row)
Round 19 :
19 row. 6 SC, don't cut the thread. (6)
Info :
Pull out the loop to the front side. Crochet 5 SlSt in the last row.
Info :
Leave the end about 60 inches (1.5 m) long for sewing. Cut the thread, pull out the end. Pull out the end to the wrong side again.
Info :
Similarly crochet the 2nd side part. Crochet the base trim with 5 SlSt in the other way.
Info :
That's, the ends of the side parts will be on opposite sides.
Info :
Steam the side parts with an iron through a damp cloth.
— Assembly :
Info :
Turn the side of the canvas to himself, where the additional row of the base trim.
Info :
Count 10 rows (or 5 squares).
Info :
Place the marker between the rows in the loop of the base trim.
Info :
Then count 4 rows (or 2 squares). Place the markers between the rows.
Info :
There should be 7 loops between the 1st and the 2nd markers.
Info :
Count 10 rows (or 5 squares) again. Place the markers. Its should be in the 19th loops from the 2nd markers.
Info :
Also, count 19 loops from the 1st markers. Place the markers in the 19th loops on the rounding.
Info :
Take the right side part.
Info :
The side with the chain of the base trim with SlSt - front. The end of the thread on the left.
Info :
Put on the corners of the side part to the canvas. Take the plastic needle.
Info :
Make the securing stitches at the beginning. Next sew the side part with the canvas in each loop of the canvas and each row of the side part.
Info :
Sew to the marker, remove, make the stitch in the corner.
Info :
At down, sew 6 loops in the chain of the side part, make the 7th stitch in the knot.
Info :
Remove the marker, make the stitch in the corner. Then sew to the next marker.
Info :
Make securing stitches at the finish.
Info :
Strengthen and hide the end, process with fire.
This handmade Canvas handbag Pattern combines sturdy cord construction with a delicate embroidered diamond motif for a modern, elevated look. The pattern includes clear photos, base shaping, side panel instructions, and full assembly guidance to help you finish a polished bag. Make one for yourself or as a thoughtful, handcrafted gift — enjoy every stitch! 🧶✨