🧢 Beautiful ✨ Detailed πŸ’ Adorable

Cactus frog with removeable pot Amigurumi Pattern

Cactus frog with removeable pot Amigurumi Pattern
4.0β˜… Rating
2-4 Hours Time Needed
2.0K Made This
βœ‚οΈ

Intermediate Level

Ideal for those with basic crochet experience, featuring slightly more advanced stitches and techniques to expand your skills.

⏱️

Bite-Sized Project

Finishes in 2-4 hoursβ€”perfect for an afternoon of creative relaxation.

🧸

Cute Companion

An adorable friend to cherish, handcrafted with love to bring comfort and joy for years to come.

About This Cactus frog with removeable pot Amigurumi Pattern

This pattern creates a tiny cactus-themed frog with a removable crochet flower pot and a layered flower. You will work the frog body, legs, toes, a decorative flower and a snug pot that the frog fits into. The design is compact and playful, featuring embroidered 'X' cactus spots and a detachable bloom for display or play.

Cactus frog with removeable pot Amigurumi Pattern crochet pattern - detailed view of completed project

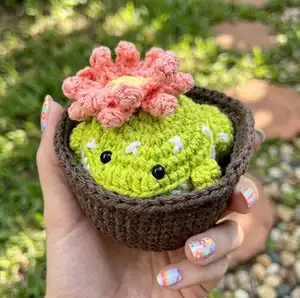
Finished size is approximately 2 1/2 inches high and 2 1/2 inches wide using cotton yarn and a 3.5mm hook. Full step-by-step rounds, materials, abbreviations and assembly instructions are included for clarity.

Why You'll Love This Cactus frog with removeable pot Amigurumi Pattern

I absolutely love this pattern because it combines two cute ideas β€” a frog and a cactus β€” into one tiny, delightful amigurumi that feels fresh and playful. I enjoy the removable pot feature because it adds interactivity and a sweet display option that makes the piece more than just a toy. The flower petals are a satisfying little crochet detail that let you practice shaping stitches and color changes. I also love how quick it is to make; you can complete it in an afternoon and gift it or keep it as a charming desk buddy.

Cactus frog with removeable pot Amigurumi Pattern step 1 - construction progress Cactus frog with removeable pot Amigurumi Pattern step 2 - assembly progress Cactus frog with removeable pot Amigurumi Pattern step 3 - details and accessories Cactus frog with removeable pot Amigurumi Pattern step 4 - final assembly and finishing

Switch Things Up

I love how easy it is to customize this cactus frog by changing yarn colors β€” try pastel greens and peaches for a soft look or neon for a bold statement.

To make a larger version, switch to a bulkier yarn and a larger hook; you'll get a chunky, hug-ready frog that still fits its pot if you scale the pot accordingly.

I sometimes swap the safety eyes for embroidered eyes for a child-safe version; embroidery gives a cute, sleepy expression that suits baby toys.

Experiment with the flower by using variegated yarns or beads at the petal tips to give it sparkle and texture.

Make the pot heavier by inserting a small plastic disk or layer of felt in the base so the frog sits more securely when displayed.

I also like to embroider different cactus marks β€” small dots, crosses, or spirals β€” to vary the personality of each frog I make.

Try adding a little loop at the back of the pot to turn it into a hanging ornament for a plant wall or holiday decoration.

If you want posable limbs, thread thin craft wire into the front legs before sewing them closed and cover with a few more rounds of crochet for safety.

I often make a set in coordinating colors and give them as a small planter trio β€” change the pot color slightly for each to create a matching set.

When gifting, include a tiny tag with care instructions and the yarn names used so the recipient can recreate the look or repair it easily.

Common Mistakes & How to Fix Them

βœ— Skipping the stitch marker can make counting rounds confusing; use a marker or a scrap of yarn to mark the first stitch of each round. βœ— Not stuffing as you go leads to uneven shaping and lumps later; stuff gradually and evenly while shaping the body and limbs. βœ— Failing to leave long tails for sewing makes attachment difficult; always leave long ends where pieces will be joined for easier assembly. βœ— Forgetting to insert safety eyes at the correct rounds will misplace facial features; insert safety eyes between rounds 5 and 6, spaced 4 stitches apart as instructed.

Cactus frog with removeable pot Amigurumi Pattern

Make a charming cactus frog with a removable flower pot and a pretty bloom on top. This compact amigurumi is perfect for gifting, decorating, or keeping on your desk. The pattern uses basic amigurumi techniques with a fun petal detail and removable pot for added playability. Follow each step for a neat, professional finish and enjoy a relaxing crochet project.

Intermediate 2-4 Hours

Materials Needed for Cactus frog with removeable pot Amigurumi Pattern

β€” Main Fabric

  • 01
    Sugar and Cream cotton yarn (or any similar cotton yarn) in Hot Green for the frog body (small amount)
  • 02
    Cotton yarn in White for the belly and details (small amount)
  • 03
    Cotton yarn in Yellow for the flower center (small amount)
  • 04
    Cotton yarn in Light Red / Tea Rose for the flower petals (small amount)
  • 05
    Cotton yarn in Brown (warm brown) for the flower pot (small amount)
  • 06
    Red yarn (optional accent) - small amount

β€” Tools Required

  • 01
    Crochet hook size 3.5mm
  • 02
    Poly-fil fiber for stuffing
  • 03
    Yarn needle (tapestry needle)
  • 04
    Scissors
  • 05
    Stitch markers or a piece of scrap yarn
  • 06
    Safety eyes 6mm (2 pieces) - Not for children under 3
  • 07
    Pins for assembly (optional)

Progress Tracker

0% Complete

β€” Head and body :

Round 1 :

8sc in a MR (8)

Round 2 :

8inc (16)

Round 3 :

(sc, inc) x8 (24)

Round 4 :

(2sc, inc) x8 (32)

Round 5 :

(3sc, inc) x8 (40)

Round 6 :

16sc, inc, 5hdc-inc, inc, 17x (47)

Info :

Change to white yarn.

Round 7 :

R7 BLO: 21sc, 3dec, 20sc (44)

Round 8 :

R8: (3sc, inc) x2, 12sc, 2dec, 12sc, (3sc, inc) x2 (46)

Round 9-10 :

46sc (46)

Round 11 :

(3sc, dec) x2, 10sc, dec, 2sc, dec, 10sc, (3sc, dec) x2 (40)

Round 12 :

(2sc, dec) x10 (30)

Round 13 :

30sc (30)

Info :

Now it’s time to insert the safety eyes between round 5 and 6, 4 stitches apart. Make sure the nose is in the middle of the eyes.

Info :

Stuff the piece.

Round 14 :

(sc, dec) x10 (20)

Round 15 :

10dec (10)

Round 16 :

3 dec. F.O You don't have to finish this round.

Info :

Close the body by using needle and cut the yarn. Hide the end inside the body.

β€” Back legs :

Round 1 :

6sc in a MR (6)

Round 2 :

6inc (12)

Round 3 :

(sc, inc) x6 (18)

Round 4 :

18sc (18) F.O

Info :

Leave long end to connect with the body.

β€” Toes :

Round 1 :

8sc in a MR (8)

Round 2 :

do not break the working yarn, continue to work the toes with it: chain 3, turn work, start from the second chain from the hook, hdc, 1 slst in the chain, 1 slst on the MR)x3, 4sc, slst on the last stitch. (8) F.O

Info :

Leave long end to connect with the back legs.

β€” Front legs :

Round 1 :

5sc in a MR (5)

Round 2 :

inc, 2sc, inc, sc (7)

Round 3-10 :

7sc (7) F.O

Info :

Do not close the piece. Do not stuff the piece. Leave long end to connect with the body.

β€” Flower :

Round 1 :

R1 BLO: 6sc in a MR (6)

Round 2 :

R2 BLO: 6inc (12)

Round 3 :

R3 BLO: (sc, inc) x6 (18)

Info :

Change to light red yarn.

Round 4 :

R4 BLO: slst, (chain 5, start from the 2nd chain from the hook, 4hdc along the chain, skip 1 stitch, slst on the next stitch of the base) x8.

Info :

After you finished all the petals in the back loop (8 petals), change to the front loop and do the same step (8 petals). F.O the last stitch.

Info :

At the end you should have 16 petals. Leave long end to sew into the frog's body.

β€” Flower Pot :

Round 1 :

8sc in a MR (8)

Round 2 :

8inc (16)

Round 3 :

(sc, inc) x8 (24)

Round 4 :

(2sc, inc) x8 (32)

Round 5 :

(3sc, inc) x8 (40)

Round 6 :

(4sc, inc) x8 (48)

Round 7 :

(5sc, inc) x8 (56)

Round 8 :

R8 BLO: 56sc (56)

Round 9-14 :

56sc (56)

Round 15 :

R15 FLO: 56hdc (56), slst to the first stitch.

Info :

F.O Leave long end and sew around the pot to secure and hide the end. Cut off the yarn.

β€” Assembly :

Back legs and toes :

Start sewing the back legs on two side of the thighs and make sure to stuff it before closing it all the way. Sew the toes to the bottom of the legs. Make sure 3 toes pointed out.

Front legs :

Sew the front leg two stitches away from the back leg, 3 stitches long. Then sew the tip of the leg into the belly. Repeat the same steps on the other side.

Info :

Using white yarn, embroider "X" around the frog body.

Sew the flower :

Sew the flower to one side of the frog. You can also sew it on the top of the frog. It’s completely up to you :)

Finish :

Now you have a cactus frog. Please take care of it by handwashing when dirty. Hide all ends and make final adjustments to the positioning before presenting.

Assembly Instructions

  • Attach each back leg to the sides of the thighs, stuffing the leg pieces before closing so they keep their shape and are firmly connected to the body.
  • Sew each toe piece to the bottom of its corresponding back leg, shaping so three toes point outward as pictured.
  • Position and sew the front legs two stitches away from the back legs; stitch the tip of each front leg into the belly to secure the pose.
  • Use white yarn to embroider small "X" cactus marks around the frog body for detail, spacing them evenly across the top and sides.
  • Sew the finished flower onto one side of the frog (or onto the top) using the long tail left from the flower; secure and hide the end inside the frog.

Important Notes

  • πŸ’‘Work in continuous spiral rounds and use a stitch marker or a small piece of yarn to mark the first stitch of each round.
  • πŸ’‘Insert safety eyes between rounds 5 and 6 and space them about 4 stitches apart so the features align correctly.
  • πŸ’‘Leave long yarn ends on pieces that will be sewn to the body to make assembly easier and neater.
  • πŸ’‘Stuff pieces gradually and evenly; overstuffing can distort the shape while under-stuffing can make sewing difficult.
  • πŸ’‘When finishing the pot, leave a long end to sew around the rim to secure and hide the yarn tail.

This little cactus frog lives in a removable pot and wears a pretty bloom on its head, making it a delightful tiny companion. 🧢 Perfect as a small gift, desk buddy, or shelf decoration β€” handmade with cotton yarn for a soft, tactile finish. 🌸 Care for it by handwashing gently when needed and enjoy the smiles it brings! 😊

You ask,

we answer.

FAQs

What size will the finished piece be?

The finished amigurumi is about 2 1/2 inches in height and 2 1/2 inches wide when made with cotton yarn and a 3.5mm hook.

Can I use different yarn weights for this pattern?

Yes, you can use different yarn weights but this will change the final size; choose an appropriate hook for your yarn and be aware the pot may need more rounds to fit.

Do I need prior crochet experience for this pattern?

This pattern is rated intermediate, so a basic knowledge of single crochet, increases, decreases and working in the round is recommended.

How long does this project typically take to complete?

Most crocheters can finish this project in about 2-4 hours, depending on experience and how many interruptions you have while assembling details.