🧢 Beautiful ✨ Detailed πŸ’ Adorable

Bunny Amigurumi Pattern

Bunny Amigurumi Pattern
4.4β˜… Rating
5-7 Hours Time Needed
3.0K Made This
βœ‚οΈ

Intermediate Level

Ideal for those with basic crochet experience, featuring slightly more advanced stitches and techniques to expand your skills.

⏱️

Weekend Treat

Takes 5-7 hours, making it an enjoyable project to finish over a couple of days.

🧸

Cute Companion

An adorable friend to cherish, handcrafted with love to bring comfort and joy for years to come.

About This Bunny Amigurumi Pattern

This pattern creates a charming long-eared bunny with a weighted, tear-drop shaped body and posable ears using an internal wire. Youll work in continuous rounds and use simple shaping to achieve a neat, rounded body. The design is versatile and can be made in three different sizes by changing yarn and hook.

Bunny Amigurumi Pattern crochet pattern - detailed view of completed project

Detailed rounds for ears, body and bottom are provided, plus finishing instructions for wiring and embroidery. Clear materials and abbreviations are included so you can start crocheting right away.

Why You'll Love This Bunny Amigurumi Pattern

I absolutely love this pattern because it turns simple single crochet rounds into a delightful, expressive bunny with minimal sewing. I enjoyed designing the ears to be posable using a folded wire β€” it gives lots of personality to the finished toy. I love that the pattern is easy to scale for three different sizes by changing yarn and hook. I also appreciate how the continuous rounds keep the shape smooth and tidy, making assembly quick and satisfying.

Bunny Amigurumi Pattern step 1 - construction progress Bunny Amigurumi Pattern step 2 - assembly progress Bunny Amigurumi Pattern step 3 - details and accessories Bunny Amigurumi Pattern step 4 - final assembly and finishing

Switch Things Up

I love to customize this bunny by changing yarn colors and textures to create different personalities and moods.

Swap the chunky yarn for a thinner DK yarn and use a smaller hook to make a petite, delicate bunny perfect for keychains or small gifts.

For a bold, oversized version I hold four strands of DK together and use a larger hook to create a chunky, squishy companion that makes a wonderful pillow-like toy.

I often experiment with ear shapes β€” try widening the ears slightly or shortening them for a different expression and silhouette.

Add embroidered eyebrows or different mouth shapes to change the bunny's expression from playful to sleepy or surprised.

Try safety eyes of different sizes or use embroidered eyes for a fully soft, baby-safe toy option.

Use variegated or striped yarn for fun color transitions down the body, or add a small crocheted bow or scarf for personality.

I sometimes add a small felt heart or patch to the belly for a personalized touch, stitching it firmly in place for durability.

Want a weighted bottom for stability? Add a small pouch of poly pellets inside the lower stuffing before closing the bottom piece.

Mix yarn fibers like a fuzzy mohair for a soft, whimsical finish on the ears or body for a uniquely textured result.

Consider painting or coating the wire ends slightly before insertion if youre concerned about any potential sharpness, then hide them well inside the ear tops.

Common Mistakes & How to Fix Them

βœ— Skipping the instruction to work in continuous rounds causes visible seams and misaligned shaping; always work in continuous rounds and mark the first stitch of each round. βœ— Fastening off the second ear before joining can make the body join messy; do not fasten off the second ear β€” use its working yarn to start the body as instructed. βœ— Forgetting to insert and fold the wire properly makes ears floppy or pokey; fold the wire in half and fold the ends before inserting, then place it centrally inside each ear for safe, stable posability. βœ— Not stuffing the body firmly yields a saggy shape that flattens the bunny; stuff the body tightly and evenly before sewing the bottom piece in place to maintain a rounded silhouette. βœ— Placing safety eyes without counting stitches leads to uneven features; insert the safety eyes three stitches apart and position them between the specified rounds for correct facial placement.

Bunny Amigurumi Pattern

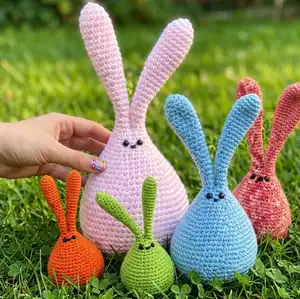
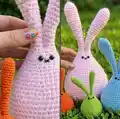
Make a sweet, long-eared bunny amigurumi using simple crochet techniques and clear step-by-step instructions. This pattern guides you through ears, body, and finishing touches including an internal wire for posable ears. Perfect for gifting or adding a handmade touch to your home, you can customize size and colors to suit your style.

Intermediate 5-7 Hours

Materials Needed for Bunny Amigurumi Pattern

β€” Main Fabric

  • 01
    Stylecraft Special Chunky (Chunky/Bulky) - Cloud Blue 1019, approx 65 g for medium bunny
  • 02
    Black DK yarn - small amount to embroider mouth (optional)
  • 03
    Polyester fiberfill stuffing - approx 60 g
  • 04
    One pair of 9 mm safety eyes (for medium size; adjust size for different versions)
  • 05
    Iron wire: 12 inches long (30 cm), 18 gauge (1.25 mm thick) - used folded inside ears
  • 06
    Smallest size option: DMC Petra No.3 with 3 mm hook
  • 07
    Largest size option: 4 strands of DK yarn held together and crocheted with a 6 mm hook

β€” Tools Required

  • 01
    Crochet hook 4.00 mm (US: G/6, UK: 8)
  • 02
    Crochet hook 3.00 mm for smallest size (DMC Petra No.3)
  • 03
    Crochet hook 6.00 mm for largest size (4 strands DK together)
  • 04
    One pair 9 mm safety eyes (adjust size for variants)
  • 05
    Tapestry needle for sewing and weaving ends
  • 06
    Polyester stuffing (fiberfill)
  • 07
    Scissors
  • 08
    Stitch marker to mark the first stitch of each round
  • 09
    Iron wire: 12 inches (30 cm), 18 gauge (1.25 mm thick)
  • 10
    Pins for assembly (optional)

Progress Tracker

0% Complete

β€” Abbreviations :

Infos :

US Crochet Abbreviations: ch = chain, sc = single crochet, st = stitch, sl = slip, rnd = round, tog = together. For this project you work in continuous rounds, do not join or turn unless otherwise stated. Mark first stitch of each round.

β€” Materials :

Info :

For medium bunny: Chunky, Bulky yarn, brand: Stylecraft Special Chunky, color: Cloud Blue 1019 = 65 g. A little bit of Black DK yarn to embroider the mouth (optional). 4.00 mm hook (US: G/6, UK: 8). Tapestry needle. Polyester fiberfill = 60 g. One pair of 9 mm safety eyes. Iron wire: 12 inches long (30 cm), 18 gauge (1.25 mm thick).

β€” Size :

Info :

The blue, medium sized bunny is 10.3 inches tall (26 cm).

β€” Ear :

Info :

Make 2.

Round 1 :

With Cloud Blue 1019 and 4 mm hook, 6 sc in a magic ring. (6)

Round 2 :

(Sc in next st, 2 sc in next st) around. (9)

Round 3 :

(2 sc in next st, sc in next 2 sts) around. (12)

Round 4-10 :

Sc in each st around. (12)

Round 11 :

Sc next 2 sts tog, sc in next 10 sts. (11)

Round 12 :

Sc in each st around. (11)

Round 13 :

Sc in next 5 sts, sc next 2 sts tog, sc in next 4 sts. (10)

Round 14 :

Sc in each st around. (10)

Round 15 :

Sc next 2 sts tog, sc in next 8 sts. (9)

Round 16 :

Sc in each st around. (9)

Round 17 :

Sc in next 4 sts, sc next 2 sts tog, sc in next 3 sts. (8)

Round 18 :

Sc in each st around. (8)

Round 19 :

Sc next 2 sts tog, sc in next 6 sts. (7)

Round 20 :

Sc in each st around. (7)

Round 21 :

Sc in next 3 sts, sc next 2 sts tog, sc in next 2 sts. (6)

Round 22-23 :

Sc in each st around. (6)

Round 24 :

Sc in each st around. (6)

Info :

For the first ear, join with sl st in first st. Fasten off. For the second ear, do not sl st in first st. Do not fasten off.

β€” Body :

Info :

The yarn of the second ear is used to start the body.

Round 1 :

Sc in the stitch on rnd 24 of the first ear (mark first st), sc in next 5 sts on first ear, sc in next 6 sts on second ear. (12)

Round 2 :

(Sc in next st, 2 sc in next st) around. (18)

Round 3 :

Sc in each st around. (18)

Round 4 :

(2 sc in next st, sc in next 2 sts) around. (24)

Round 5 :

Sc in each st around. (24)

Round 6 :

(Sc in next 3 sts, 2 sc in next st) around. (30)

Round 7 :

Sc in each st around. (30)

Round 8 :

Sc in next 2 sts, 2 sc in next st, (sc in next 4 sts, 2 sc in next st) 5 times, sc in next 2 sts. (36)

Round 9 :

Sc in each st around. (36)

Round 10 :

(Sc in next 5 sts, 2 sc in next st) around. (42)

Round 11 :

Sc in each st around. (42)

Round 12 :

Sc in next 3 sts, 2 sc in next st, (sc in next 6 sts, 2 sc in next st) 5 times, sc in next 3 sts. (48)

Round 13 :

Sc in each st around. (48)

Round 14 :

(Sc in next 7 sts, 2 sc in next st) around. (54)

Round 15 :

Sc in each st around. (54)

Round 16 :

Sc in next 4 sts, 2 sc in next st, (sc in next 8 sts, 2 sc in next st) 5 times, sc in next 4 sts. (60)

Round 17-22 :

Sc in each st around. (60)

Round 23 :

Sc in next 4 sts, sc next 2 sts tog, (sc in next 8 sts, sc next 2 sts tog) 5 times, sc in next 4 sts. (54)

Round 24 :

(Sc in next 7 sts, sc next 2 sts tog) around. (48)

Round 25 :

Sc in next 3 sts, sc next 2 sts tog, (sc in next 6 sts, sc next 2 sts tog) 5 times, sc in next 3 sts. (42)

Round 26 :

(Sc in next 5 sts, sc next 2 sts tog) around. (36)

Round 27 :

Sc in next 2 sts, sc next 2 sts tog, (sc in next 4 sts, sc next 2 sts tog) 5 times, sc in next 2 sts, sl st in first st, fasten off. (30)

β€” Bottom :

Info :

With Chunky yarn and 4 mm hook.

Round 1 :

With Cloud Blue 1019, 6 sc in a magic ring. (6)

Round 2 :

2 sc in each st around. (12)

Round 3 :

(Sc in next st, 2 sc in next st) around. (18)

Round 4 :

(2 sc in next st, sc in next 2 sts) around. (24)

Round 5 :

(Sc in next 3 sts, 2 sc in next st) around, join with sl st in first st, leave long end for sewing, fasten off. (30)

Info :

Insert safety eyes 3 sts apart between rnds 27-28.

β€” Finishing :

Info :

Do not stuff ears. Stuff body tightly then sew the bottom piece to the last round of the body.

Info :

Fold the wire in half and make it as long as the ear by folding the ends of wire. Insert the wire inside ears.

Info :

With Black DK yarn embroider a little x-cross between the eyes on rnd 28.

Assembly Instructions

  • Insert the safety eyes 3 stitches apart between rounds 27-28 and secure the back fasteners before finishing the head area.
  • Do not stuff the ears; fold and insert the folded iron wire inside each ear, then shape and hide the ends inside the ear top.
  • Stuff the body firmly and evenly before attaching the bottom; sew the bottom piece to the last round of the body using the long tail left from the bottom and a whipstitch.
  • For the first ear join with a slip stitch in the first stitch and fasten off; for the second ear do not slip stitch or fasten off because its working yarn is used to start the body.
  • Position and pin the ears symmetrically at the top of the body before permanently sewing them in place to ensure even spacing.
  • Embroider a little x-cross for the mouth with Black DK yarn between the eyes on the round indicated (rnd 28) to finish the face.

Important Notes

  • πŸ’‘Work in continuous rounds and mark the first stitch of each round to avoid losing track of your place.
  • πŸ’‘Do not stuff the ears; only stuff the body tightly to keep a neat silhouette and allow safe insertion of wire into ears.
  • πŸ’‘Fold the iron wire ends before inserting into the ear to avoid sharp points and ensure safe, smooth assembly.

This adorable bunny is a delightful handmade companion that brightens any room and warms hearts. Create it in playful colors or soft pastels to suit your decor or gift recipient. Whether you make the smallest, medium, or largest version, each bunny is unique and full of charm. 🧢🐰✨

You ask,

we answer.

FAQs

What size will the finished piece be?

The finished medium bunny measures approximately 10.3 inches tall (26 cm) when using Stylecraft Special Chunky yarn with a 4 mm hook.

Can I make different sizes of this bunny?

Yes. The smallest bunny uses DMC Petra No.3 with a 3 mm hook, the medium uses Chunky yarn with a 4 mm hook, and the biggest can be made by crocheting 4 strands of DK yarn together with a 6 mm hook.

Do I need to stuff the ears?

No. The pattern specifically instructs not to stuff the ears; instead fold and insert the wire inside each ear for posability.

Where should I place the safety eyes?

Insert the safety eyes 3 stitches apart between rounds 27-28 as directed to ensure correct facial placement.